

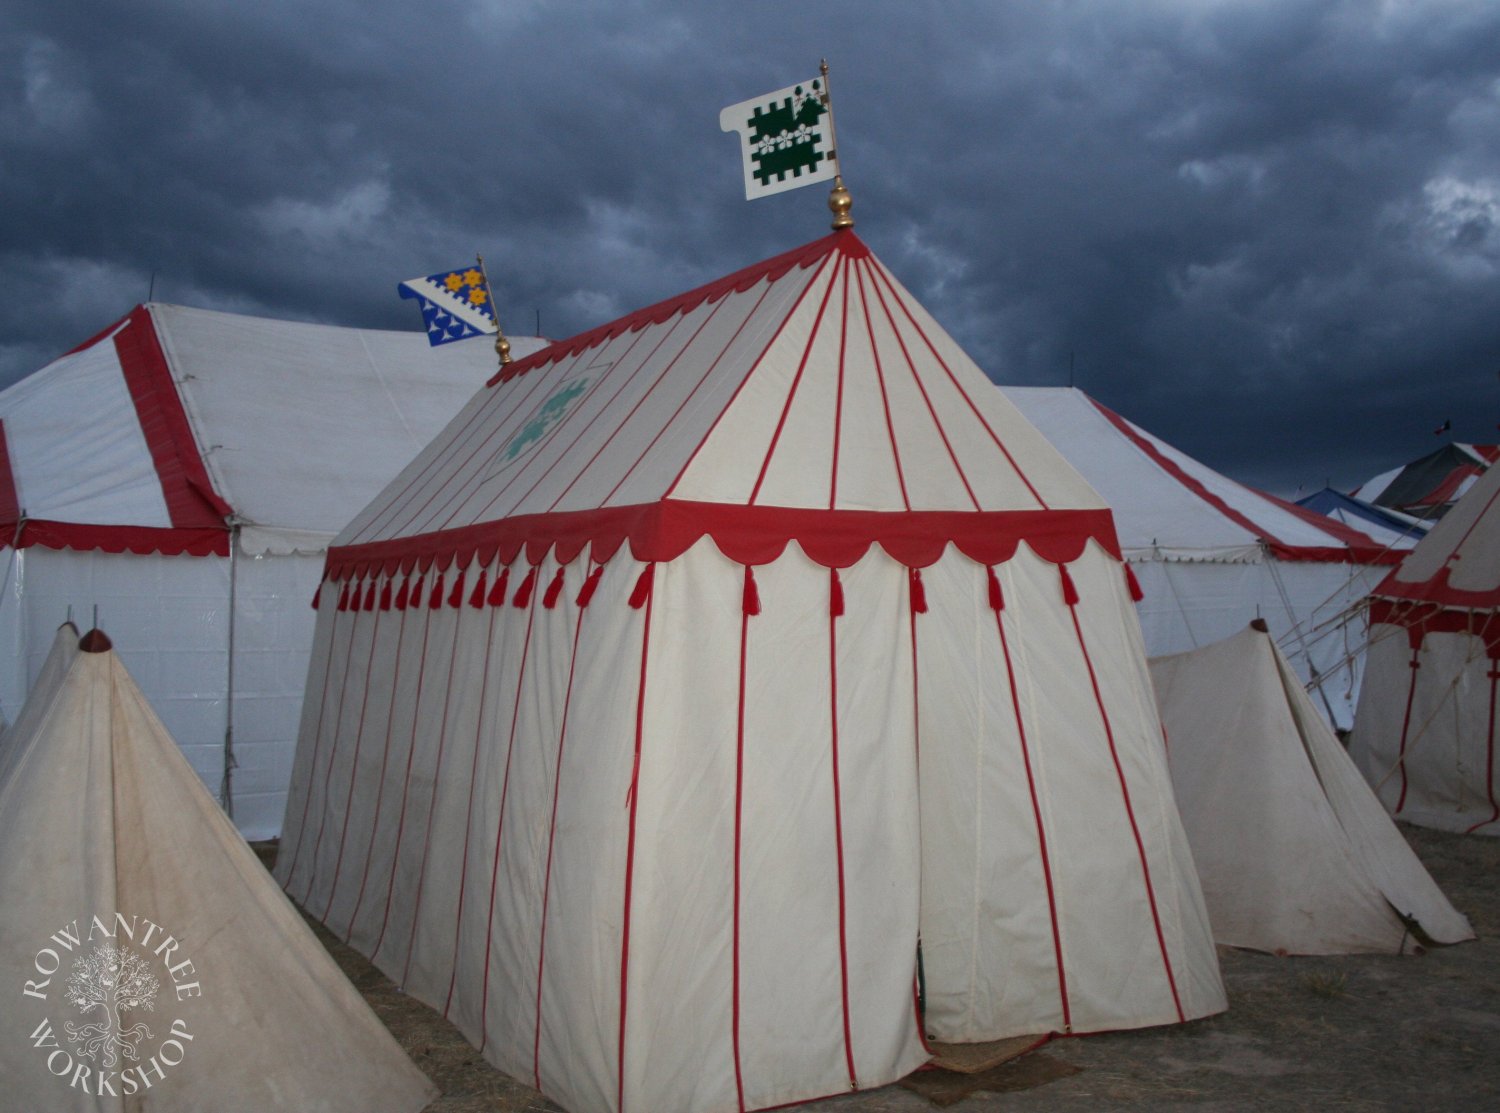
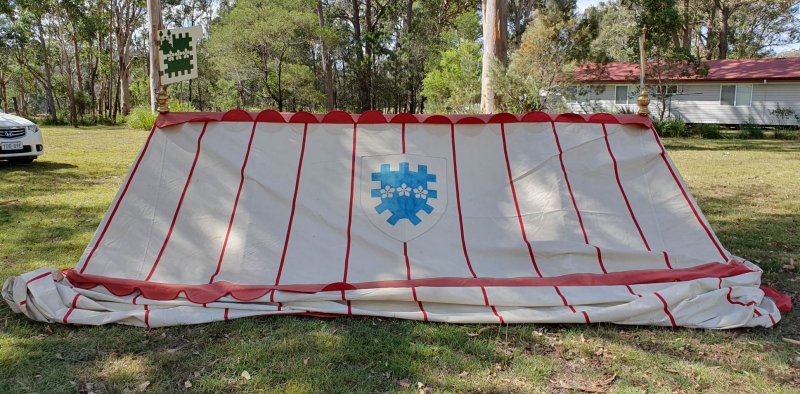
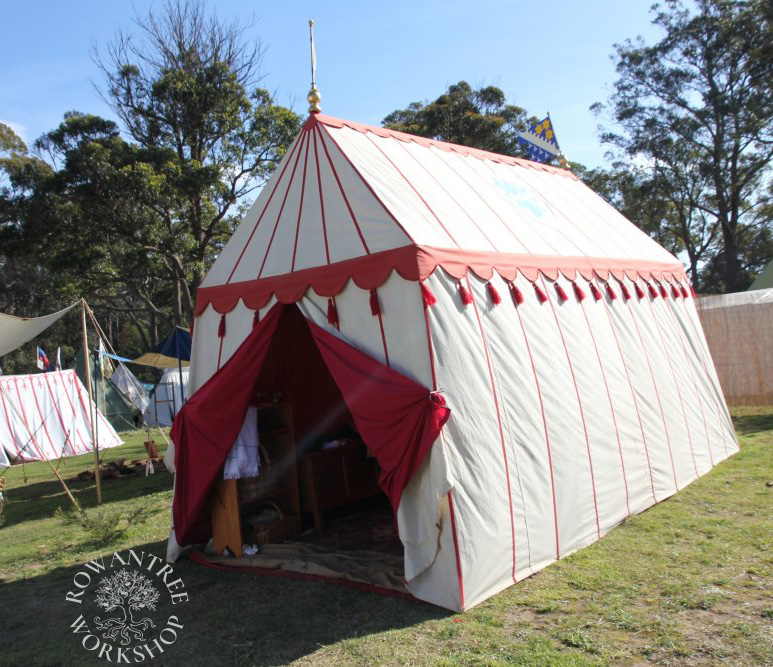
A rectangular tent with internal frame, based on several 16th century German images.
The first pavilion I made was a small round one, which worked well for one person and served me for many years, but now there were two of us… It was too small for a couple, and was a lot of work to put up and pack away.
My criteria for this new tent were:
- Quick to pitch and break camp
- Easy to store and transport
- Room enough for sleeping, dressing, washing and relaxing
- Small footprint (no long guy-ropes)
- Appearance, materials and construction appropriate for my early 16th century German persona.
The finished tent is everything I’d hoped for. It goes up in 15 minutes with two people, provides generous living space, withstands strong winds without guy ropes, packs down well and looks wonderful.
(Note – this is a LONG article – tents are complex!)
Research and Design
Rectangular tents provide much more usable space than round ones, and are one of the common shapes seen in 16th century German images. Some of these examples are clearly made with an internal frame – essential if I wanted to avoid using guy ropes.
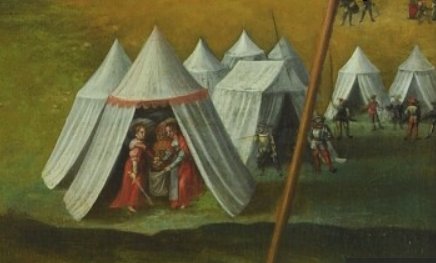
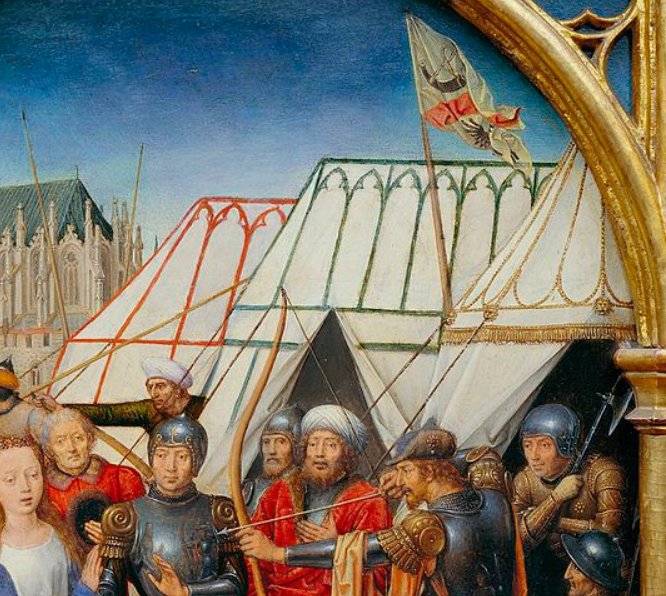
When I travelled through Europe in 1996, a painted table in the Louvre caught my eye. This work by Hans Sebald Beham depicts a white tent with hard edges, wall angles and lack of guys – clearly a full-framed rectangular pavilion. This design was supported by other examples, including the 16th century sgraffito I saw on a wall in Krems and a tent in the background of a painting by Lucas Cranach.
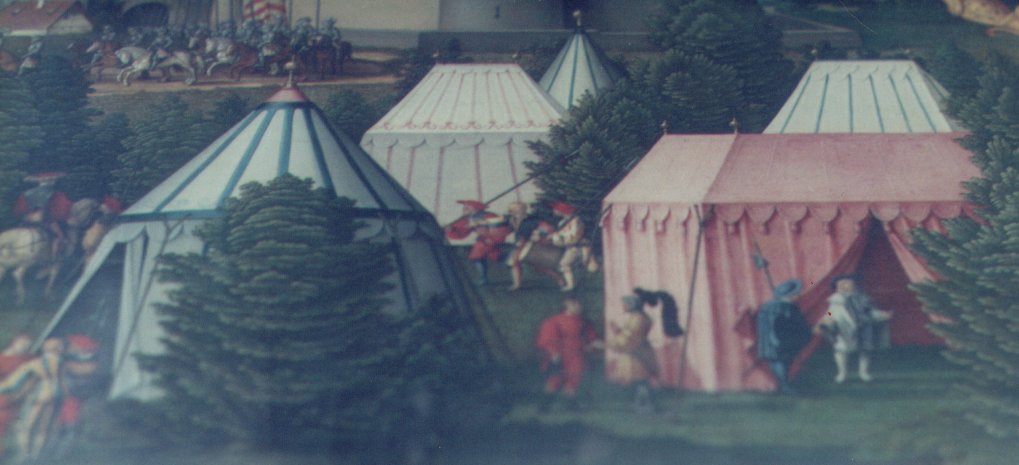
Photo: Robyn Spencer
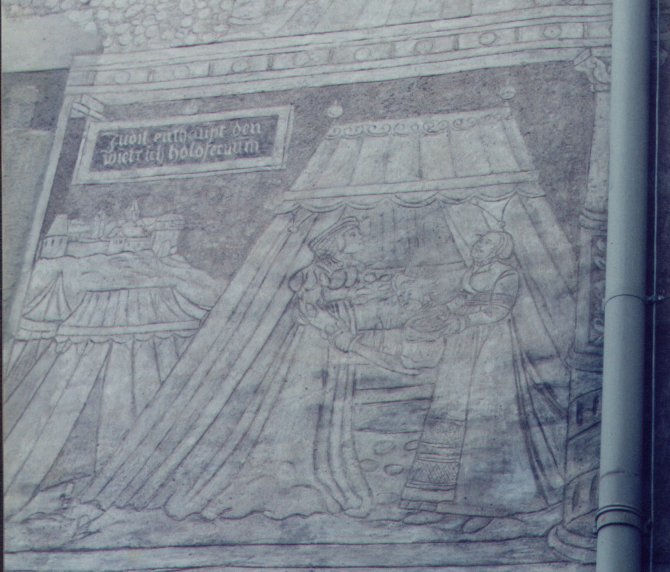
Photo: Robyn Spencer
Source: Cranach Digital Archive
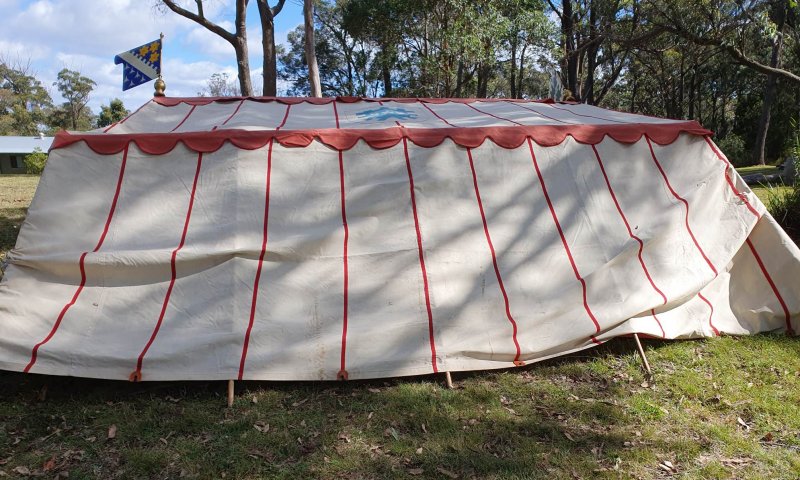
This last also shows entry at the short end, rather than the middle of the long side, which looked like a practical idea, especially in bad weather. There are no guy ropes – the tent is pegged to the ground around the base, with the sloped walls providing stability.
White canvas with coloured stripes was the dominant colour scheme from 14th – 16th centuries and can be seen in many paintings and manuscript illuminations. My stripes are red, a common option in Germany, although blue was more prevalent in France and Italy.
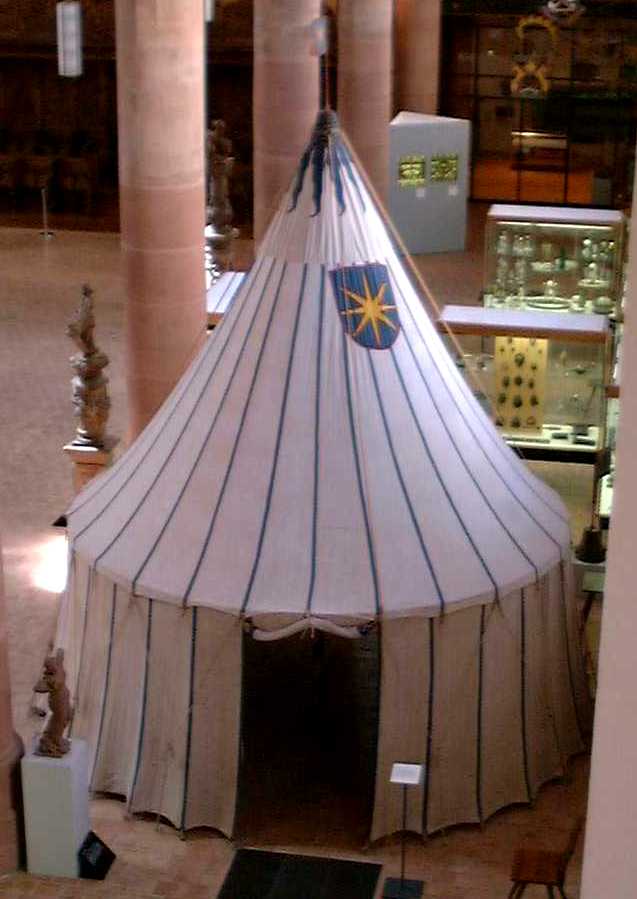
Although decorations were often painted, they might also be sewn on. The extant 17th century Guild tent in the Historisches Museum Basel has stripes made of fabric, sewn to the canvas over the seams.
Source: Greydragon
Source: Cranach Digital Archive
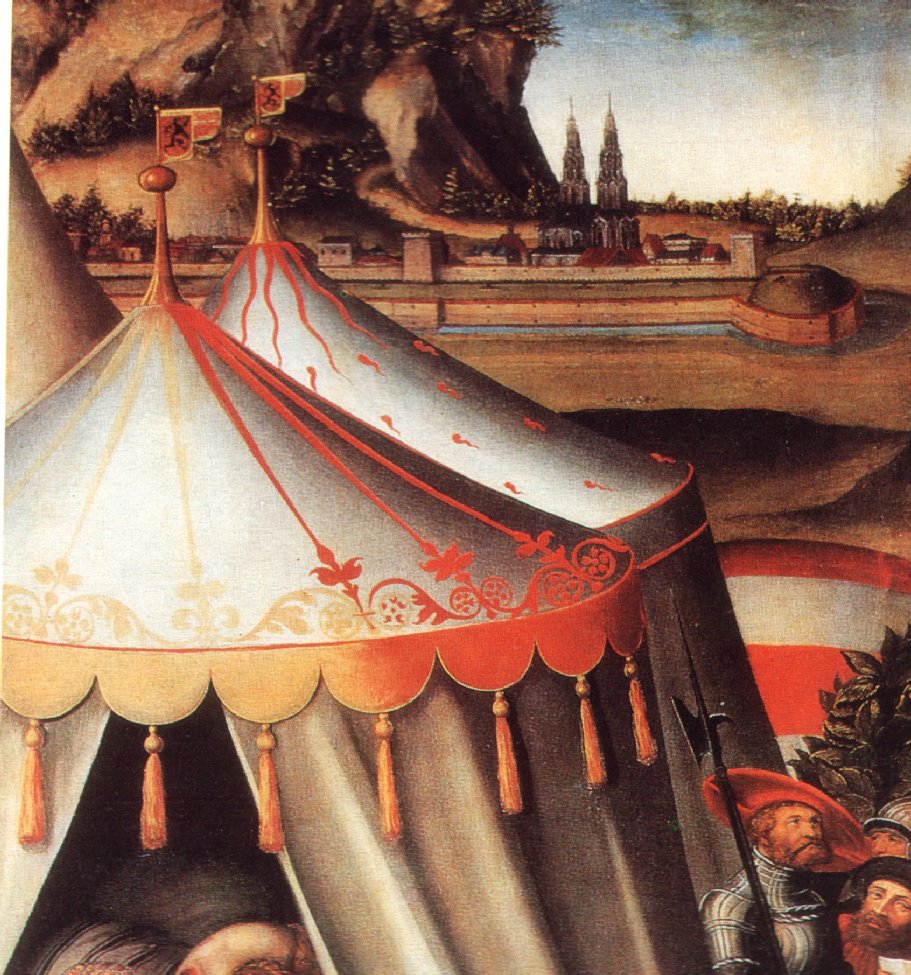
The other decorations are also typically German – the scalloped ridge and valance can be seen on the Krems scraffito image and the Beham painting. This Cranach detail shows a valance with tassels, as does the Beham painting. I include both scallops and tassels in my design.
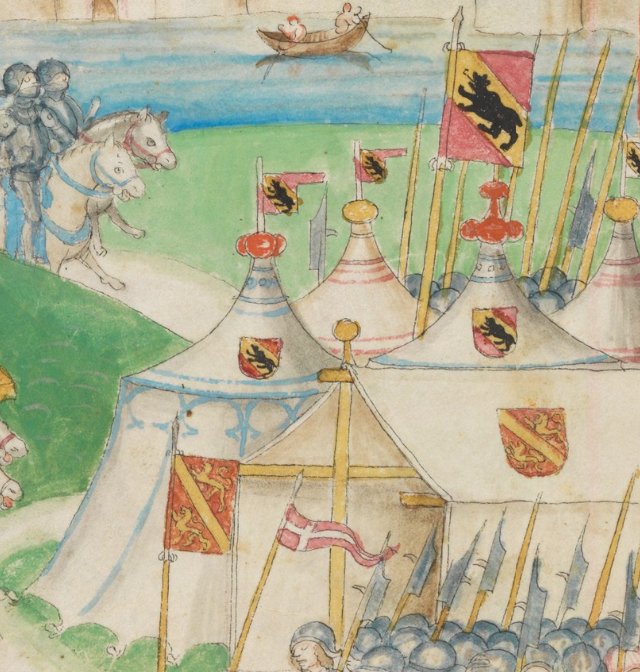
The stiff wooden pennons are another typical northern European feature, as is displaying the heraldic device on the roof of the tent. I used both these features to make the tent distinctly German.

Source: Greydragon
Source: e-Codices
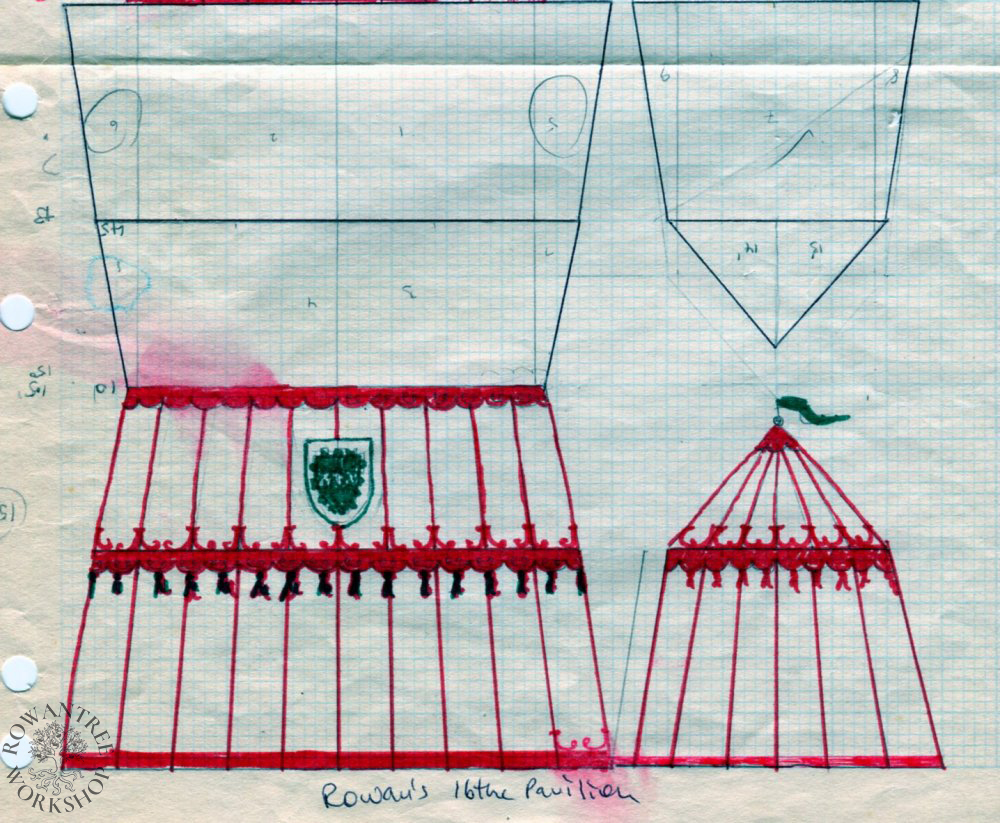
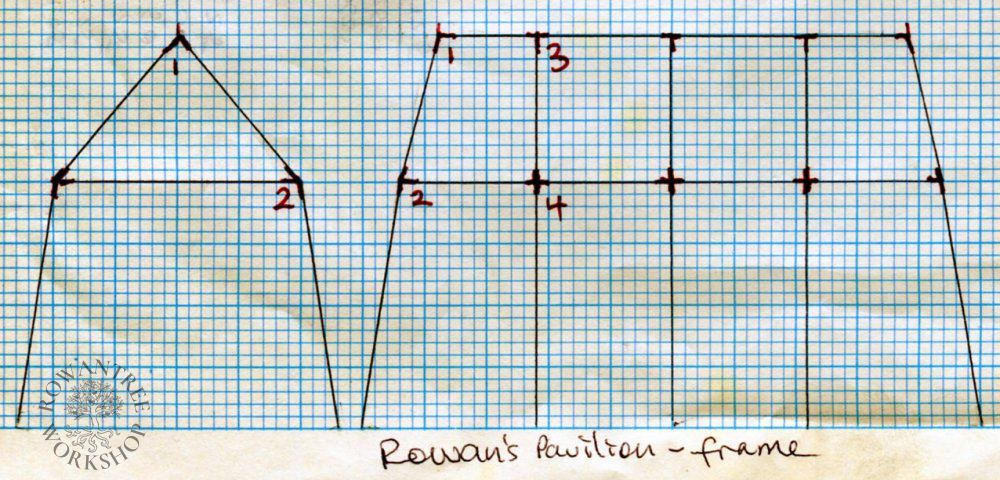
The design started with the floor plan, ensuring a double bed could fit in the short end, with access either side – 2.6m x 5m. The walls are 2m tall, and the tent is 3.2m tall overall. The slanted walls are essential for stability. To check the proportions and decorations would look right, I made a scale model.

I decided to make the tent in one piece, rather than the tie-on walls of my round pavilion. A single piece tent is faster to put up, and is much more weatherproof.
Construction
The Canvas
Based on my plan, I drew up a cutting diagram (allowing for seams and hems) and calculated how much canvas I’d need – 28m of off-white and 5m of red for the valance and roof ridge.

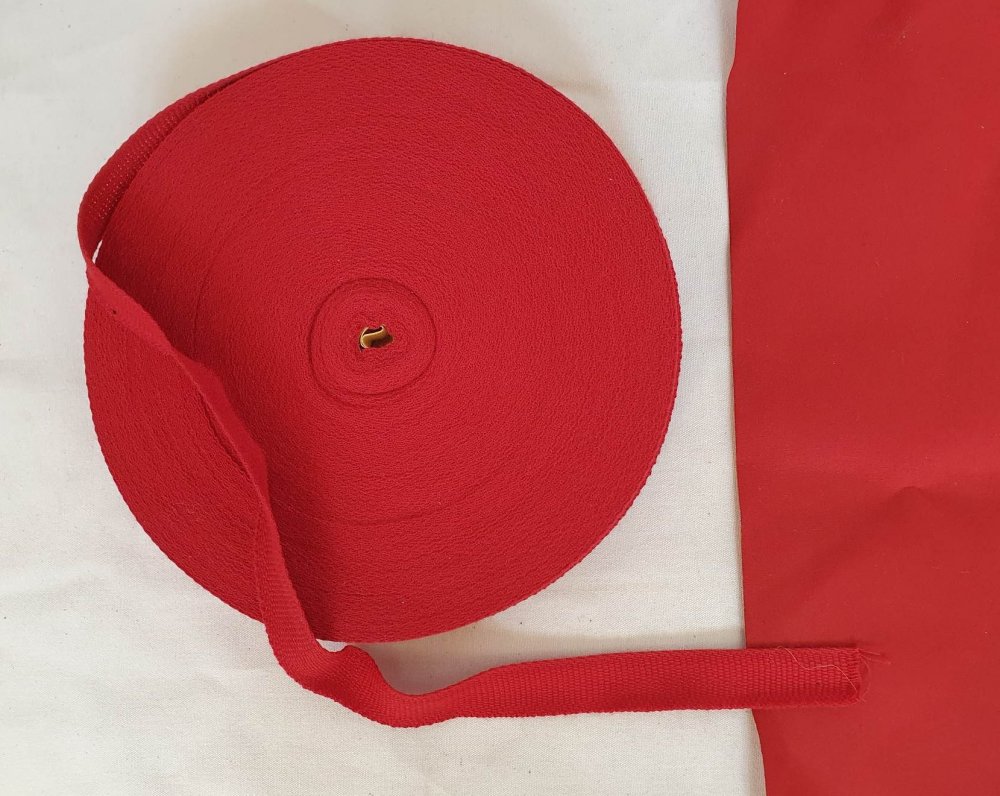
The 320 gsm (10oz) canvas is not a period fabric – it’s made of polycotton, treated with waterproofing and fire retardant. Likewise, the stripes are polyester binding tape, which stands up well to the sun. Based on my design, I needed 3 x 50m rolls of edging tape.
I used a hall floor to mark out the canvas, using a 2m straight-edge. I numbered the pieces as I went, and marked them off the layout plan
I sewed the canvas using an industrial machine and my old Elna, fitted with a jeans needle and Rasant heavy duty thread. I did some test runs to make sure the machine could handle the canvas and the thread – I needed to adjust the bobbin tension. A large table in front and another behind helps to feed the stiff canvas through the machine.
I constructed one face at a time using a run-and-fell seam. Within the panels, I used run and fell seams. To save time, I offset the edges by 1.5cm (holding with pegs), then sewed a 3cm seam – no trimming required. Then I folded the long edge over the short and sewed it flat.

As I added sections, I folded the canvas over to get it through the throat of the machine. Most of the panels were straightforward, but the entry end has an overlap to make it weatherproof, with a series of ties.
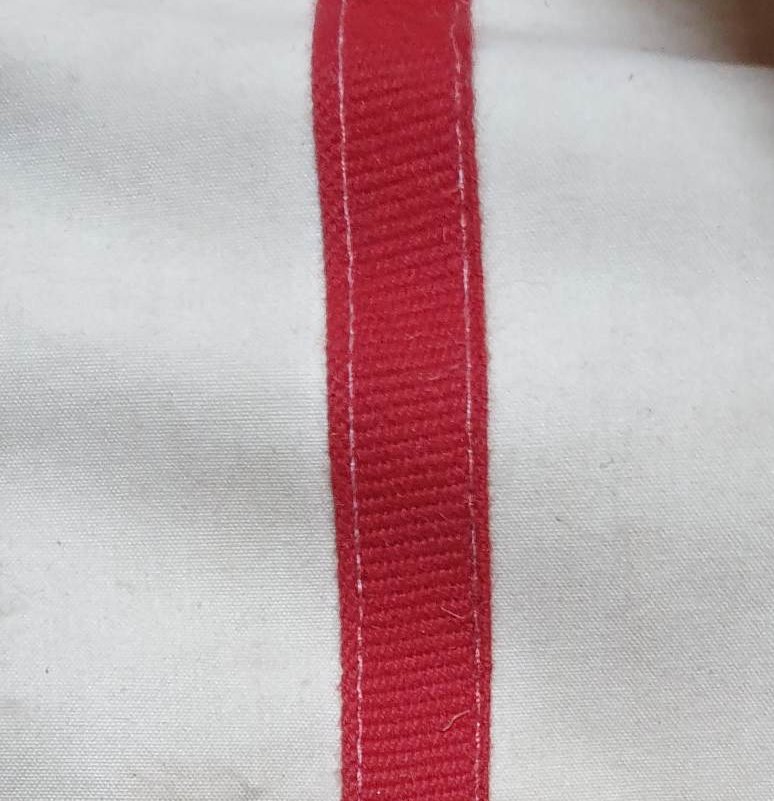
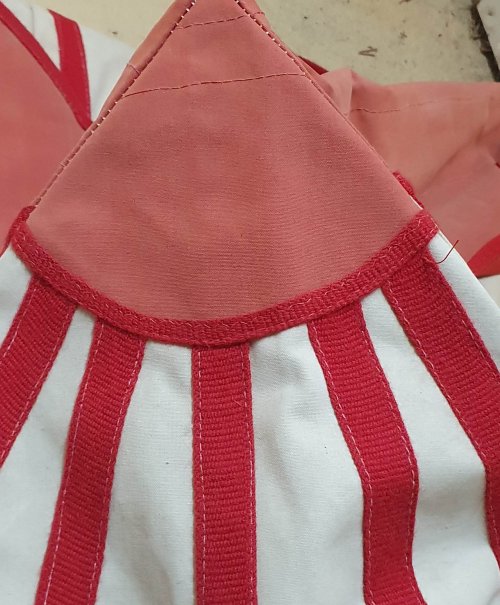
I sewed on the red stripes on each panel before assembly, stitching along both edges. The panels are wider at the base, so I spread the stripes out evenly to follow the shape. On the triangular roof ends, the stripes stop short of the peak, since this bit is covered by the red scallop. Pinning and sewing on the stripes took about 2/3 of the total tent construction time.
My tent has my heraldic device attached to the roof as an appliqué (so I can remove it in the future if I need to). I cut the shield shapes out of canvas, painted them with fabric paint, then edged the canvas with fine black tape. I sewed this onto the roof, over the stripes.
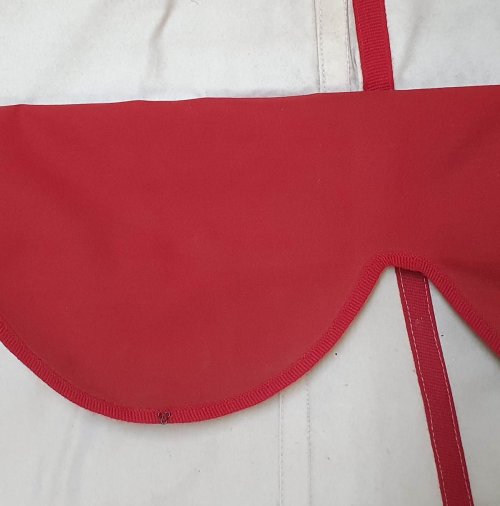
My next step was to finish the free edges of the roof scallops, by folding the edging tape in half and sewing it over the scalloped edge. I also made a single scallop to cover the peaks of the triangle roof ends and sewed this on to those panels.
I sewed the two main roof panels together using a run and fell seam, then sewed on the scalloped top reinforcement panel with several parallel rows of stitching. I sewed the triangle ends into the roof, but had to finish the top of the seam by hand, using waxed linen thread and a heavy needle. Then I sewed red tape over these seams to complete the roof.
With the roof done, I sewed the wall panels together with run and fell seams, and sewed red tape over the seams (a major effort on this much canvas).
Next step was the valance. I sewed the four valance sections are together at an angle to match the wall angle, then sewed the folded edging tape around to finish the scallops. I pinned this to the top of the wall, pinned on the roof and sewed it all with a run and fell seam, folding the seam up towards the roof (the corners needed some hand work).
At the two ends of the roof peak, I set in heavy duty 3cm brass eyelets to take the spikes from the future frame. I left the hem unfinished for now.
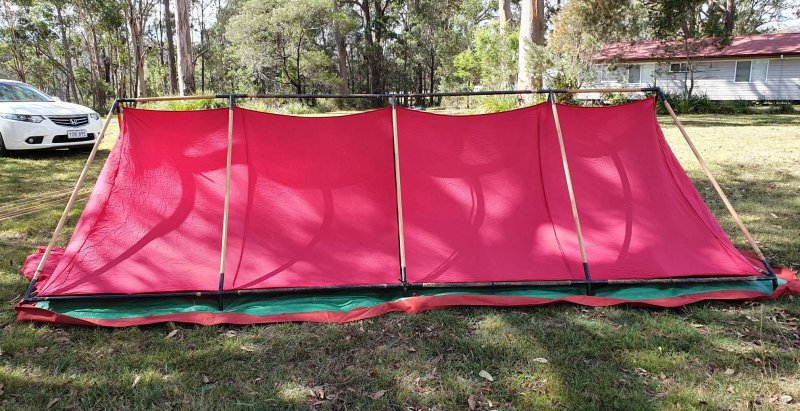
The Frame
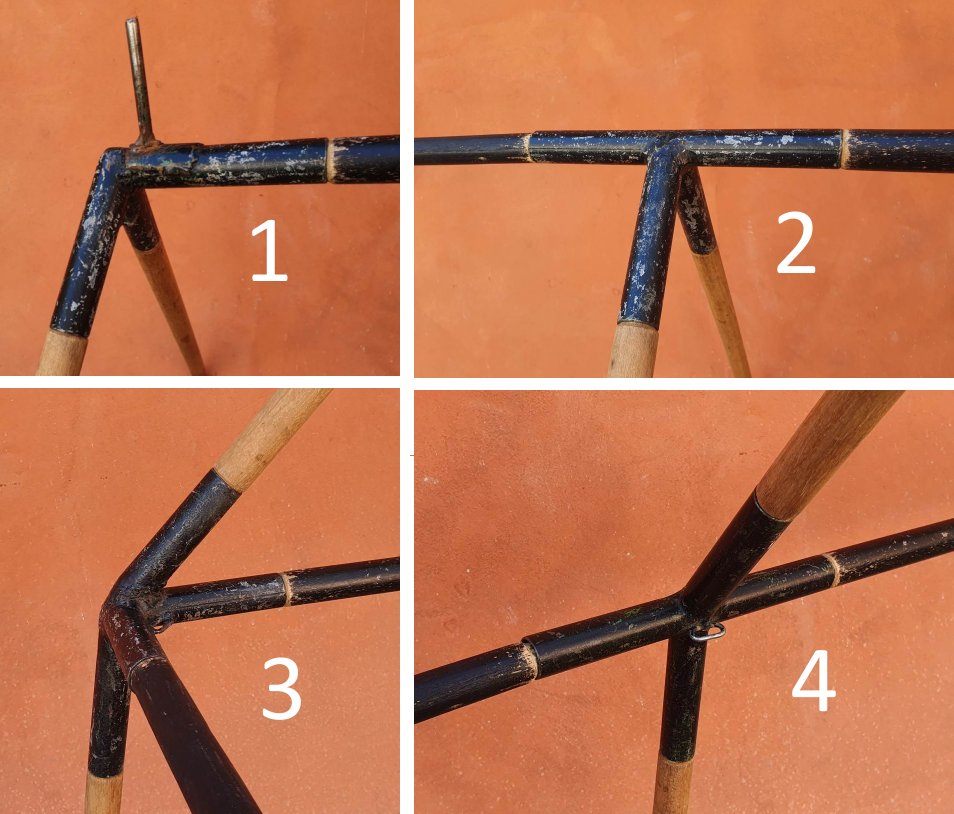
The tricky part of the frame is the steel knuckles, made from 25mm steel tubing, 1.6mm thick. These need to be welded together at the precise angles to match the wall and roof angles. I gave my husband Nico the sets of angles to make up:
- Peak knuckles (with spikes) x 2
- Corner knuckles (the most difficult) x 4
- Ridge knuckles x 3
- Eave knuckles x 6
Given the wall thickness, he used a MIG welder (Arc would melt the steel). To make it easier to attach the lining, I asked him to weld a single chain link inside each angle. He filed off any rough bits (including the inside of the pipe ends) and painted them black to guard against rust.

The poles are 25mm dowel – light but surprisingly strong. To simplify things, I went for as many uniform sized poles as possible. We bought broom handles for the short elements and standard lengths of dowel for the rest, then trimmed to length.
We laid out the frame, checked measurements against the tent and trimmed the poles to fit, starting with the central ridge. We used the router to reduce the ends of the poles, so they fit in the knuckles, making a smooth frame.
Once we had the roof poles done, we tested the canvas over the assembled roof. Once this looked good, we trimmed the wall poles to approximate length (corner poles 3cm longer than side poles), then raised the tent.
I trimmed the walls, making them an even height from the ground, then turned up a double hem. We marked the new pole heights, struck the tent, and trimmed the poles. We marked the different pole types to make them easy to find during set-up. Frame is complete!

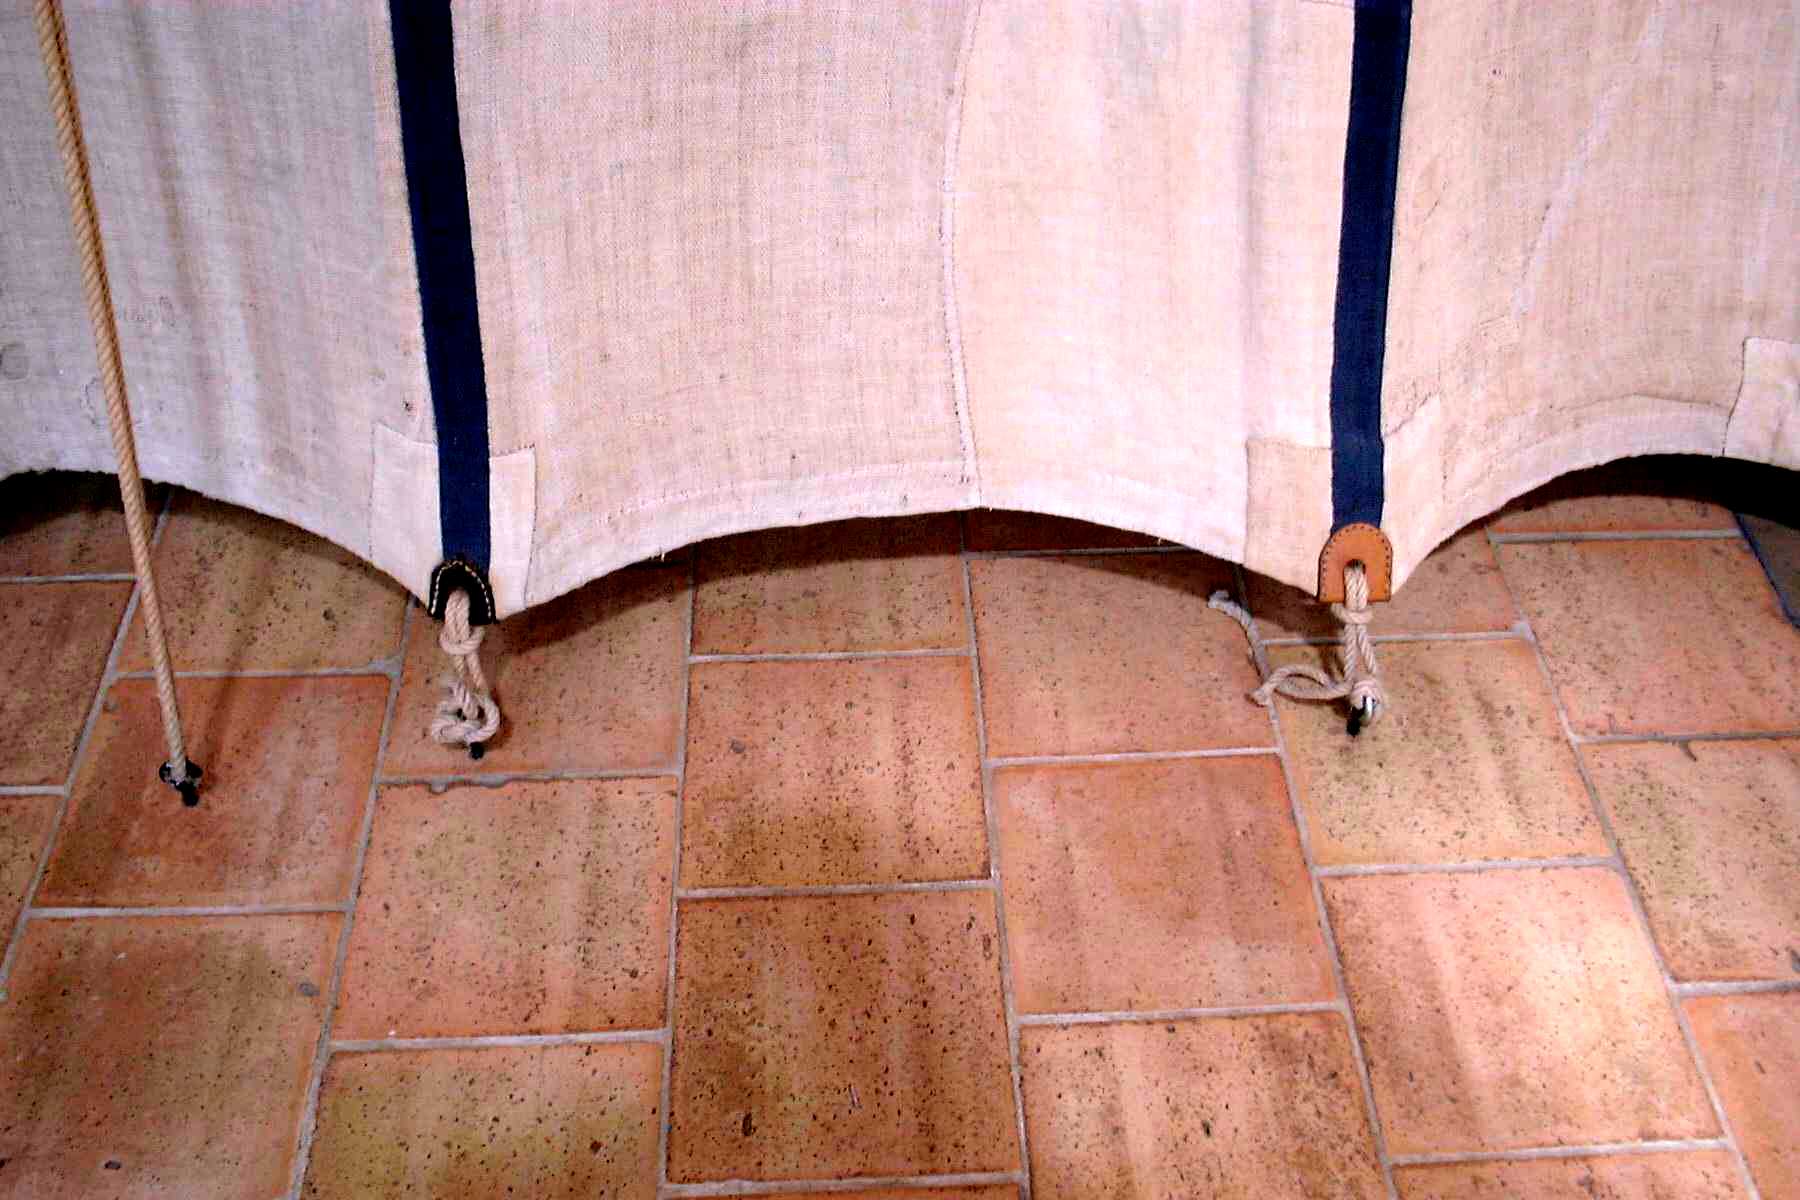
Cringles
Back to the canvas. I sewed the hem, then marked the 20 peg positions around the base – one in each corner and at intervals along the edge, always on a seam or applied stripe for extra strength, at about 50cm intervals. I ran out of time to make leather cringles, so I put in brass eyelets as a ‘quick fix’.
Many years later, I finally finished them properly… I cut tabs in 4mm leather, wet them to soften, then folded over and punched a hole through both layers with a wad punch – large enough for a tent peg. Then I sewed them over the eyelets, making holes with an awl and using a heavy duty needle and waxed linen thread.
If doing this without the temporary eyelets, I’d sew them on then punch the hole through all layers.
Source: Greydragon

Final touches
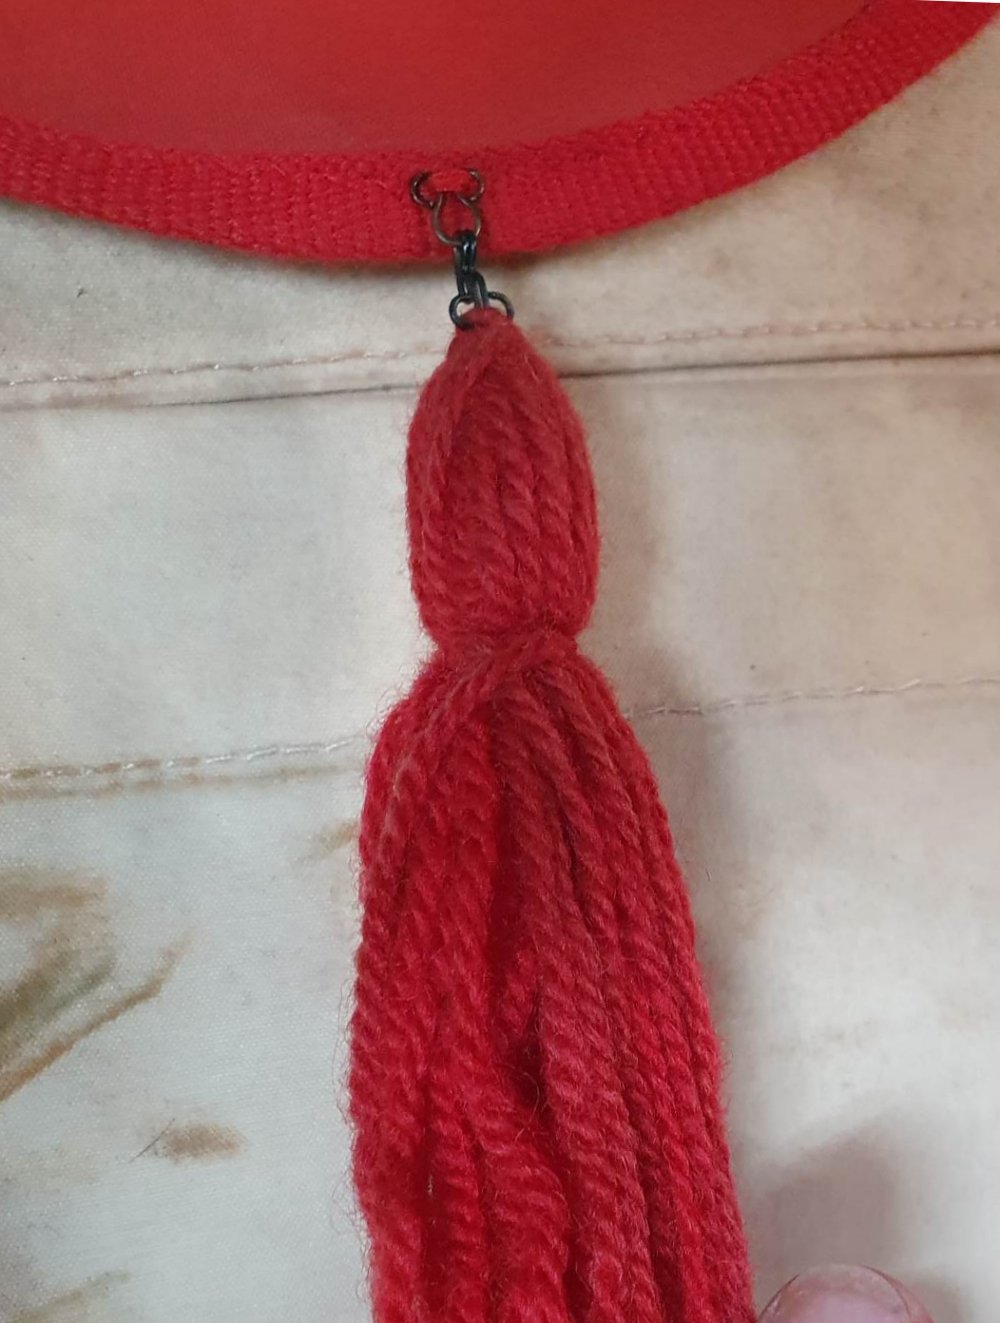
Tassels – I made 22 out of red yarn, winding around a book to make them even. I could see that these would become full of grass and might need cleaning or replacing, so I made them removable using hooks and eyes. I sewed the hook onto each tassel, and the matching eye onto each scallop.
Flags – German style, based on the images and the extant example from Basel. I cut them from 3-ply and painted them up with our devices. The finials are made from commercial turned fence capitals, which I drilled to take the spike at the base, and the dowel flag stand at the top. I glued in the dowel and added smaller finial on top, then gold-leafed and varnished the lot.
Just like the Basel example, I cut tabs out of sheet brass, formed them around the dowels, then drilled and riveted them with copper nails. The flags swing around on the dowels in the breeze.


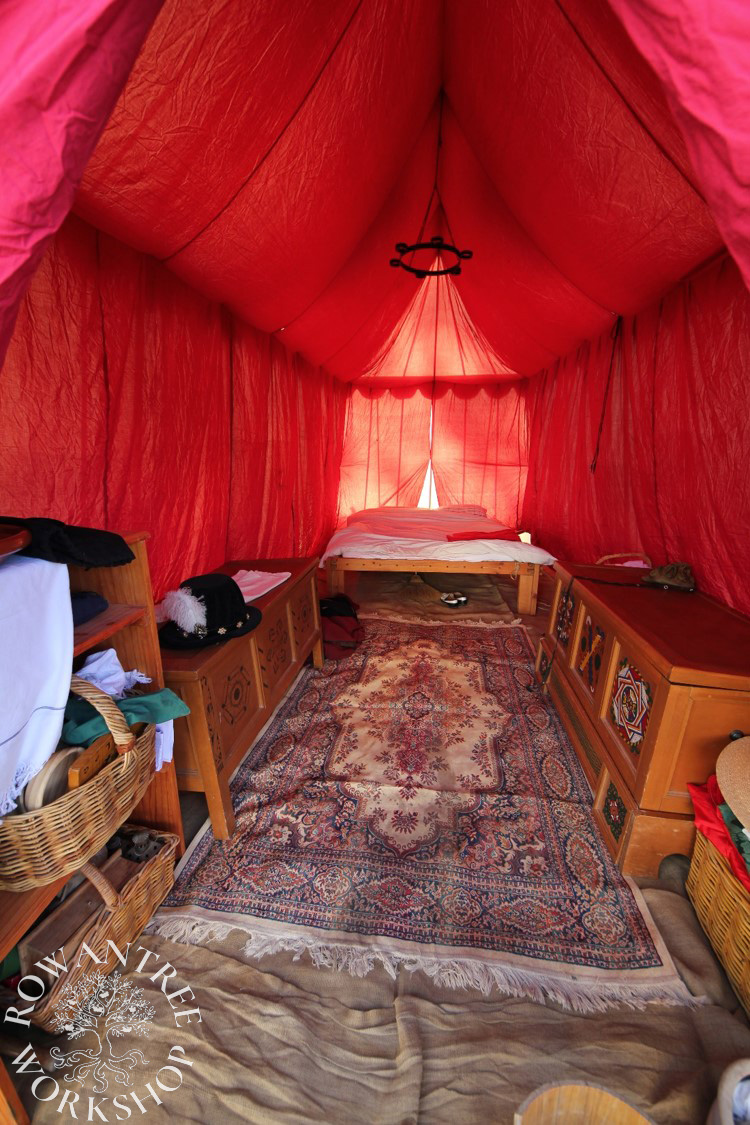
Lining – Many period examples show tents lined in a contrasting colour, sometimes patterned. Lining the tent provides luxury, privacy – and insulation, due to the airspace between the lining and canvas.
I made it out of 50m of 90cm wide cotton lawn (bought on massive special!). The fabric lets in enough light and breathes well, but prevents shadows and improves insulation. I used the tent pattern to make the lining, adjusting for fabric width, with a split at both short ends (because it will always be the wrong way round).
I sewed edging tape along the peak and top of the walls for reinforcement – and to hold the hooks for attaching to the inside of the frame. This system makes it very quick to put in the lining, once the roof frame is assembled (before the canvas goes on). There are also ties along the base at each pole, to hold the lining out – a necessity with the slanted walls.
Set up
To set the tent up, we lay out the groundsheet, then set out the knuckles. We assemble the roof frame, then hook in the lining and string the chandelier up over the loop on the top knuckle, then through a slit in the lining and down to another slit and knuckle loop on the side. The lining helps keep the frame together for the next steps.

Next, we haul the canvas over, locating the grommets on the end spikes and putting on the flags (the tent is too tall to add them later).
We lay out the wall poles, with the marked poles in the corners. We tilt up the roof, put poles in one side and pull the canvas down. Then we heft up the other corners, put in the other side poles, pull the canvas down and adjust everything, then peg all around. Finally, I hook on the tassels to complete the look.

Then we add the carpets, rope bed, chests and so on…
Afterthoughts
We have used this tent now for some 20 years. The colours are less bright, but it is still easy to set up, weatherproof and very comfortable. With solid ground and long pegs, it has stood in winds that reduced many other tents to sad piles.
The only change I would make to the design is to increase the size of the front overlap flap, for better protection in windy, wet weather.