

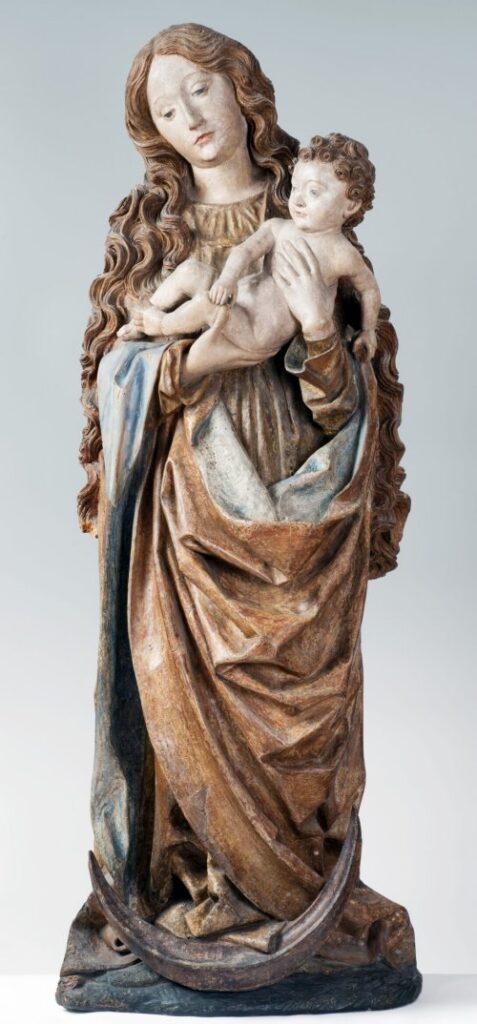
This loose pleated overgown was commonly worn by German women in the mid-late 15th century, and remained in practical use into the early 16th century. It is also found in several other countries, including the Netherlands and Spain and is often depicted as a symbolic garment for the Virgin Mary.
My interest in this gown started a few months before, when I saw a post by Um1504 with several 15th century examples, asking if anyone had made one. I realised I had actually made a very poor version several decades ago, when I was first exploring early 16th century German clothing, but had long forgotten it.
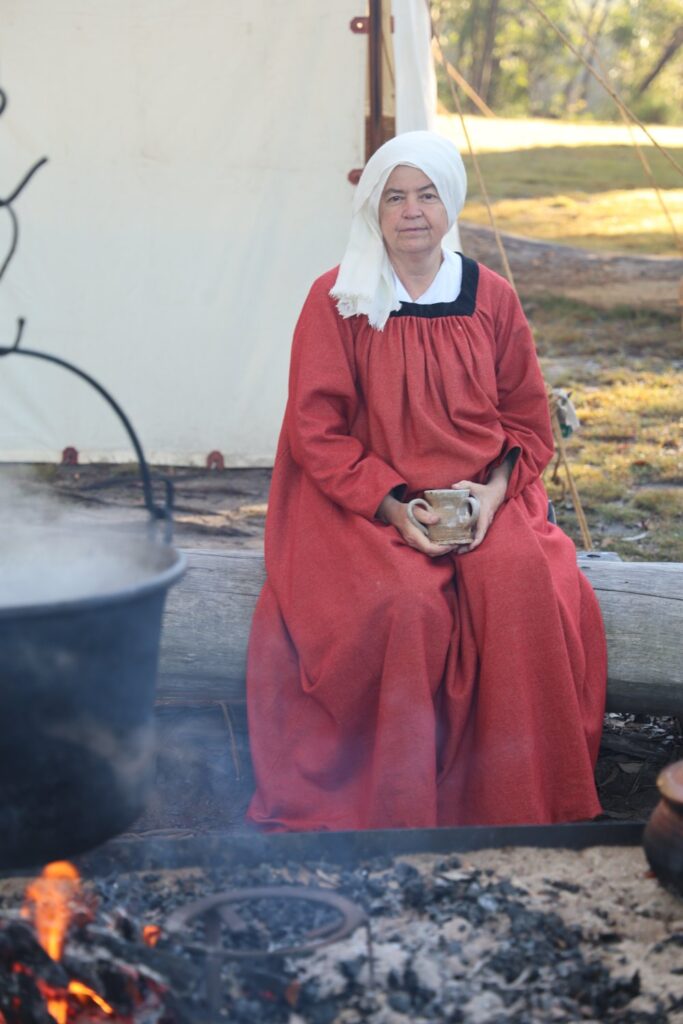
I love my early 16th century German wardrobe, but it does take some time to get dressed in the mornings! For some years, I had been wanting to make something I could quickly throw on for that early morning breakfast by the fire on camping trips, or the midnight trip to the privies. Something actually German, rather than my husband’s Elizabethan coat.
This looked like the ideal solution – and I had just enough time to make it before the next big camping event…
Research & Design
My first questions were – could I find examples in the early 16th century? And – was it ever worn by ordinary people, or only in images of the Virgin Mary?
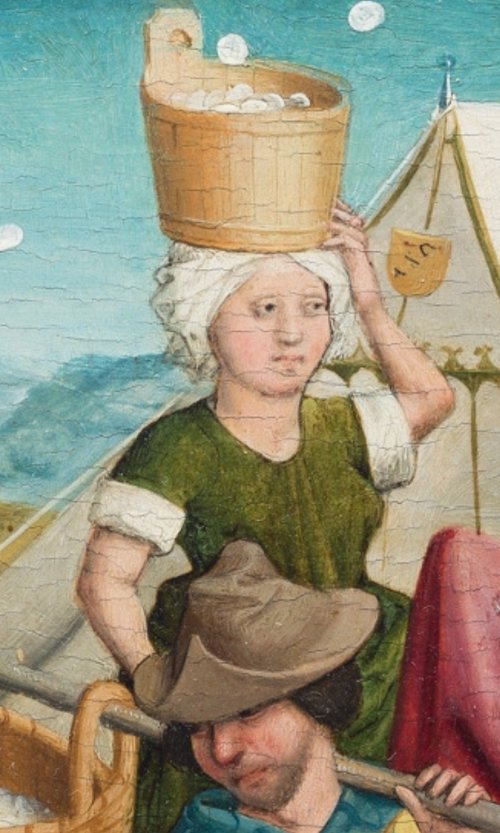
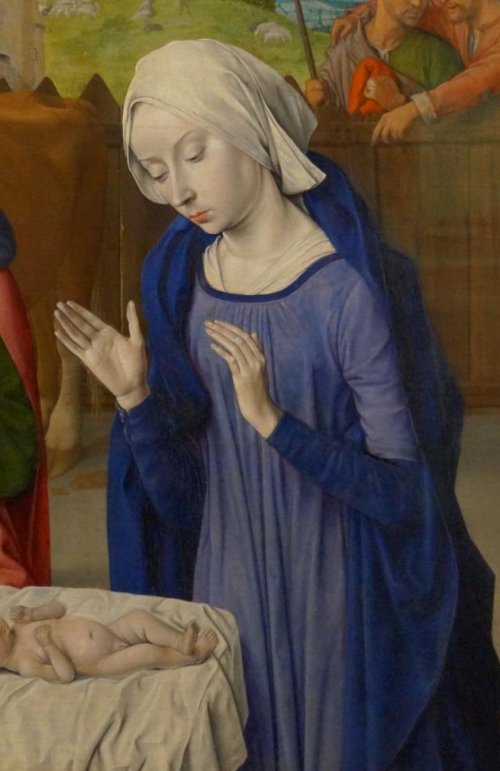
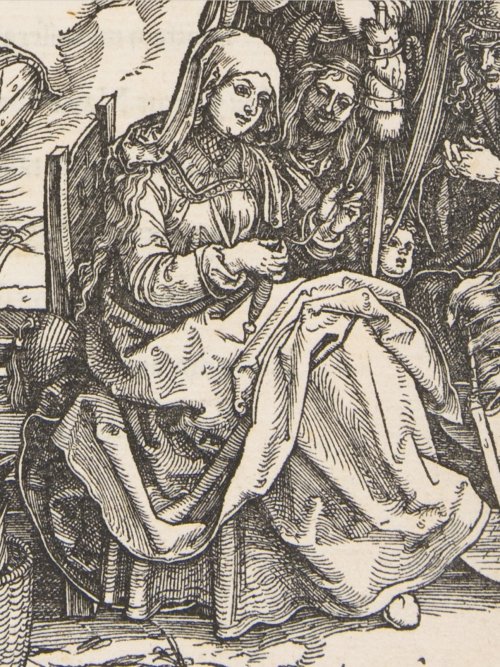
Many 15th century examples do show Mary in this dress, but it was also clearly worn by ordinary women, such as the images below of the farmer’s wife, and the woman collecting manna in a bucket.
The style at this time shows a few pleats gathered into the centre of a rounded neckline, with a slim binding (self fabric or contrasting) – a very gothic aesthetic. The gown may have long or short sleeves and may be worn over other garments.
Source: Musée Unterlinden

I also found 15th century examples in some adjacent countries (France, Netherlands, Spain) of ordinary women wearing the overdress as a practical garment, as well as images of Mary. In others it only seems to appear as a religious signifier for Mary.

Source: Louvre

Source: Wikimedia
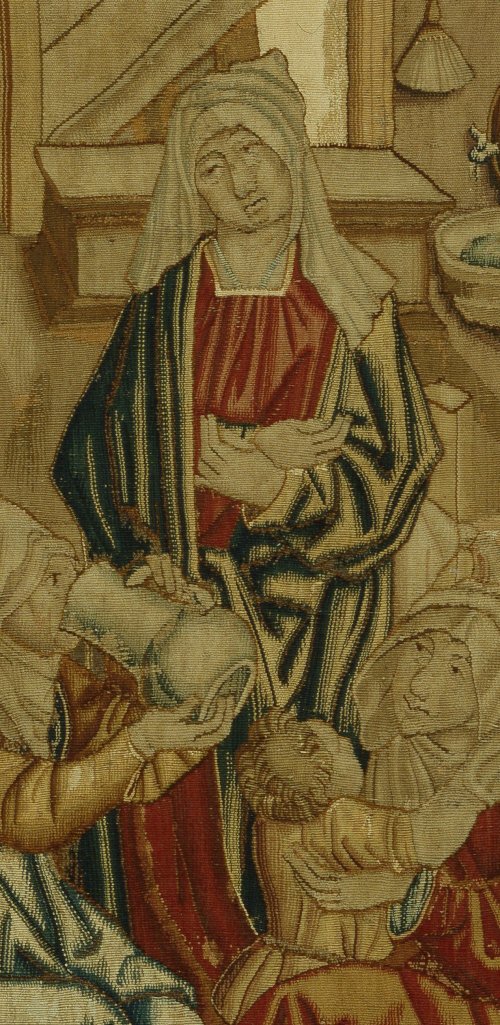
Once I started looking, I also found many 16th century German examples, and while Mary was still the most common subject, I also found ordinary women wearing the garment – usually servants or older women.
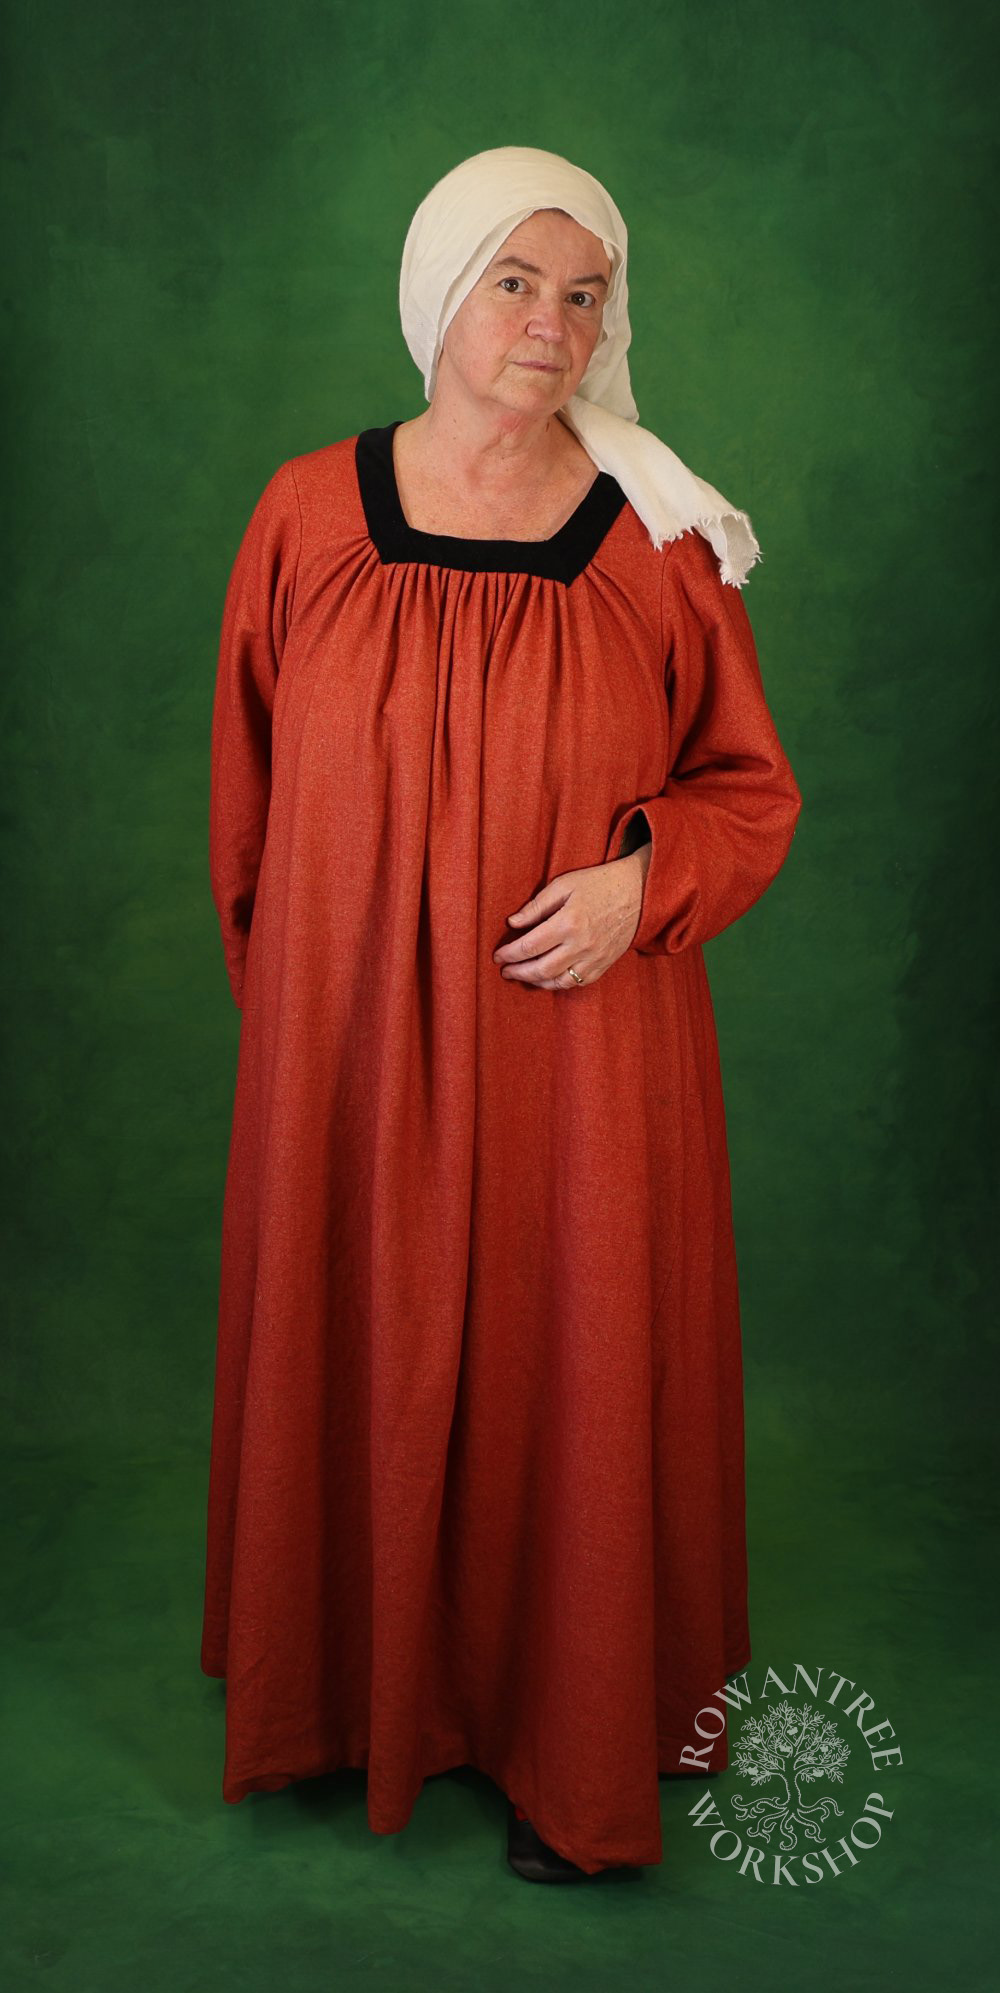
The 16th century version has a lot more fullness, with many parrallel gathers at a square-fronted neckline, and a contrasting guard. As with the 15th century versions, some are lined with fur; the garment may have short sleeves or loose long sleeves; and it may be worn over a Rock.

Source: The Met
Source: Rijksmuseum
This was enough to justify this as a practical and appropriate garment for my purposes.
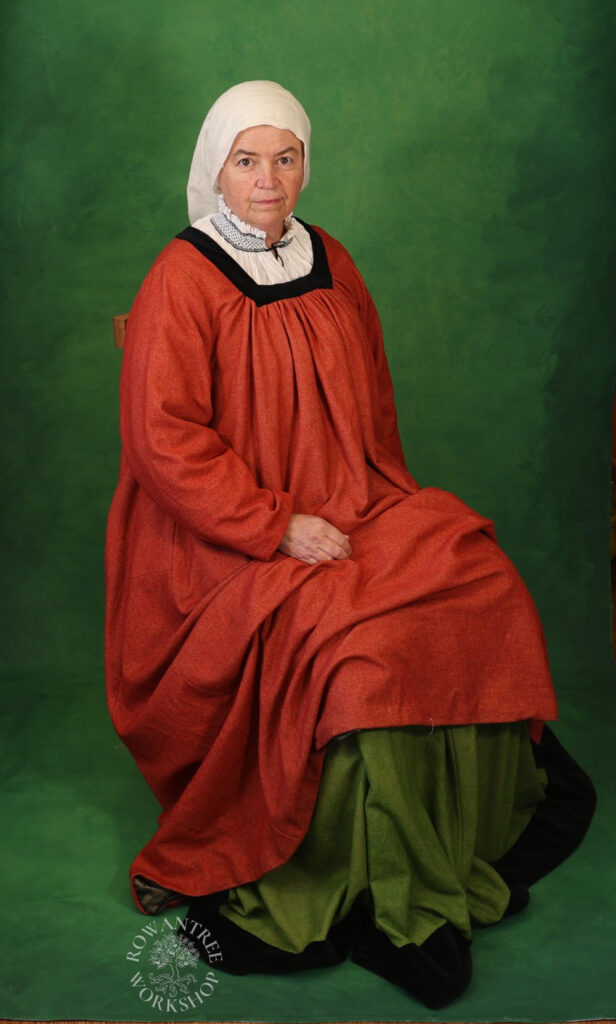
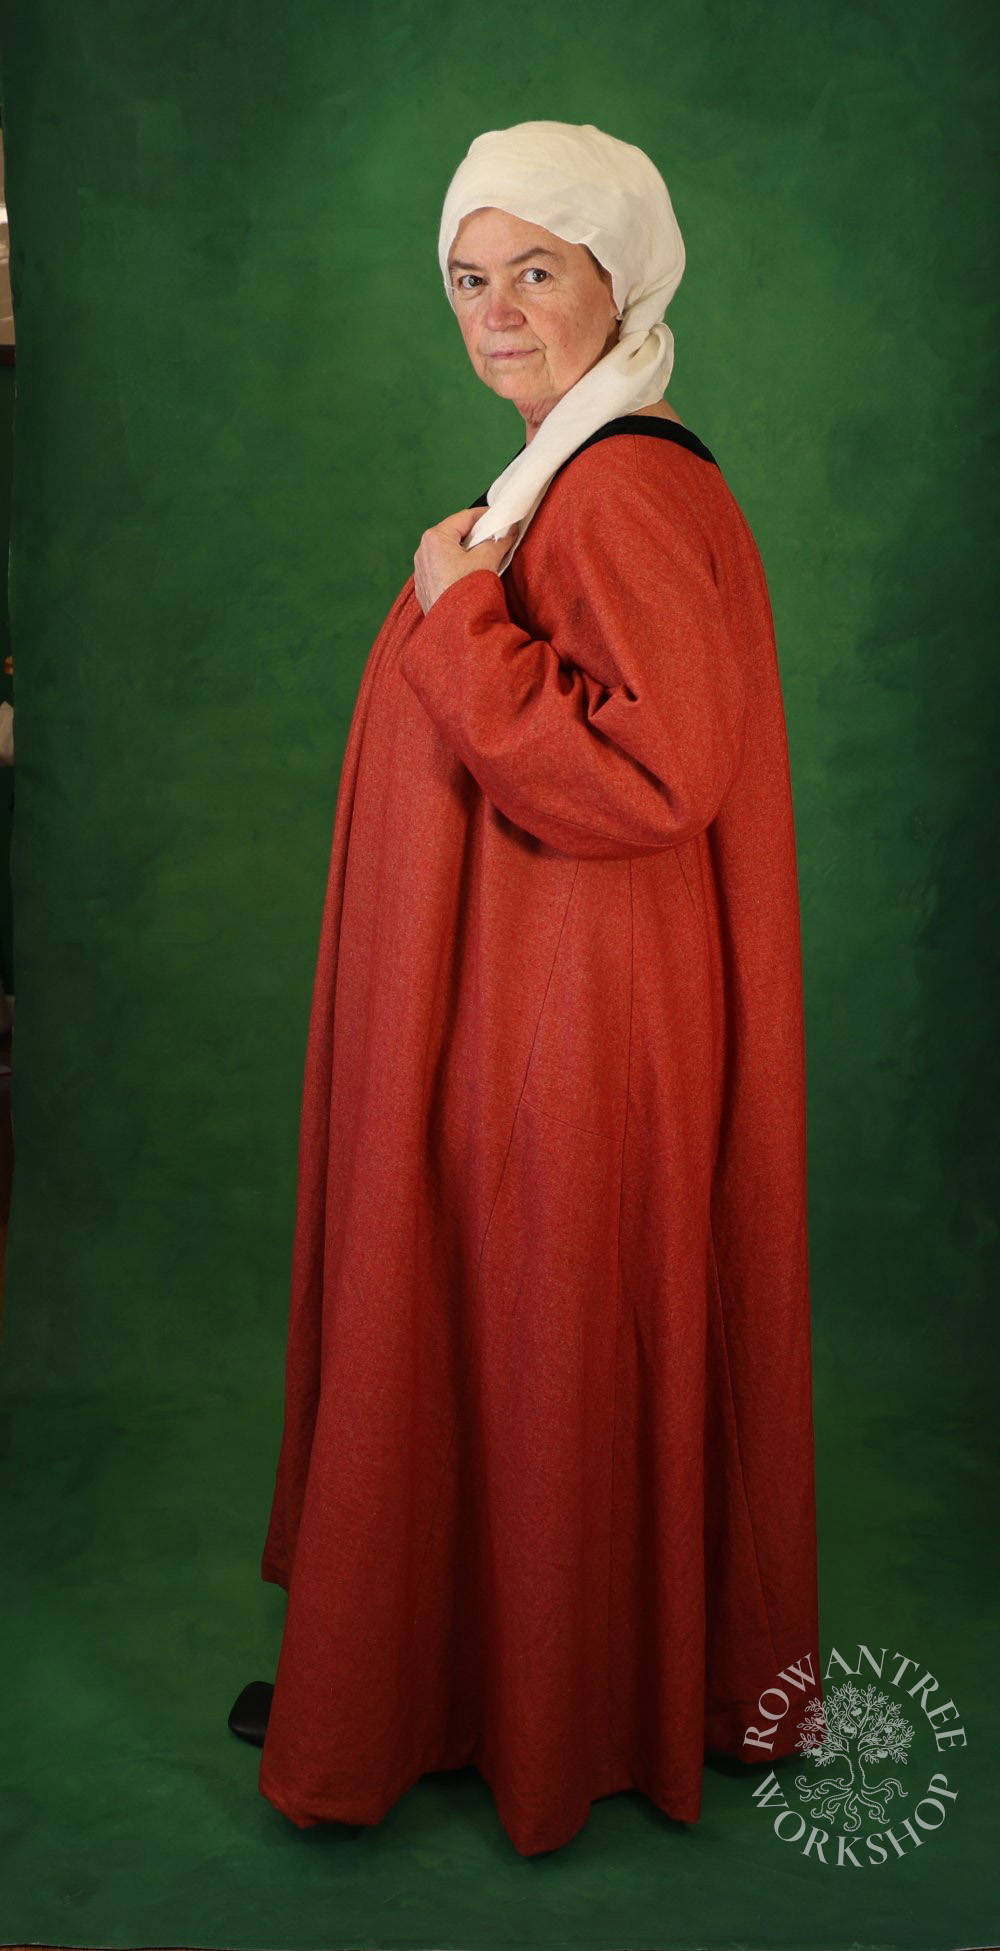
I planned to make one in red wool, with black velveteen guards, moderately loose sleeves, lined with silk for warmth and to make it easy to put on and off.
But what was this garment actually called?
The name
The Um1504 post called the garment style “Kleider mit Falten-Ausschnitt” (dresses with pleated necklines) – a description, rather than the actual garment name. It had several links to related articles, incuding an Arbegg restoration report of an undated relic garment (possibly 15th century), which it termed ‘Marienkleid‘ or ‘The Dress of the Holy Virgin Mary‘ (Flury-Lemberg, 1988) – again, a descriptive term.
I consulted Textiler Hausrat (Zander-Seidel 1990) to see what the garment was actually called, and when it was worn – but it was not even listed! I remembered my friend Michaela le Bruce had access to a German PhD thesis on period clothing names (Lindskog-Wallenburg, 1977), so I asked her to see what she could find. She came back with some excerpts she thought might fit.
Translated from the German, the first option was Samarie, from the Spanish zamarra via middle French chamarre. This looked promissing, but the description made it clear this was an open-fronted gown, with gathered shoulders, so not what I was after.
The second term was Husseke, which in the 16th century in southern Germany referred to a “woman’s coat with fur cuffs”. It is related to the French housse, ‘blanket, overdress, coat’, which appeared in France in the 14th century and spread to other countries. To my mind, there is also a clear relationship with the English cassock. So – Husseke seems likely! (And more research to follow, once I’ve made the garment).
Construction
The pattern
The first step was to develop the pattern.
The Arbegg article included a drawing of the relic – a linen gown with a pleated neckline (with a front slit), moderate pieced sleeves (pieced) and a hem of 2.2m before conservation (it looks more like 3.5m after conservation, but this data is not given). There are 6 roll pleats at the neck, and side gores for added fullness. It also appears to have seams under the arms rather than down the back of the arm, which is unusual at this date. A fascinating piece, but very much in the 15th century gothic style.
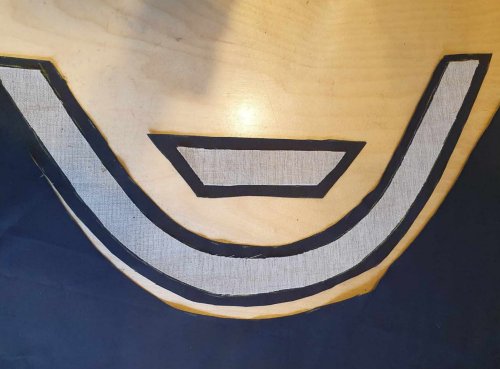
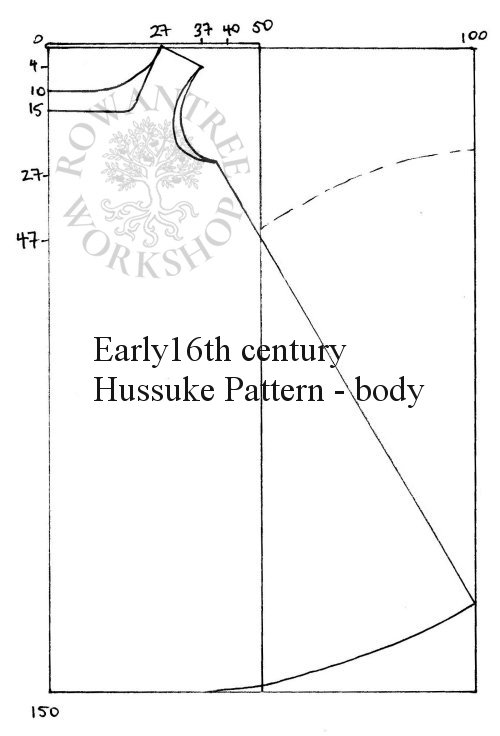
Then I recalled a pattern in the Book of Patterns by the Guild of Tailors from Most in the Year 1576 (in Šimša, 2021). The monastery in Most (a town in Bohemia) housed the Order of St Mary Magdelen from the 13th-18th centuries and this pattern for a nun’s habit, was amazingly right! I love the piecing, and the way the hem arc comes from the shoulder point.
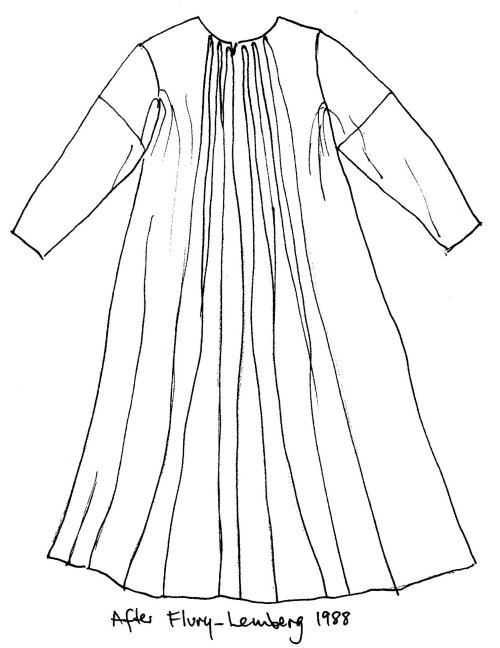
After Flury-Lemberg, 1988
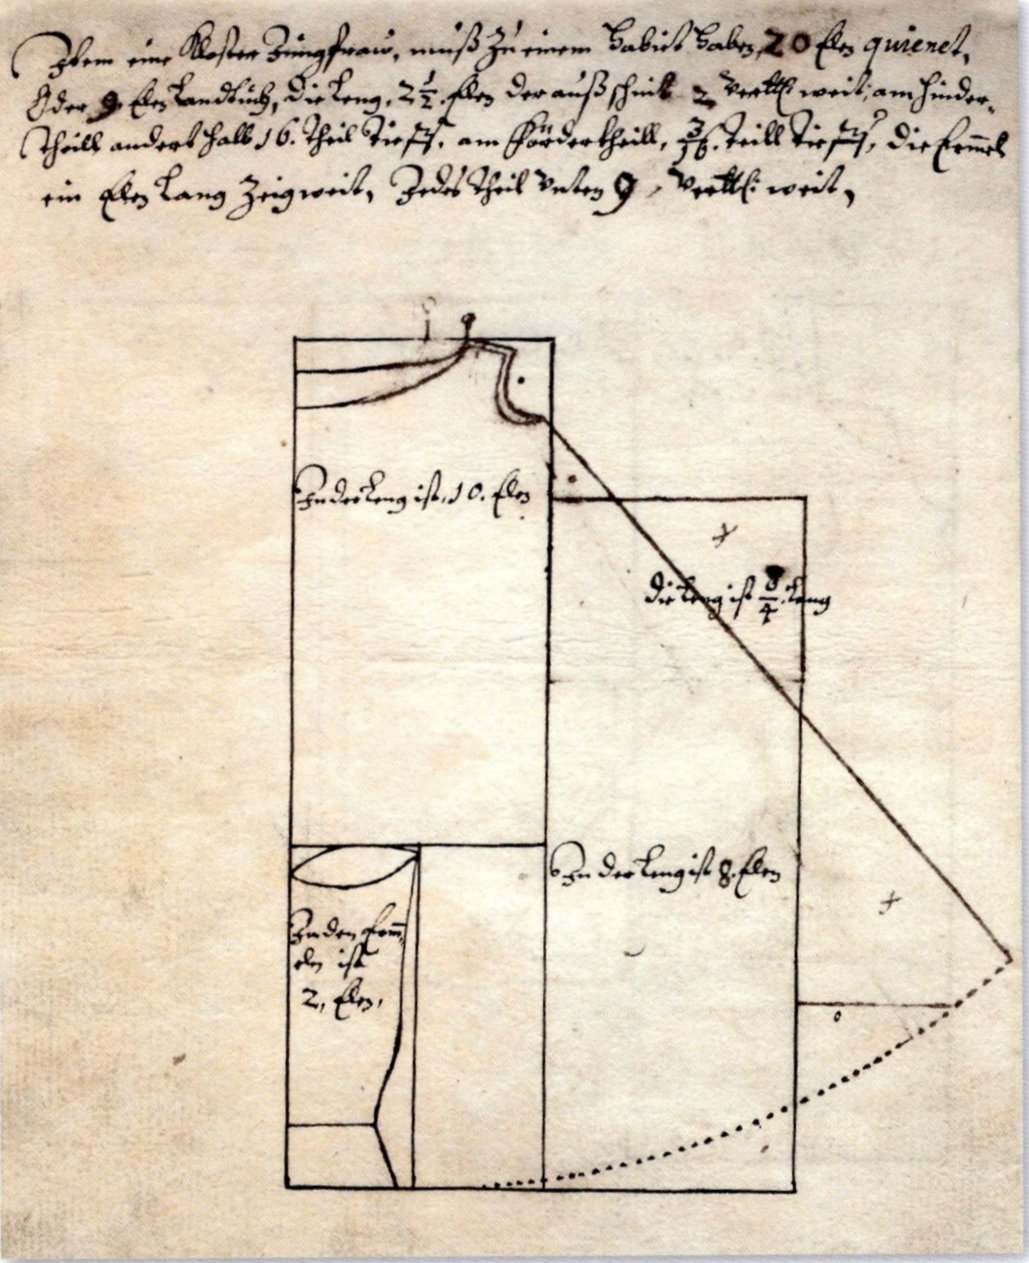
In the introduction to the Most tailor’s book, Martin Šimša suggests the Prague ell, which is 59.3cm. The tailor’s notes for the pattern state that the attire is 2.5 ells long, making the habit about 148cm from the shoulder – a good length on me.
It calls for 20 ells of quinet (unknown fabric, used for habits) or 9 ells of lindisch (cloth of London). This means that the widths shown here are about 45cm wide – 90cm on the fold. Which means the hem is about 5.6m – longer than I want.
To match the 16th century portraits, I want about a 4m hem, with a square front neckline and looser sleeves with no cuffs. I also want to make efficient use of my 150cm wide wool. I decided to make the front and back 1m wide (a little wider than the habit pattern), then use the remaining 50cm width for side gores.
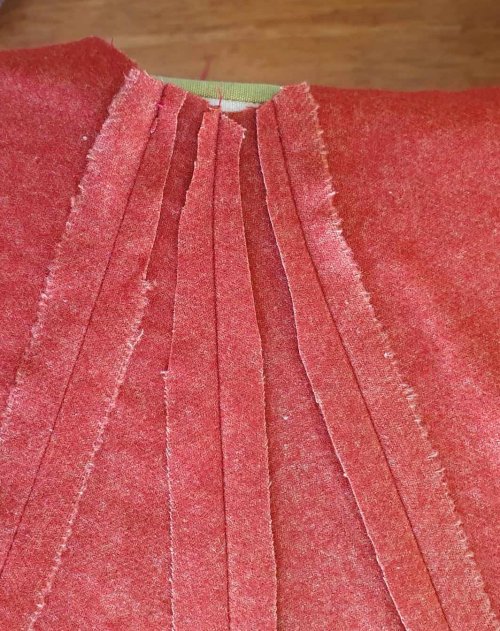
First, I needed to get the neckline sorted. I mocked this up using black fabric strips – the square side looks better than the curved one. I measured down from the shoulder to see the relative heights of the front and back neckline – similar to the habit pattern. Next, the front pleating – that’s a lot of fabric to gather! I did a test piece using a piece of similar wool, which looked good.

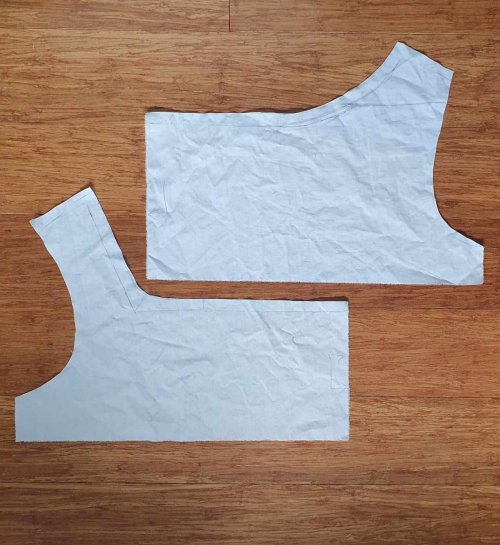
With these elements sorted, I made my patterns. Since this is being cut from a panel, I only made the top of the body patterns (and made a mistake with the cut of the side, as I found later). Although my front neckline will be square, I rounded the front to make it easier to gather around the front corners.

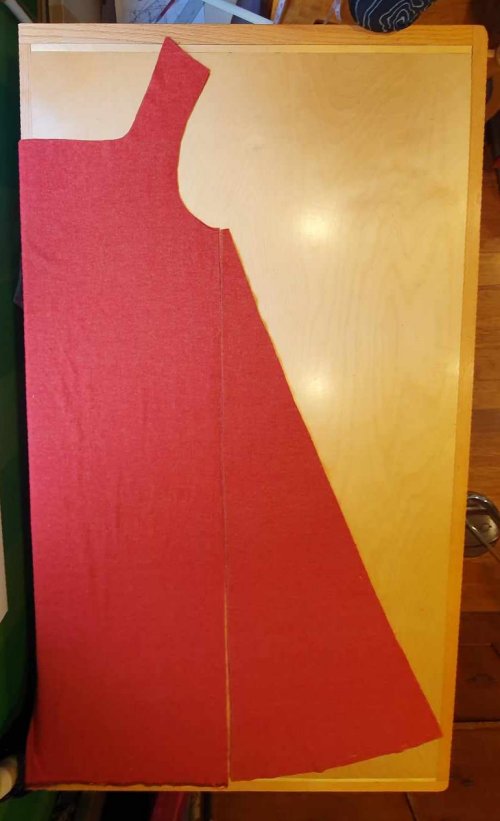
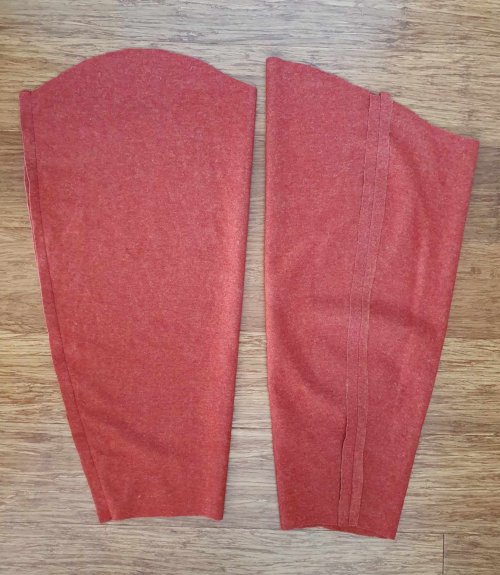
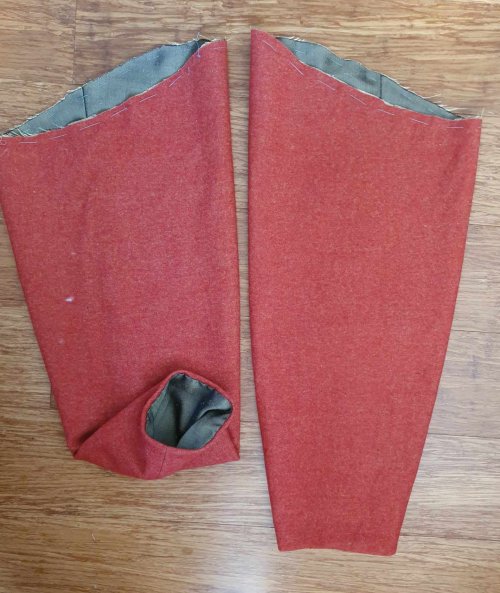
Now I could cut my fabric lengths and dye them red (a simple process, using food colouring) – 2 x 1.5m lengths, plus 65cm for the sleeves. Then I cut my body pieces and divided the remainder into triangular gores.
When I went to sew the side gores on, I realised my mistake – I would have 4 seams meeting under the arm. I went back and checked the habit pattern – I’d missed the small but essential angle before it hit the selvedge. I had length to spare, so I slid the gores up to give spread between the seams – and then adjusted the sleeve pattern to match. Sigh.

I sewed the shoulder seams and then I realised I should have stay-stitched the armscye and neckline to reduce stretch, so I did that. I am so used to mounting bodice pieces on canvas, which deals with this issue!
I made up the lining in olive silk taffeta (too slubbed for exterior use), cutting to maximise use of the fabric, then basted this to the hussuke at the neckline and armscyes.
All those meters of wool and silk were heavy! It was clear that I would need some support to keep the neckline from sagging. And the silk was making the wool much stiffer – I was worried that I might not be able to pleat it all into the neckline.
So I did some tests to try this and concluded: a) a heavy canvas backing would stop the sag, b) 1cm box pleats worked the best, c) the silk was too stiff to pleat with the wool, and d) a flat pleated silk lining would solve the problem. So I unpicked the silk lining, and put it aside for later.
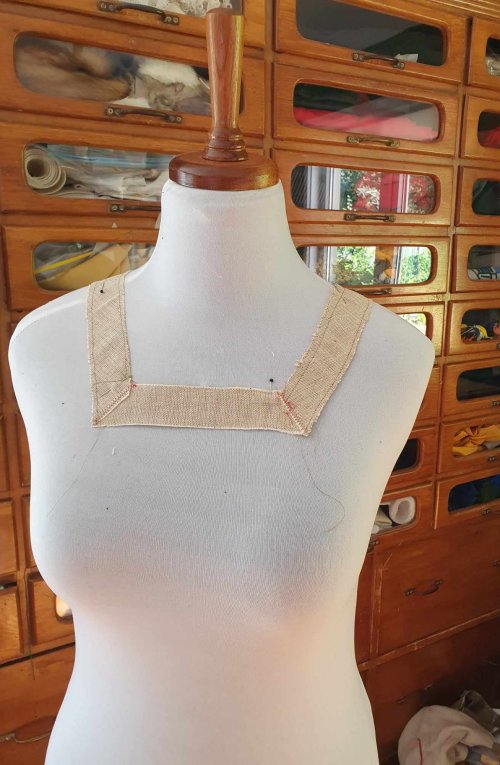
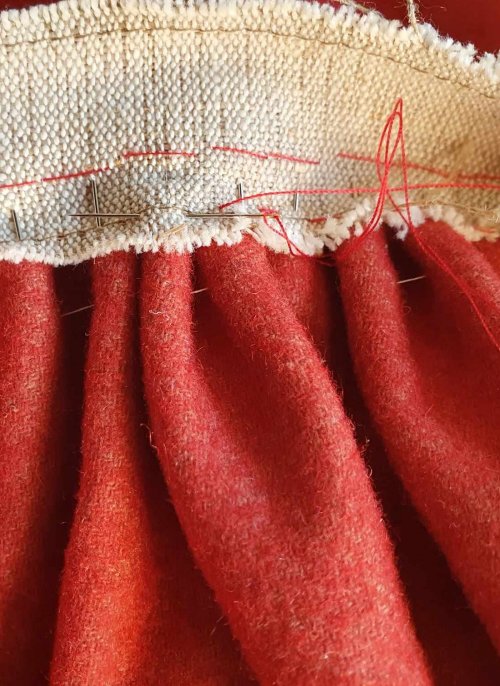
I cut a set of neckline supports in heavy linen canvas, sewed the seams and stay-stitched the edges, then tried it on my dressform and marked the shoulder lines. I took it off the form and marked 1cm increments at the front and back neckline, for even pleat spacing.

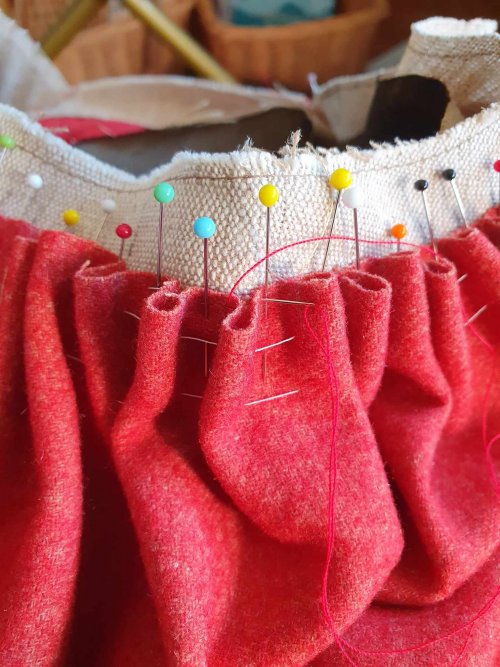
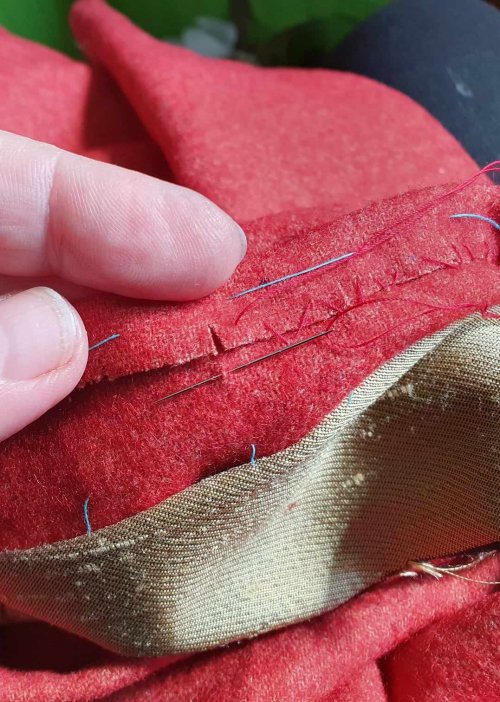
I measured the wool along the front and marked the same number of pleats, then ran a pair of gather threads. I did the same with the back neckline. Then I pinned the wool to the middle of the canvas strip at the shoulder seams and centre front and back, then down along the shoulder lines.
At the front and back, I pinned the pleats to my marks, then basted from the back to secure the pleats. I sewed the pleats and trimmed them back at an angle to reduce bulk.
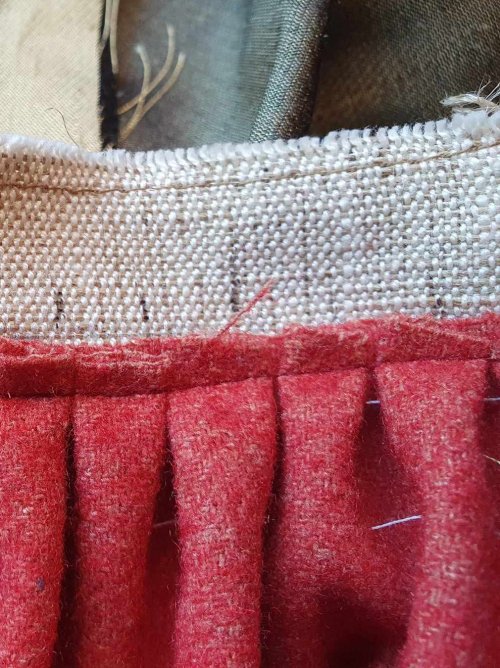
There was still going to be an obvious ridge, so I basted a scrap of wool above the pleats to smooth off the gradient.
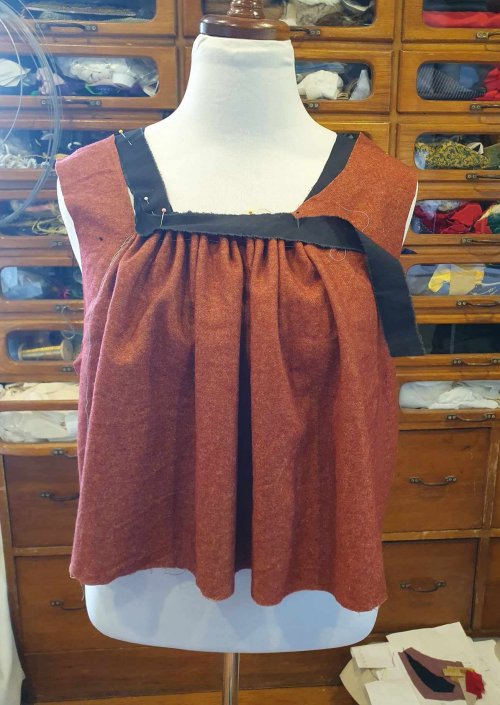
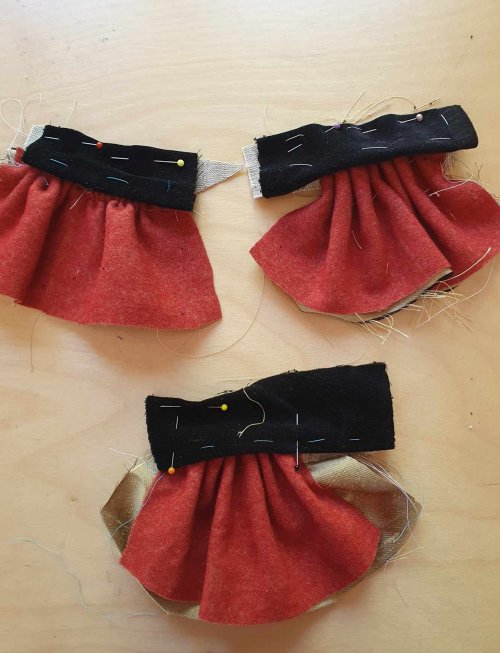
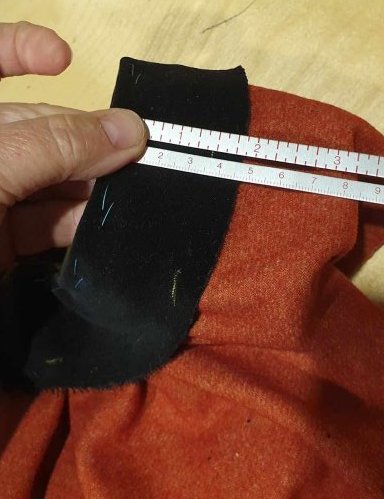
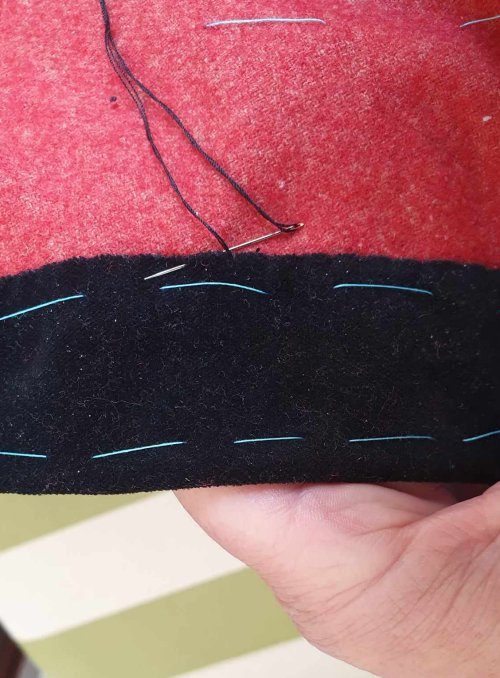
I cut the neck guards in black velveteen, pinned these over the wool and basted in place, leaving the corners unsewn. I put the Husseke on my dress form to check how the neckline was sitting, and adjusted the critical front corners.


Off the form, I sewed the corner seams, then folded the velveteen over the edge to the inside and catch-stitched to the canvas. On the outside, I turned under the hem, measuring as I went, and basted it in place. Then I felled the guard down, with small stitches over the pleats.

Time to put the lining back in.
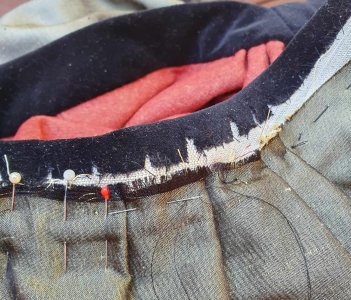
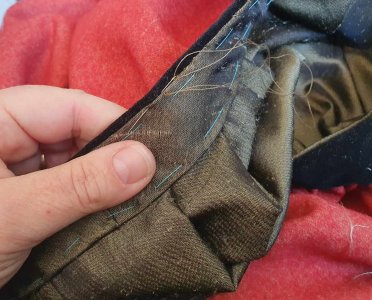
As before, I pinned this in, matching shoulder seams and centres, then pinning over the smooth shoulder line. At the front and back, I made large flat pleats in the silk, with small ones at the corners, pinning these in place. Then I sewed these in, catching each pleat with a backstitch. Using the guard pattern, I cut a neck lining in silk, then basted and sewed this in place over the top.
On to the sleeves.
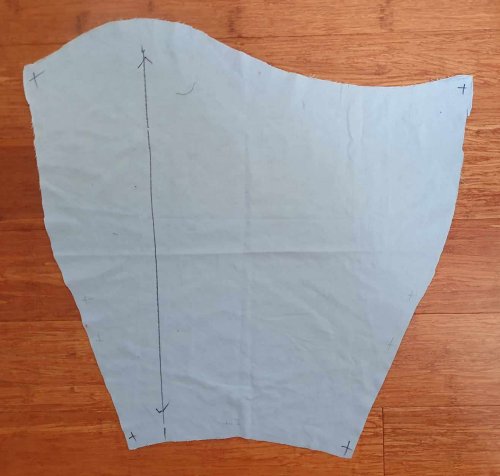
I cut these in wool and silk, sewed the back seams, turned and pressed them. I basted the lining in at the top and a bit up from the cuff, then turned the cuff, basted, clipped and hemmed with catch-stitch. I trimmed the silk and slip-stitched it a little back from the edge. Sleeves done!
I considered several options for the armscye seam – I wanted to make it as smooth as possible. In the end, I decided to sew the sleeves into the lined Husseke, then flatten the seam and cover it – the same technique I use on jackets.
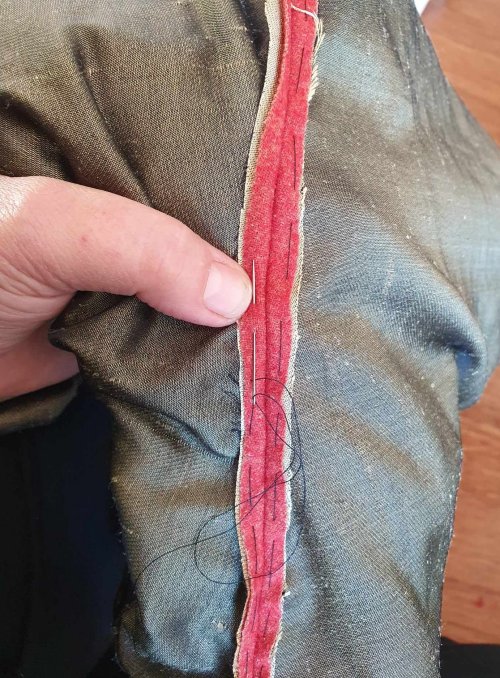
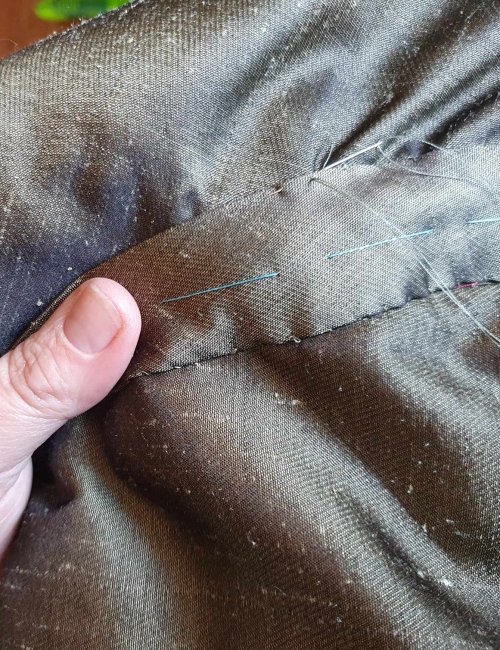
I sewed the armscye seam, then pressed it open and basted it flat, catching the lining but not the wool. Then I pressed hems into a 5cm strip of bias silk to cover the seam (I had the perfect piece from my lining offcuts). This makes a very smooth seamline, which slides esily over other garments.
With the main construction complete, I tried on the Husseke to check the length – I wanted it long, but above the mud. I trimmed the hem, folded and pressed, then overcast the hem, stitching into the back of the wool. I put the Husseke on the form and marked the silk lining to match, then took it off the form to trim and baste to the wool.
Then I stopped and packed for the event. I hemmed the lining in the car on the way there…

I was really pleased I had finished the gown in time to wear it. By the time I took these pictures, it had spent a week being useful and then washed to remove the mud!

As I’d hoped, it was perfect for early mornings by the fire – and as a warm top layer in the cold evenings. I can see it will become a mainstay of my camping wardrobe. I have noticed the open neck can be cold, but a high-necked layer beneath or a wool wrap over the top solves the problem.
Afterthoughts
If I was making this again, there are several things I would do differently, starting with the pattern. Although I do like how it falls, I think it would be better with less fullness at front and back and more at the sides. I should not have added the extra 10cm in the centre – indeed, I’d reduce this still further. And allowing for the slanted side seam would certainly simplify matters too!
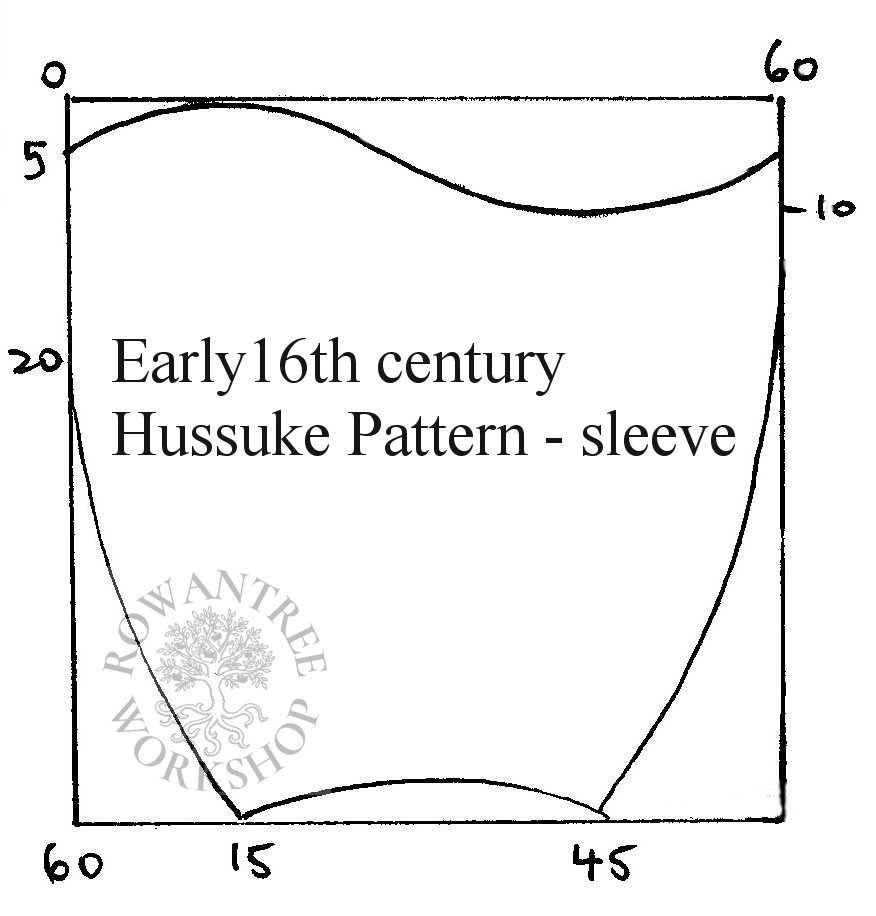
Using 90cm wide fabric, the cut from the Most tailor’s book would work well, but would be very full. For a more moderate version, here is my updated pattern for 150cm wide fabric.
I’d also remember to stay-stitch the shoulders, and not add the lining until the neckline was sorted.
On the research front, my search for a name has morphed into discovering where else this useful garment was found. It was popular in Spain into the 16th century: according to Hispanic Costume (Anderson, 1979) the late 15th century Queen Isabel had 50 over 20 years.
I have found examples in several other countries in the 15th centuries, both worn by ordinary people and as a typical/symbolic garment worn by the Virgin Mary. The topic has piqued my interest, and there is much more to explore…
And if you make one, I’d love to hear about it!