Separate cloth-cut hose in fulled, tabby-woven wool, suitable for a man from the 12-15th centuries.
Hose were worn by both women and men throughout the medieval period across western Europe in various forms, with a few variations in the cut around the foot. These styles were worn from the 12th century (possibly as early as the 11th century) and into the 15th century.

Research & Development
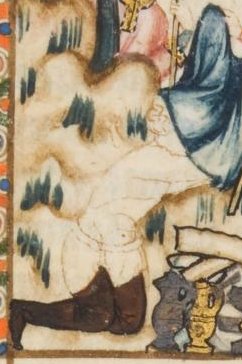
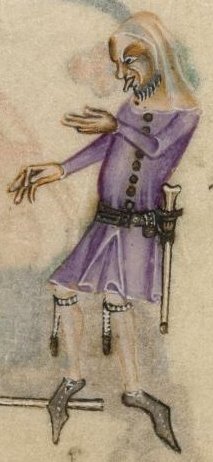
Images of men’s hose are common in medieval manuscripts and artworks, showing separate hose to mid thigh, with the point tied up to the breeches girdle (the tape or cord holding up their linen breeches) with cords.
Source: The Morgan Library
Source: The British Library
Although joined hose became common for the upper classes in the 15th century as fashionable tunic hems rose in the 15th century, separate hose remained in use by the common man in many countries, as can be seen in these images.

Source: The Morgan Library

Source: The Morgan Library

Source: Staatliche Museen zu Berlin
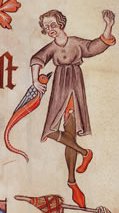
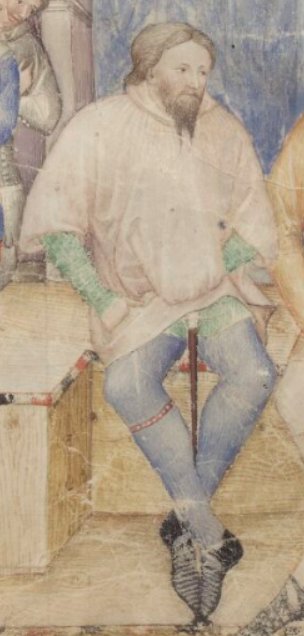
Some men wore garters beneath their knees as additional decoration or to improve the fit, as can be seen in the Lutteral Psalter image. Garters were also used to support the hose when they were rolled down in hot weather, to provide freedom of movement, as seen in the Van der Weyden altarpiece.
Unlike earlier styles of hose, pictorial and archaeological evidence show that medieval hose were cut on the bias of the fabric, which provides some natural stretch. The 12th century Winchester Bible includes illuminations depicting diagonally striped hose – easy with a bias cut (and very difficult otherwise).
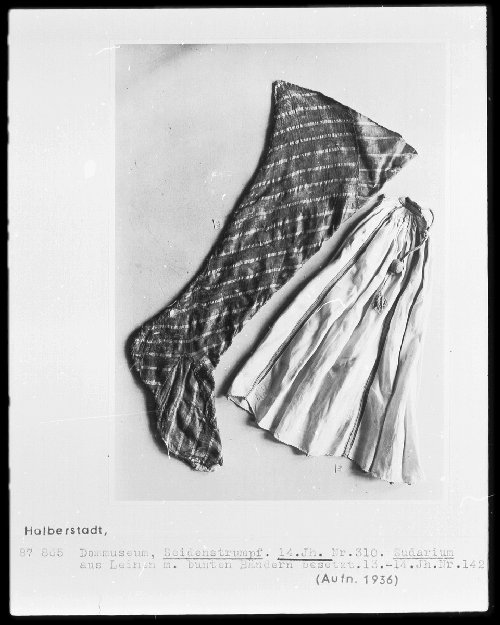
An extant example of ecclesiastical hose in silk shows the same diagonal stripes, together with some piecing to make the best use of the fabric. The cut over the instep on these silk hose is the M style – one of the typical cuts from this time.
Textiles and Clothing (Crowfoot et al 1992) depicts several hose fragments from the late 14th century London showing some variation on the shape over the instep – a slight M shape and a simple arch. The M shape is also seen in the mid 14th century Bocksten Hose (Coatsworth & Owen-Crocker 2018).

Source: The Morgan Library
Source: Germanische Nationalmuseum
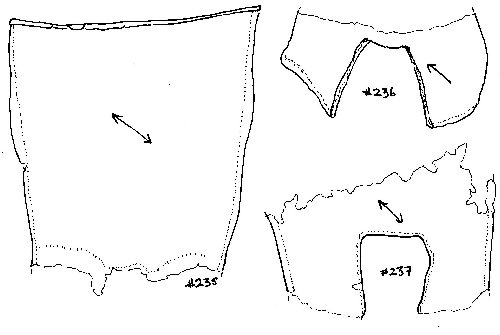
Illustration: Robyn Spencer, after Crowfoot et al (1992)
Although the London finds probably shows the remains of a woman’s hose (since the hemmed top edge would have been knee high), similar foot shaping has been found in other extant examples which are clearly men’s hose.


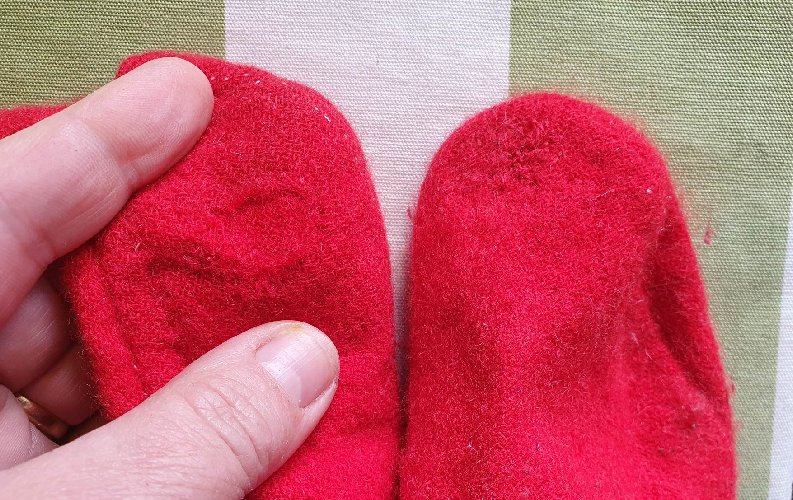
These extant London wool hose remnants were sewn with linen thread, with many fine stitches. The seam over the arch was worked as a simple overlap seam with no turnings – a seam type that appears to be unique to hose. Although less strong than a run-and-fell seam, it minimises lumps and is more comfortable.
The back seams were worked in fine backstitch, which provides both strength and give. The seams were not finished, but left raw. The seams were opened flat and sewn with a running stitch to keep them in place and minimise bulk. Because this seam is on the bias, there is very little fraying – even on linen hose.
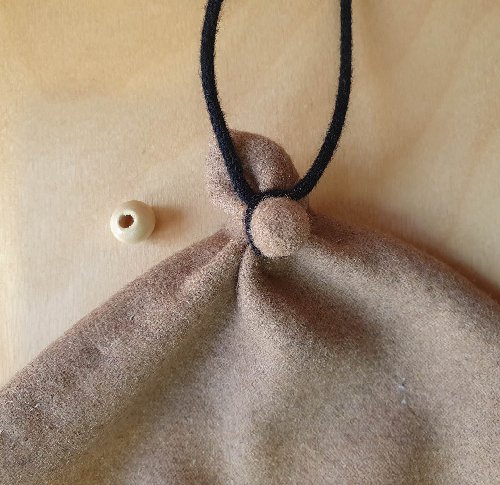
The top of men’s hose are subject to a lot of strain, so using a lacing hole to tie them up can lead to tearing out. A stronger solution is to tie a lace around a small bead, which spreads the load and creates the slight gathers seen in many images.
Garters
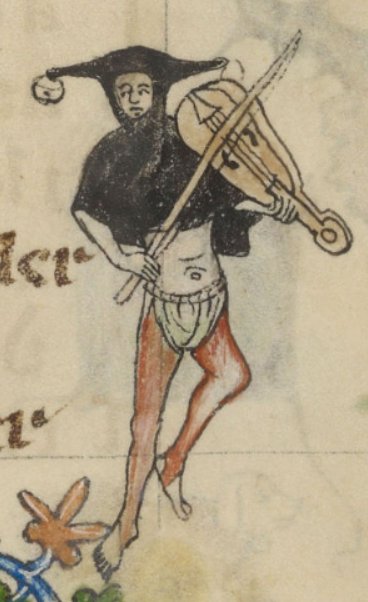
Although their hose were tied up, men sometimes wore garters to improve the fit below the knee and reduce bagging, as seen in these examples below. As single garter might be worn for decoration, such as depicted in this Guiron le Courtois manuscript.

Source: British Library
Source: British Library
Source: BNF
Men’s garters were often depicted as miniature belts of leather or textile, with small buckles and sometimes decorative mounts, as seen above. Small buckles and mounts are common finds in medieval archaeology, which may have been affixed to garters.
The Museum of London also holds several late 14th century woven garters, all woven on a band loom in red and black wool, with integral decorative scallop fringing. The bands vary in width from 8-15mm, with additional fringe of 7-10mm. The example shown above would have been worn with the fringe down.
Patterning
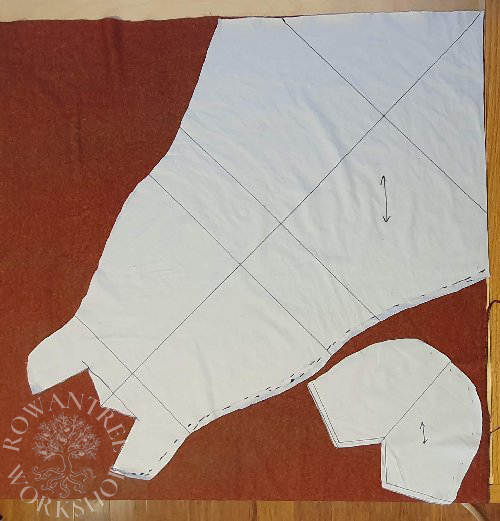
Hose can be tricky to pattern, because they have to be large enough to pull on, yet fit well without wrinkles. This style of hose can be patterned based on measurements of the foot and leg, using plain fabric on the bias to make a toile (test run). This approach gives you a custom fit – regardless of your shape and size.
I have created detailed step-by-step instructions for patterning your custom hose, available as free PDF download:
How to pattern Men’s Medieval Hose
(Patterns are also available for medieval women’s hose and 16th century hose.)
Construction
NOTE: This series shows the construction process for men’s hose with a simple arched instep, once the pattern has been developed and tested. The M style variation is detailed at the end of the process.
Well-fulled tabby-woven wool is ideal for these hose, although you can also make them in worsted wool or solidly-woven linen. It’s important to wash your fabric as you plan to wash your hose. If you get any shrinkage, wash the fabric a couple of times.
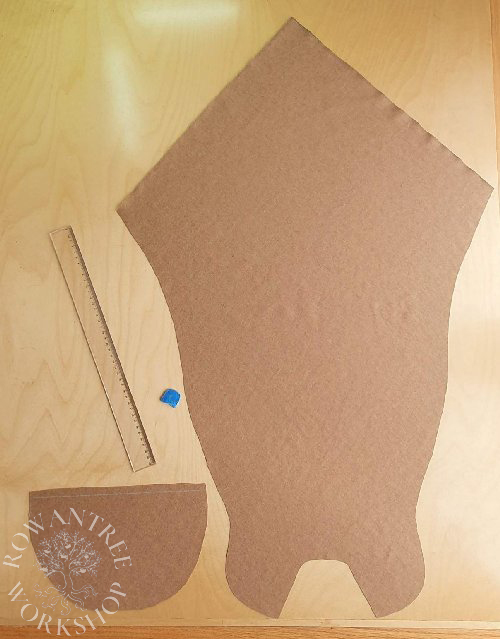
Once the test run is working well, I lay out the pattern on the wool on the true bias. Cutting on the bias is very inefficient, but cutting several pairs of hose at once does reduce the waste. The sole sections can be fitted in around the main pieces. Keep some scraps for patching!
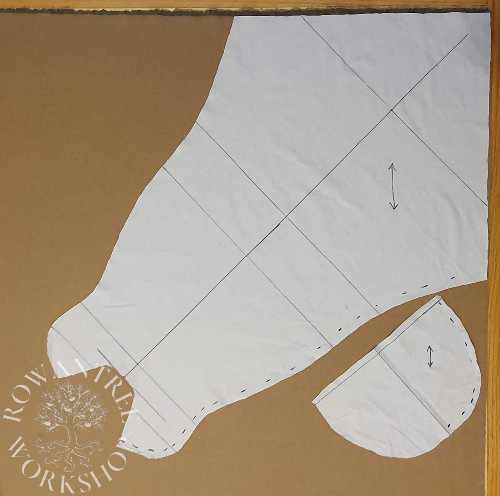
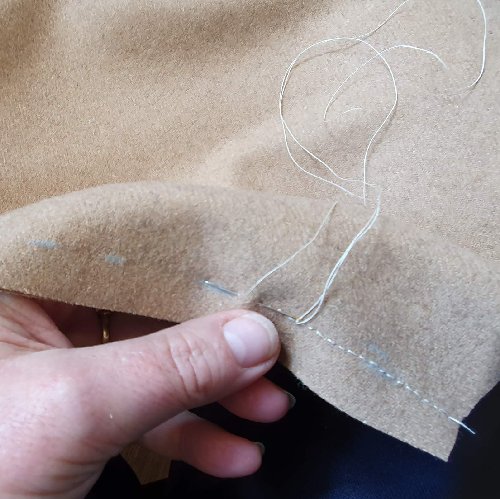
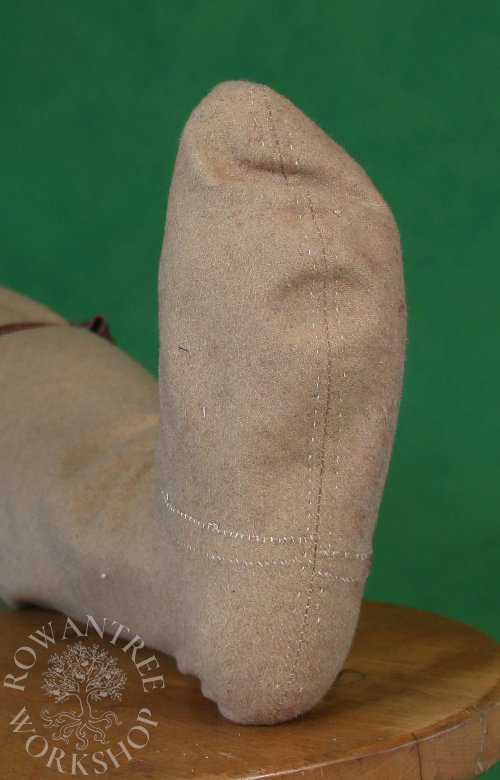
The first step is to sew the arch seam. Mark a 1cm line along the straight top the foot section and mark the middle. Slip this under the arch in the leg section and pin the middle at the line. Baste (or pin) the edge along the marked line.
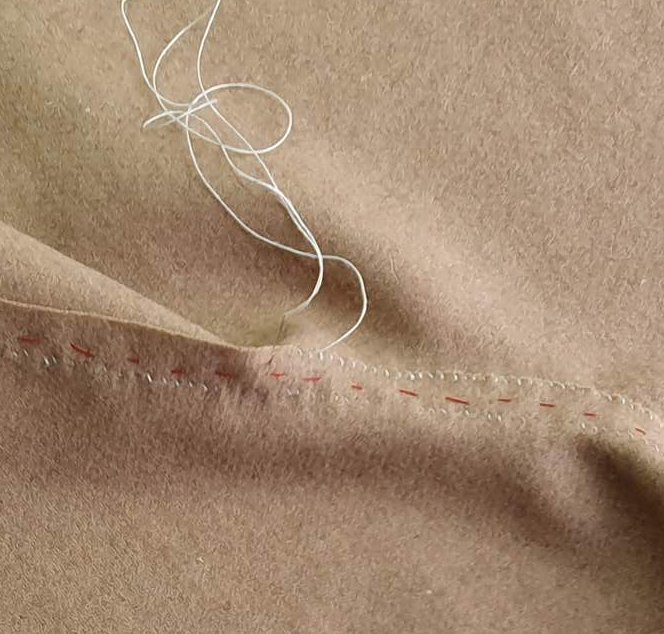
Sew over the raw edge with many small firm stitches (about 2mm apart). I’ve used fine waxed linen thread (as per the finds) but you could use a matching thread. Turn the piece over and sew more small stitches over the other raw edge, making an overlap seam, then remove the basting.

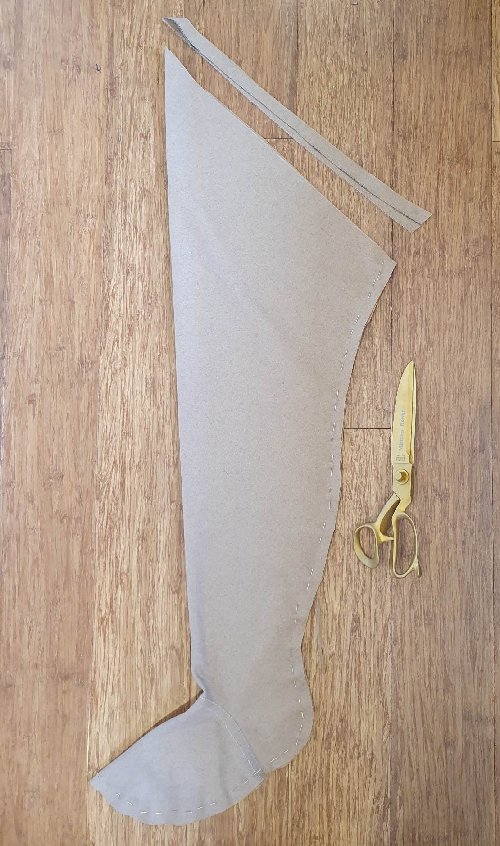
Because each fabric will have a different amount of give, you may need to adjust the fit before sewing. Right sides together, pin down the back seam all the way to the toe.
Carefully try the hose on, tying up with a garter (or piece of tape) under your knee. Make sure the arch stays at the instep – if it moves down the foot, you will get ankle wrinkles.
Working from the heel forwards, adjust the seam under your foot for a comfortable fit, then work up the calf and thigh. It should fit nicely but not tight, with a little pointed bit at the toe. Make sure the top is clear of your groin – trim if needed.
Check you can still get it off over your foot (if not, move the pins until you can). Mark any changes and trim to 1cm seam allowance.
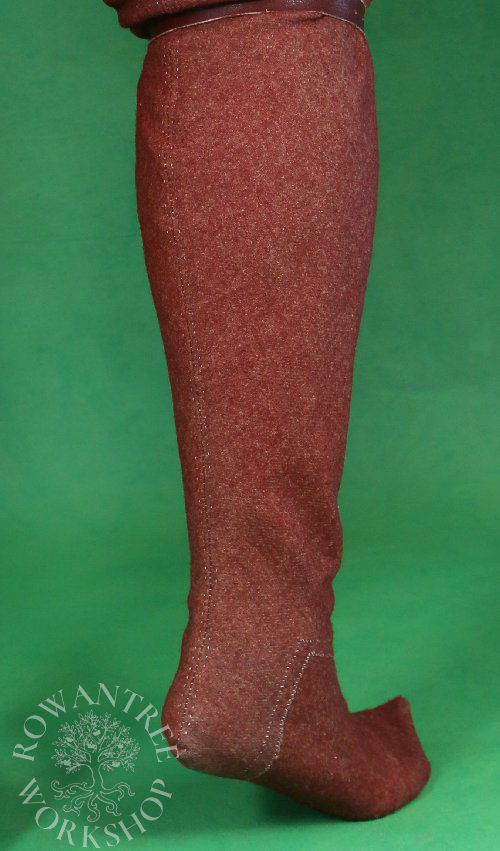
This back seam needs strength and a little stretch. In line with the historic examples, I have sewn this in backstitch with waxed linen thread (3mm stitches). You can also sew this seam by machine using a long narrow zig-zag, (1.8 width and 3.5 length works well). Trim seam allowance over the heel to 7mm.
The historic examples show that the back seam was not felled down but left raw, with a row of stitches on each side of the back seam to keep the seam flat. I sew a row of small running stitches 2-3mm from the seam on each side, pausing every 5cm or so to stretch the stitches and add a lock-stitch. This ensures the seam still has some ‘give’ when in use.
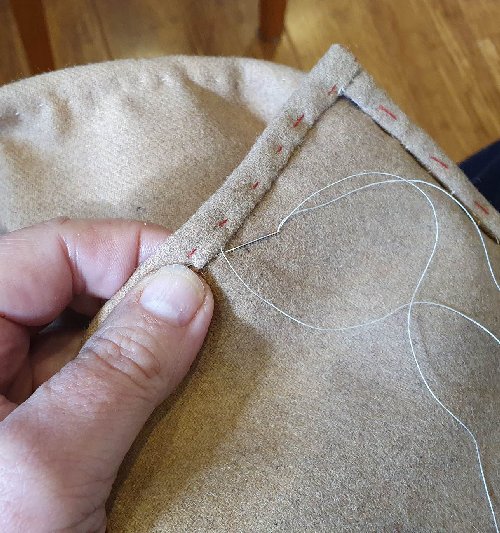
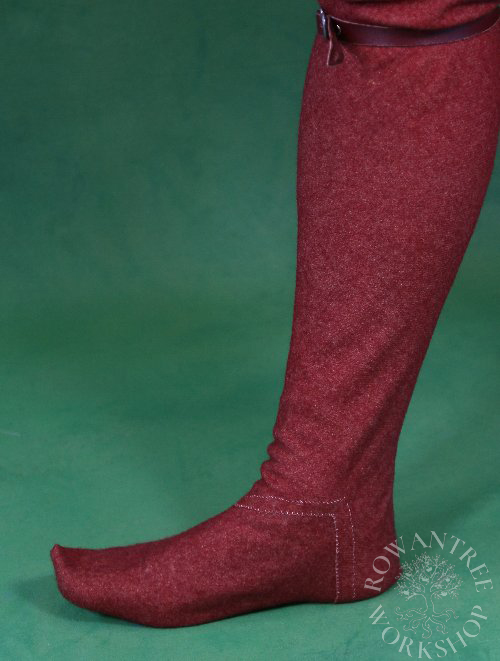
Finish the top edge with a simple hem. Turn a single hem for heavy wool, or double for lighter fabrics (and for anything that might fray). Slip -stitch the hem down (about 5-8mm, depending on the fabric).
Finally, add points for tying to your breeches girdle. These will break eventually, so they need to be replaceable. The easiest solution is to take a small bead and place under the wool in the top corner. Tie a lace around it, leaving both ends free to tie to your breeches girdle.

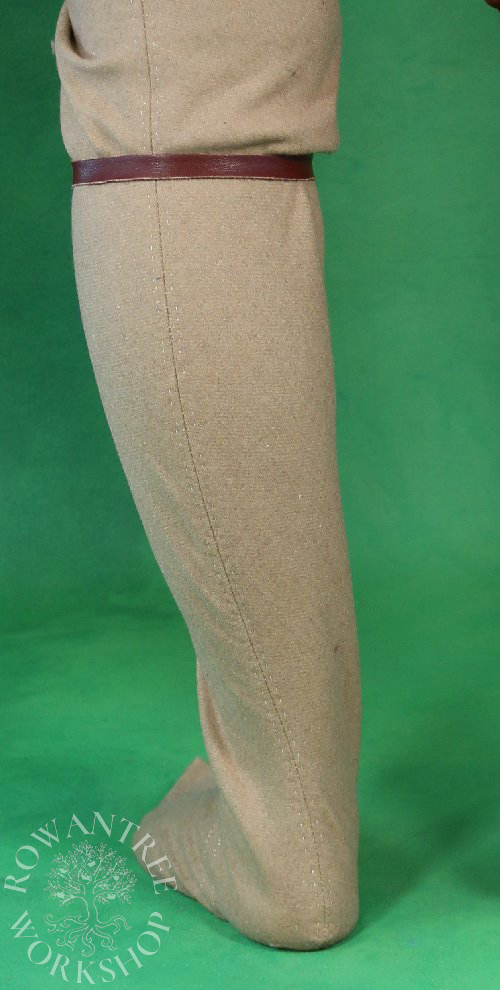
The finished hose fit well – especially with a garter under the knee.

M style version
As with the Arched style, the first step is to lay out the hose on the true bias and cut out the pieces.

Mark a 1cm line along the M shaped top the foot section. Slip this under the M shaped arch in the leg section and pin the middle at the line. Line up the top edge along the marked line and baste (or pin well).
Sew over the raw edge with many small firm stitches (about 2mm apart). I’ve used fine waxed linen thread (as per the finds) but you could use a matching thread. Turn the piece over and sew more small stitches over the other raw edge, making an overlap seam, then remove the basting.


Pin the back seam and follow the instructions above for adjusting the fit, sewing the back seam and finishing off the hose.

Other fabrics
You can also make hose for hotter weather in worsted wool or dense linen.
These fabrics fray, so do a test of the instep seam using scraps of the fabric – you may need to turn the edge under before you whip it down. If so, add 5mm to the top flat edge of the foot piece and make the overlap 1.5cm. Baste in the middle of the overlap, then turn under the edges by 2-3mm and sew down both sides.
Afterthoughts
Hose are some effort to make, so it is worth patching and/or darning to keep them in use – much less work than making a new pair. I use a fine wool mix thread (Madeira) for darning small holes, working over a wooden darning egg or mushroom.
Crowfoot et al (1992) notes that the London finds included several elliptical, bias-cut pieces of wool with stitch marks around the edge, which were probably patches for the toes and heels of hose – the areas that always wear out first!
My patches end up similar shapes – I cut them by eye to match the hole and a margin, then whip them on with the same fine wool thread I use for darning. Then I whip around the hole, making an overlap seam. The patches felt in well after the first use, and don’t feel lumpy.