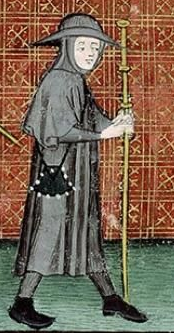
Originally a pilgrim’s hat seen in many colours, the galero developed into the red hat worn by church cardinals.
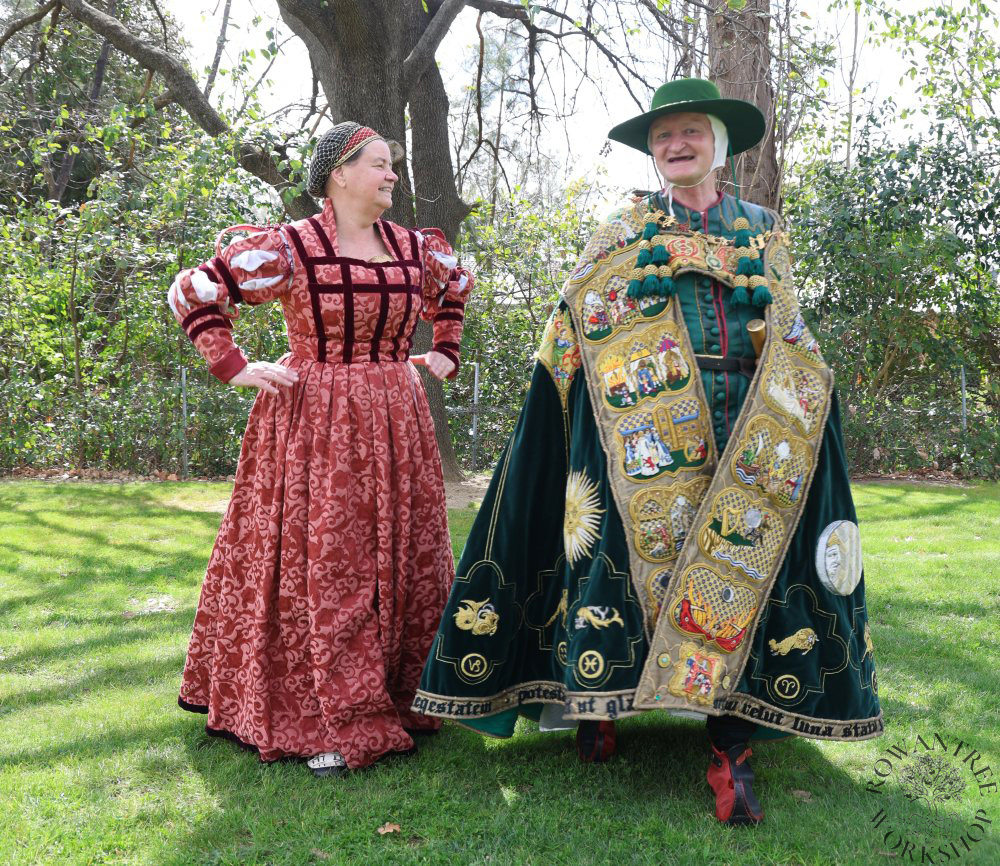
This hat was requested by my friend Maelgwyn (Graham Crawford) to go with an embroidery project he has been working on for years – a magnificent cope worked in splitstitch and laid gold, in 15th century style.
Although the 15th century cardinal’s galero was typically red, he requested a green version, with gold highlights to compliment the decoration on the green and gold cope.
Research and Design
Even though this piece is ‘inspired by’ rather than a faithful reproduction, I still want to base it on historical evidence.
The Galero was originally a practical traveller’s hat worn by ordinary pilgrims (especially in Italy and France), with a low crown, broad brim and a cord to keep it on, usually worn loose. The pilgrim’s hat came in many colours, as can be seen in the 13th-14th century examples below.
Source: BnF
In her Companion to the Early Modern Cardinal, Richards (2019) states that the privilege of wearing the red galero was first granted to cardinals by Pope Innocent IV in 1245, at the First Council of Lyon. However the cardinals’ costume evolved through the 13th to 15th centuries, only becoming consistent in the 16th century.
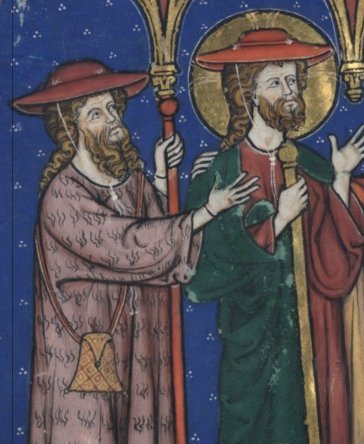
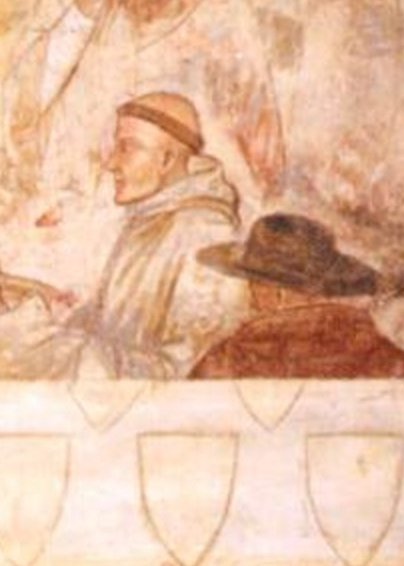
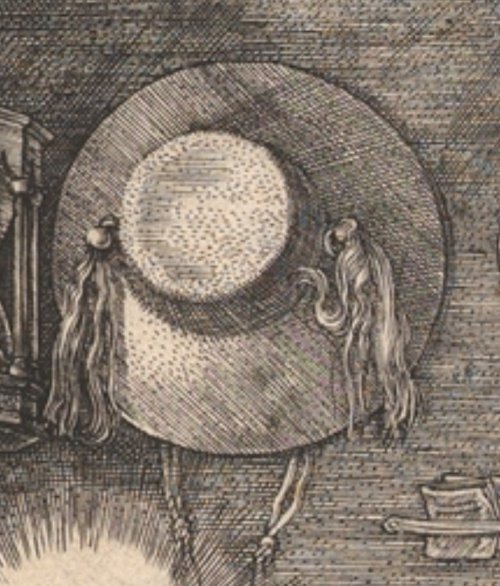
As is common in medieval art, physical symbols are used as identifiers, even when anachronistic. Saint Jerome (a 5th century theologian) is frequently pictured wearing a galero, or with one close by. The examples below show the form of the galero in the 15th and early 16th centuries.

Source: Wikimedia
_06_cappello_cardinalizio.jpg)
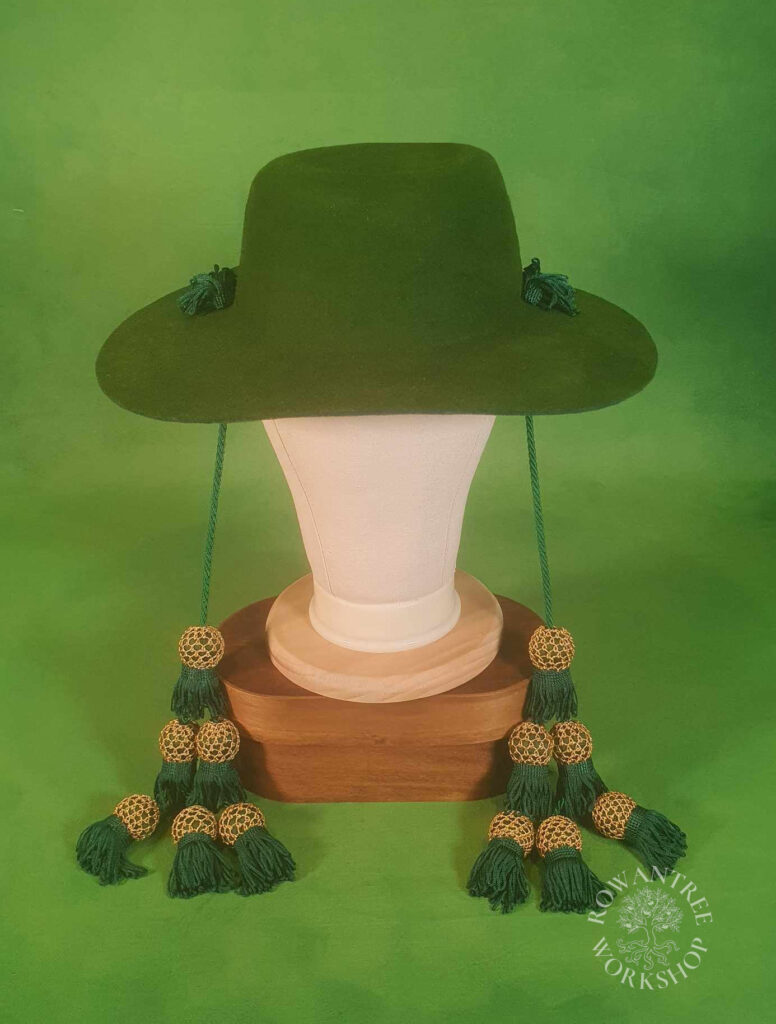
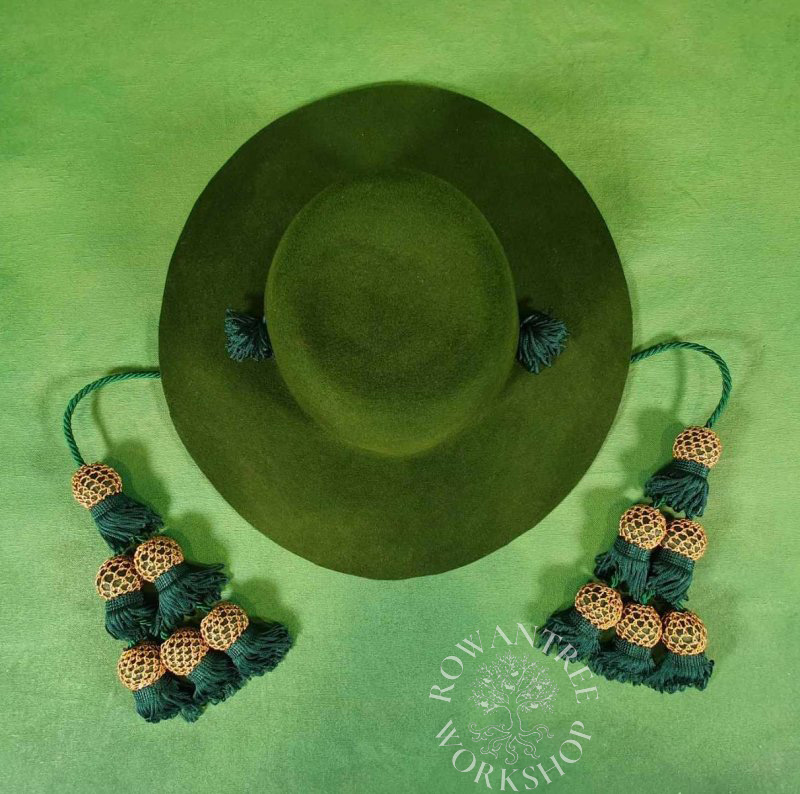
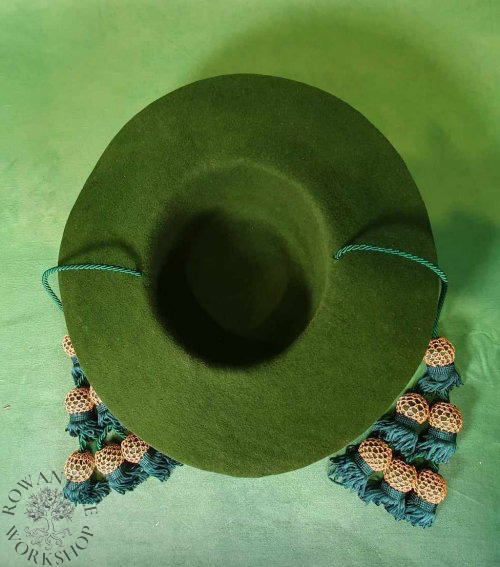
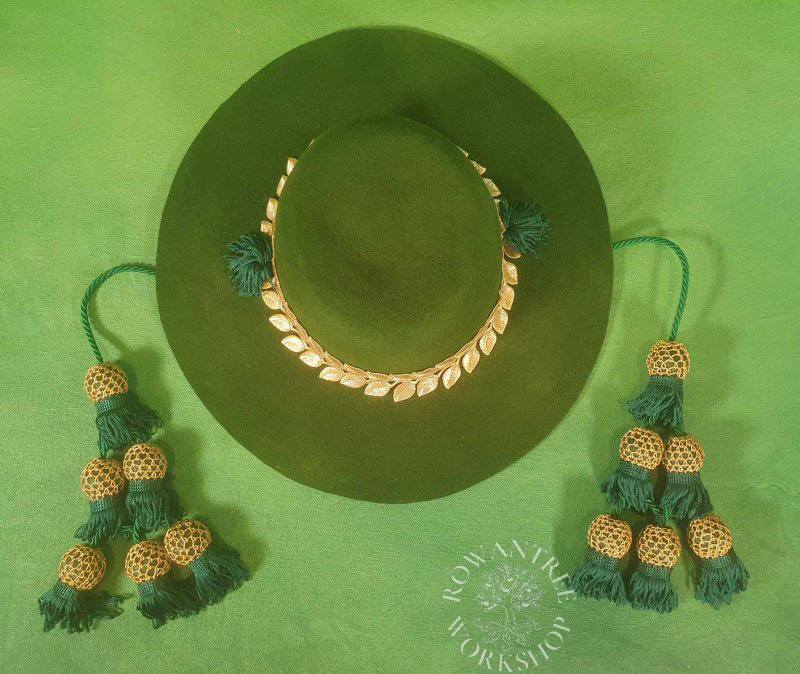
The hat depicted here is moulded from felt, with a low crown and a wide flat brim. The hat is held on with a cord that pierces the brim at each side of the crown, finished with a knot or tassel above the brim. The other ends of the cord may be plain, or end in one or more tassels. The heraldic Galero ends in 6 tassels each side, stacked above each other.
There are no extant galero from this time, so we can’t examine the tassels, but Cosimo’s Cappa Magna of the Order of St Stephen was held with woven silk cords 5/16″ in diameter and ending in tassels (Arnold, 2023). The top of the tassels are worked over a wooden base, decorated with diagonal netting in the same silk.
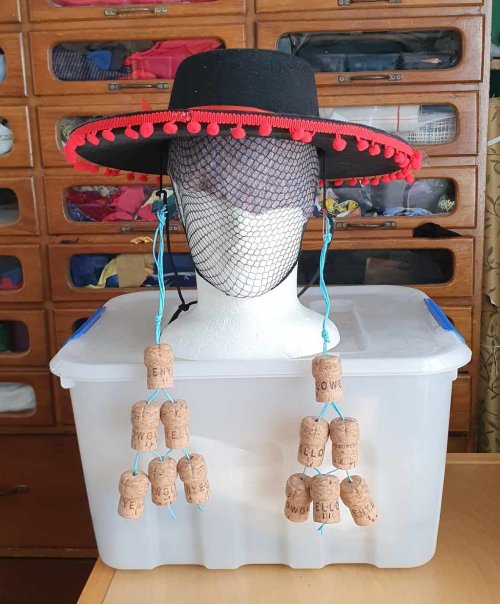
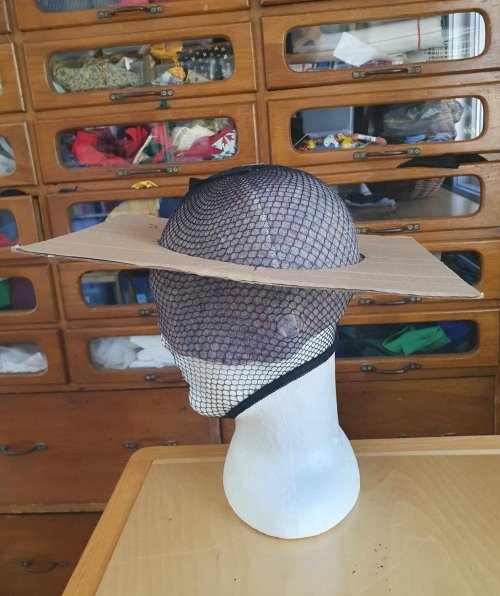
Maelgwyn wanted to take a picture of himself himself wearing the hat with the cope, so he could include an embroidered version on the actual cope, which presented a timing issue. I suggested he wear a stunt hat for the photo: a cheap party sombrero would give him the lines he needed. He went a step further and added champagne corks to stand in for the tassels!
He embroidered the image of himself wearing the hat and sent it to me.
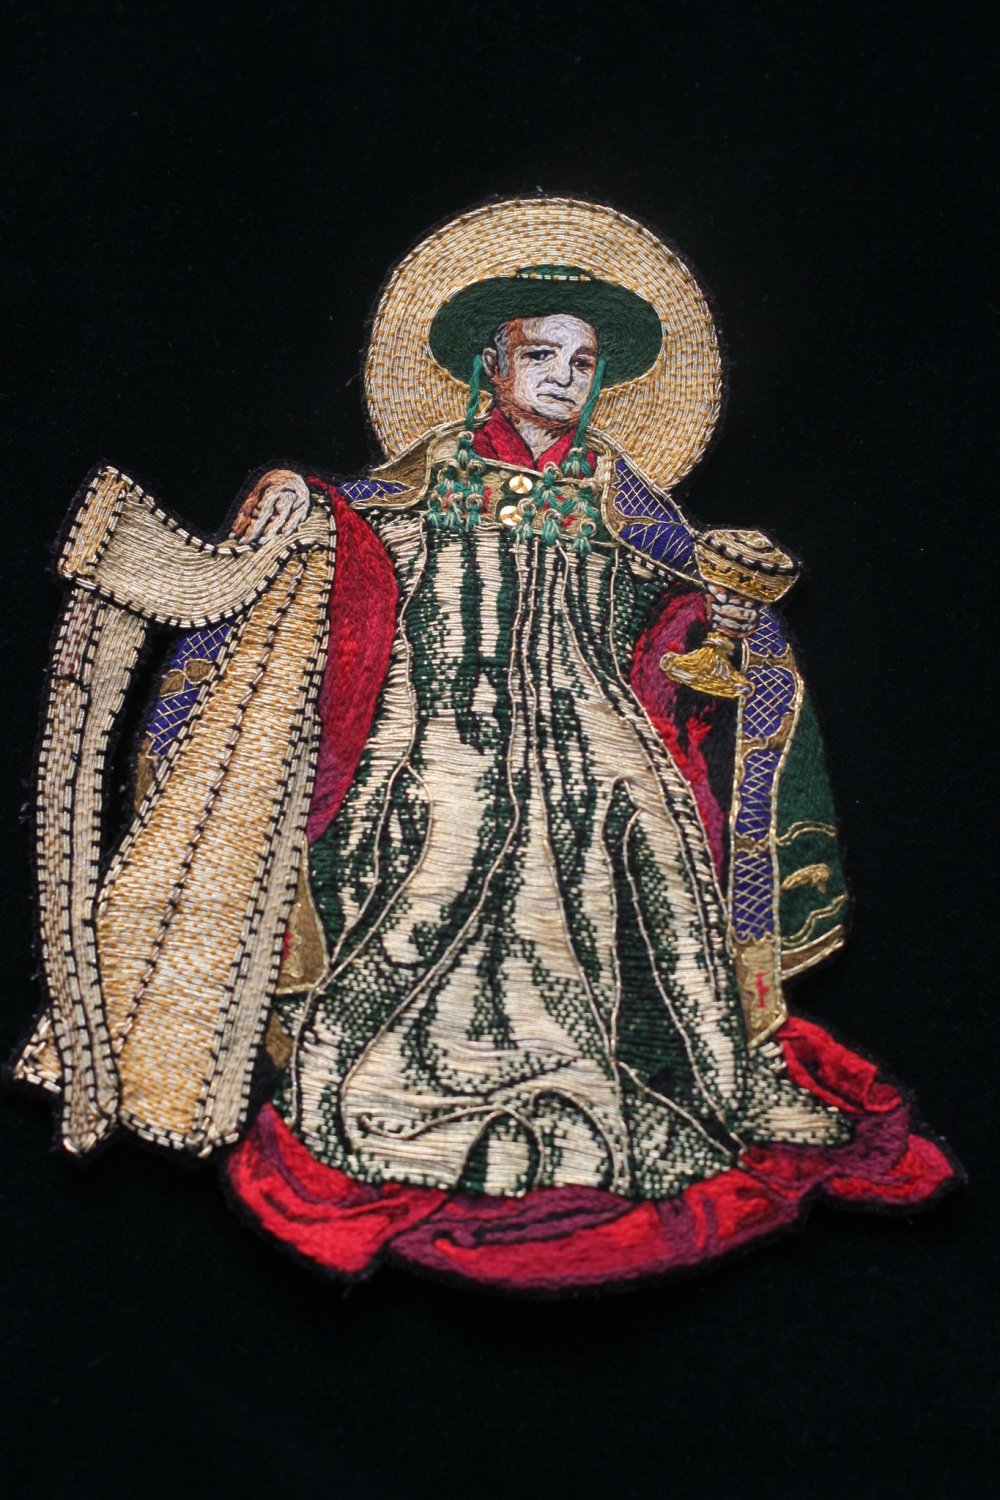
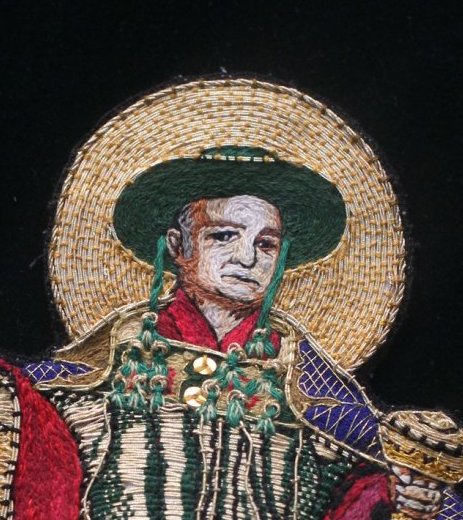
Now I needed to make a version of the hat that looked like his embroidery…
To replicate the hat, I planned to mould it from a felt capeline (a hat blank with a large brim). The original cords and tassels would have been made with silk thread, but I had to make some compromises. I’ll be making them from haberdashery items, so matching the green will be a challenge.
Construction
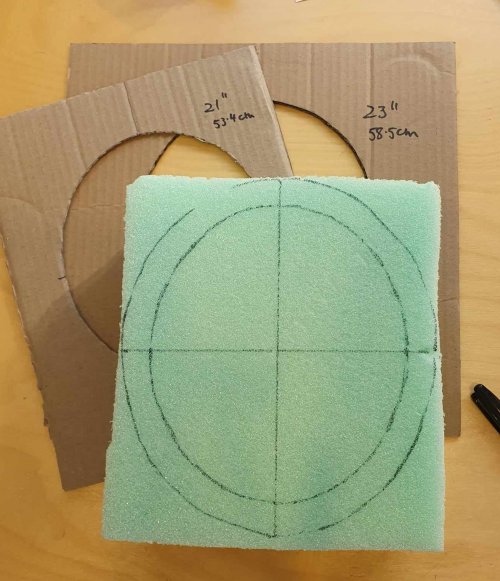
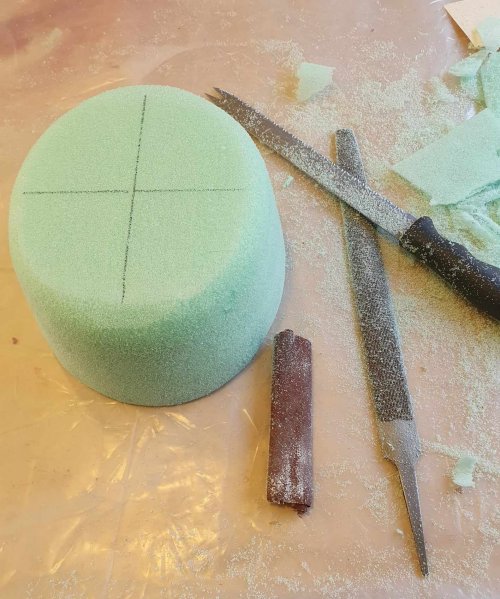
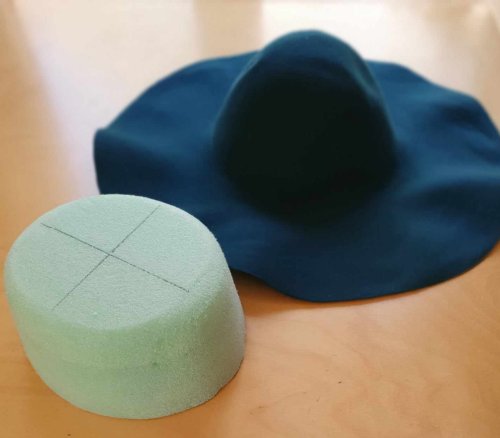
The first step was to pad up my headform to the right size. Then I tested my headsize templates to find the right one and made up a crown block in XPS foam. There was no need for a brim block, because it is completely flat.
Green felts are hard to find (unless you pay postage from the UK!). The closest I could order in Australia was ‘peacock green’, but when the capeline arrived, it was more like petrol blue. Sigh. Then a friend suggested I use the food colour dyeing technique I use for wool – great idea!
Since it was going to come out of the pot hot and wet, I set up the hat block ready to go, and prepared some dilute hide glue (1:15) to stiffen the felt.
I dyed the felt with yellow, which gave me a lovely bright green – perfect. I gave it a hot rinse, squeezed it gently and then brushed the glue onto the inside the wet felt before pulling it over the prepared block. I brushed some more on the top of the brim and worked it in well with a stiff brush.
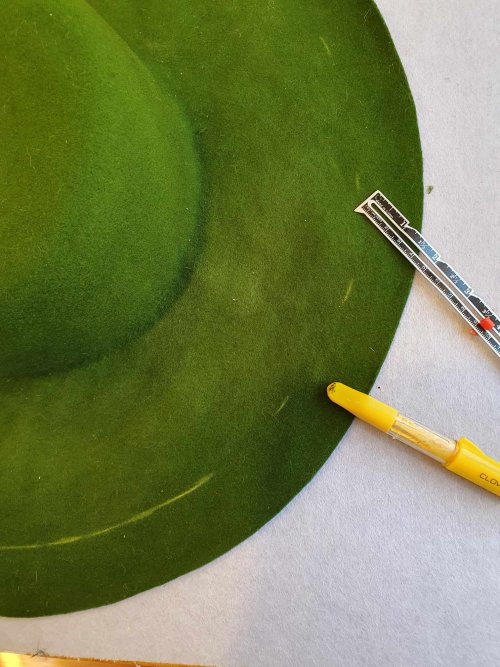
I added an elastic band and some weight bags to the crown and brim to help shape the felt and set it to dry overnight. Once the brim was dry, I eased it off the block so the crown could dry too. Once completely dry, I measured and trimmed the brim, then re-steamed the brim to flatten it.
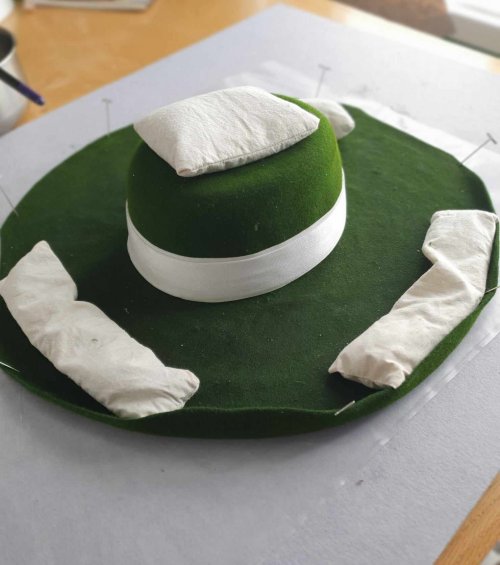
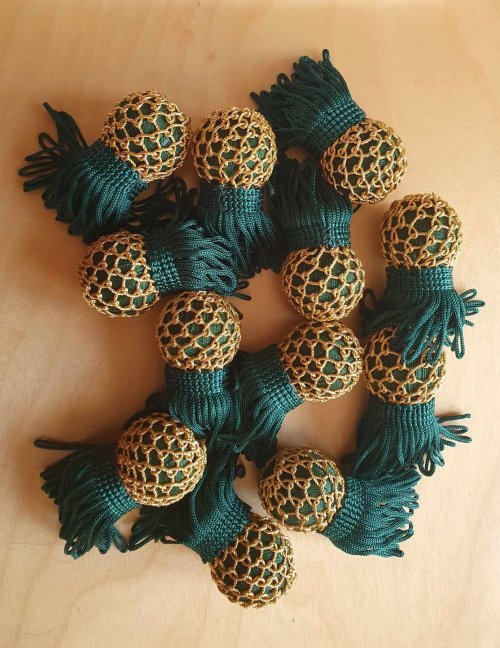
On to the tassels. These need to match proportions of the wine corks Maelgwyn used for his mockup – short and fat!
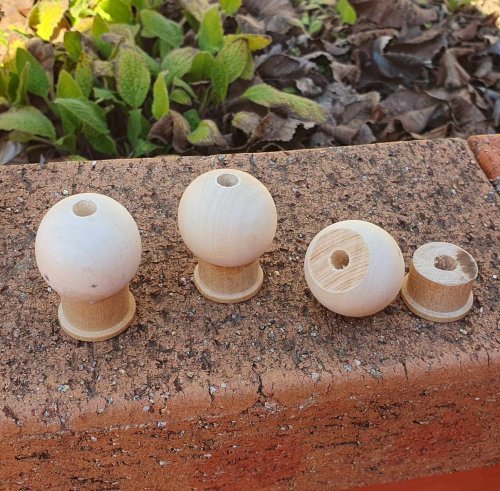
Extant tassels were made with silk over a wooden mould to shape the tops. You can buy tassel moulds, but they are expensive and I need 12. I could turn them on the lathe, but it’s hard to make them match, so I made some using large wooden beads and mini cotton reels from a craft store.
I cut the reels in half, sanded the beads flat on the base and glued them together. I drilled the holes out larger, so the cord can go through easily. Making tassels is a new skill for me, so I painted the assembled moulds green in case my coverage is not perfect.
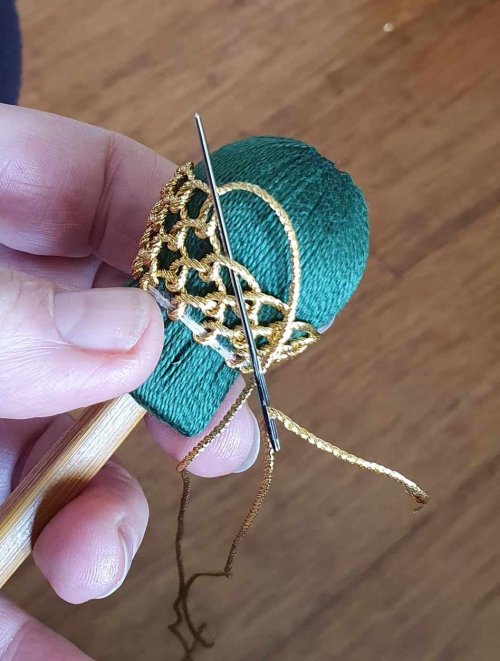
I rubbed them with beeswax for grip, then covered them using Gina-B’s satin cover technique.
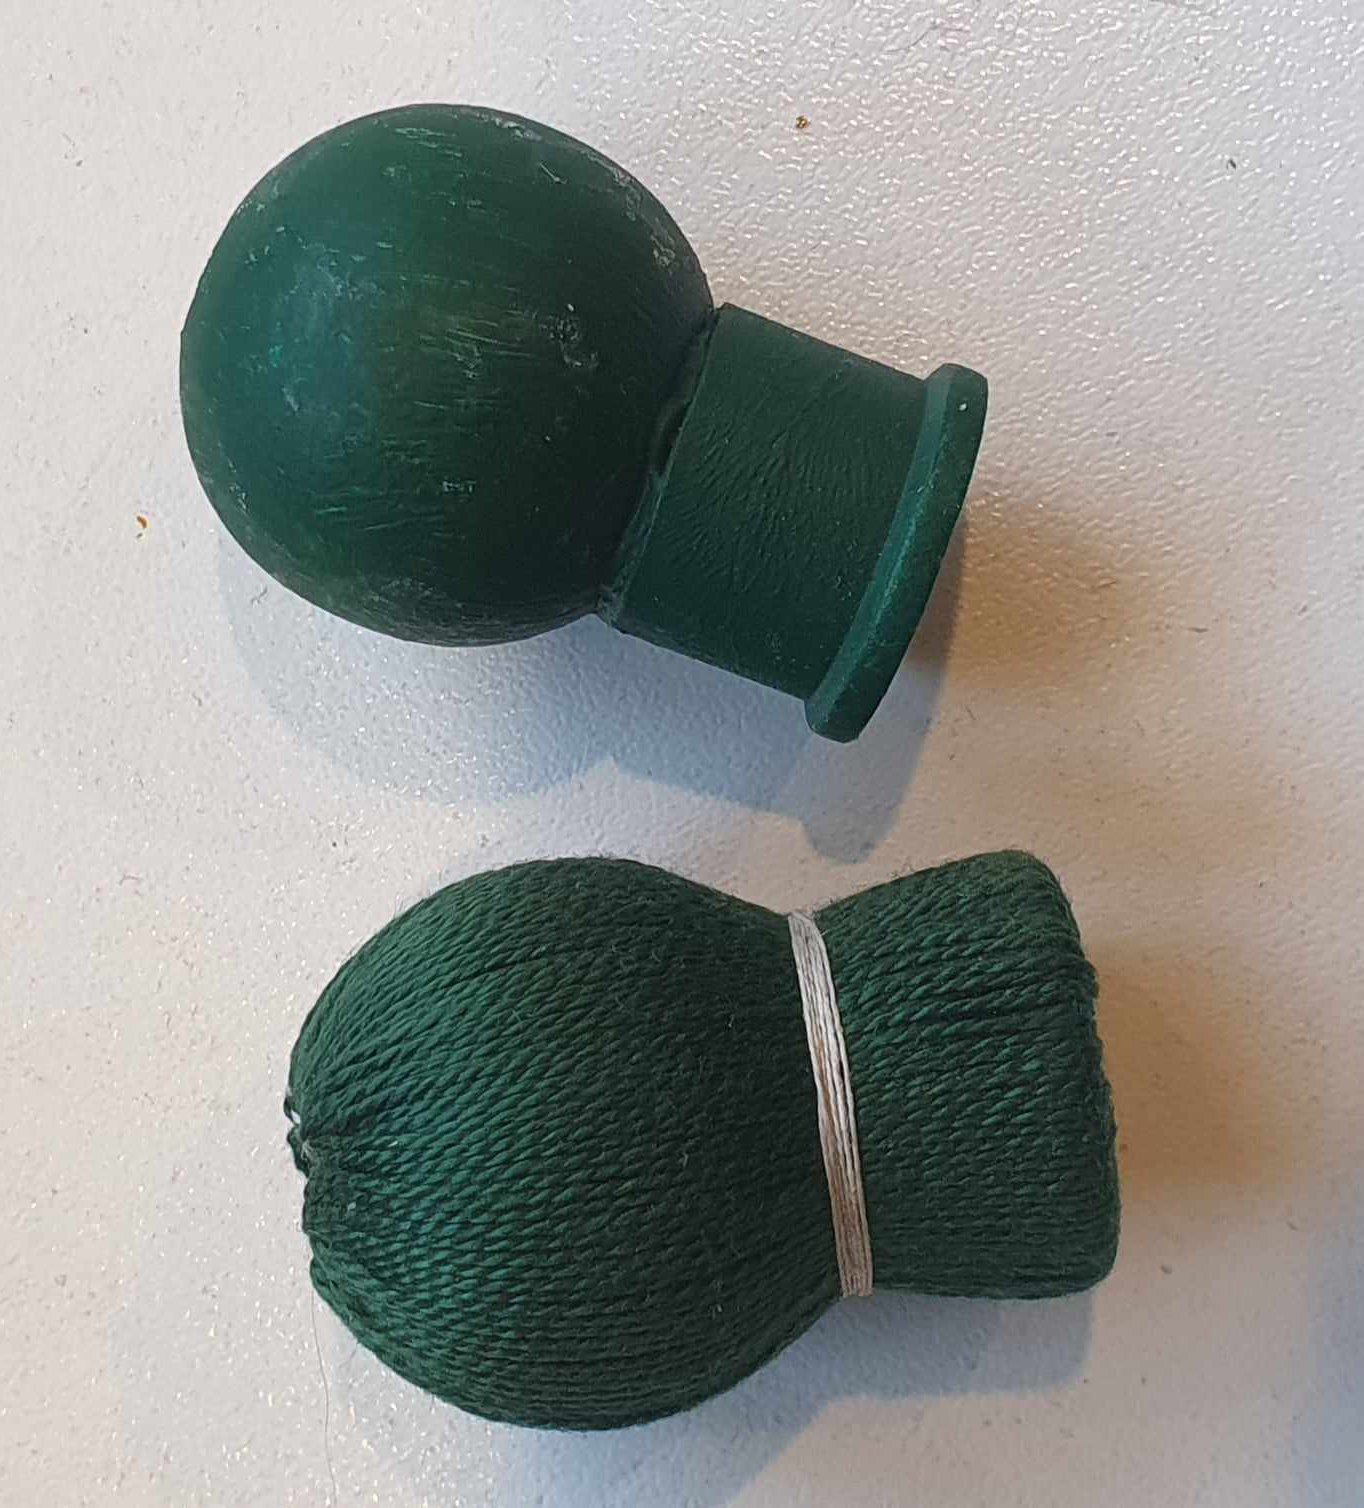
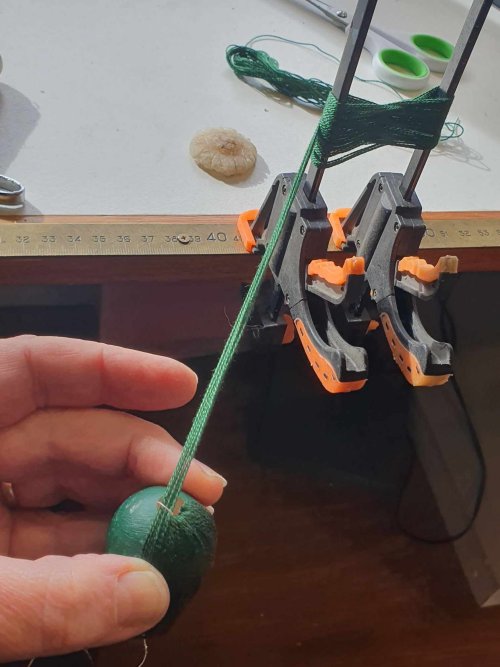
I made a warp of 8 threads of green perle cotton, then covered the mould, securing each wrap with waxed linen thread looped in the centre hole – this method leaves the hole free and uses less thread. I’d estimated I could get 3 tassels out of each hank of thread and it was just enough (just as well, becuase I could only buy 4 hanks)!
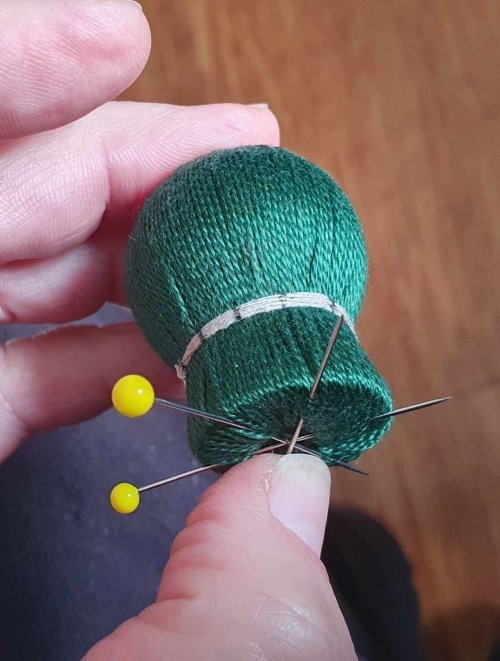
Next, netting the tops. Cosimo’s Cappa Magna tassels have netted tops in matching silk, but Maelgwyn wanted gold to match his embroidery. I tried a few different ideas to see what would work best: netting, macrame, and detatched buttonhole stitch (a feature on many 16th century purse tassels), using a variety of gold threads.
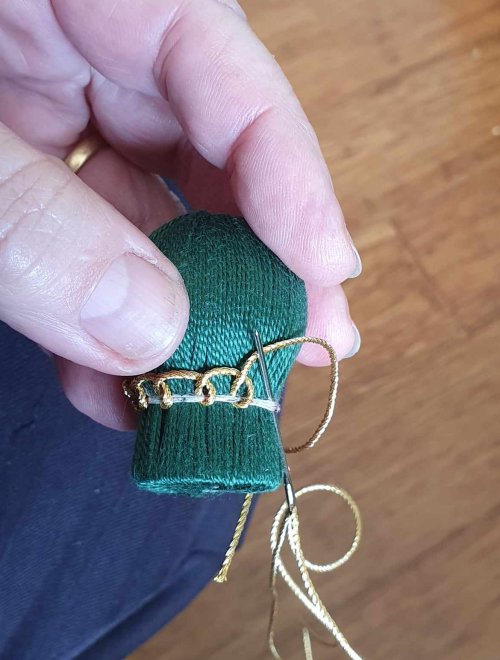
Detatched buttonhole stitch in stiff gold twist worked best, although my first trial was too densly packed. I marked the spacing on the linen thread at the waist of the tassel, then worked the first row into the threads. The remaining rows were easier, and the style makes it easy to compress the stitches at the top.
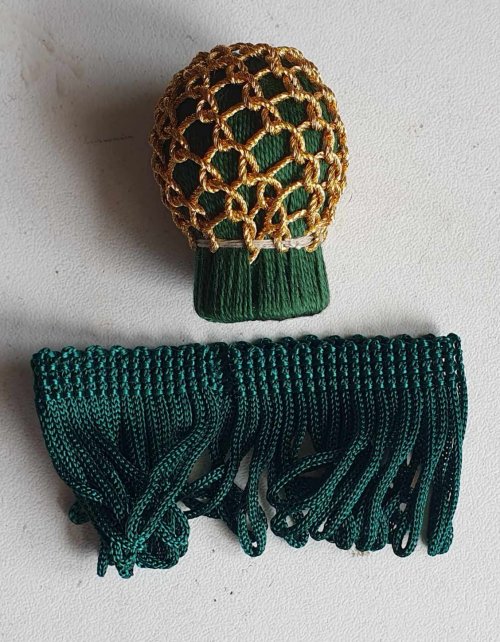
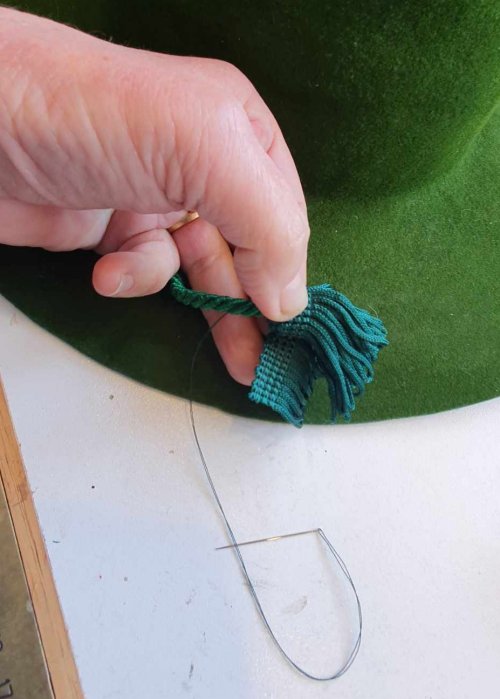
Finally the skirts. These tassels are short, so I’m using 2 layers of short rayon fringe, sewn around the base. By folding in the ends and sewing them together, I can get a neat result with no frayed edges.

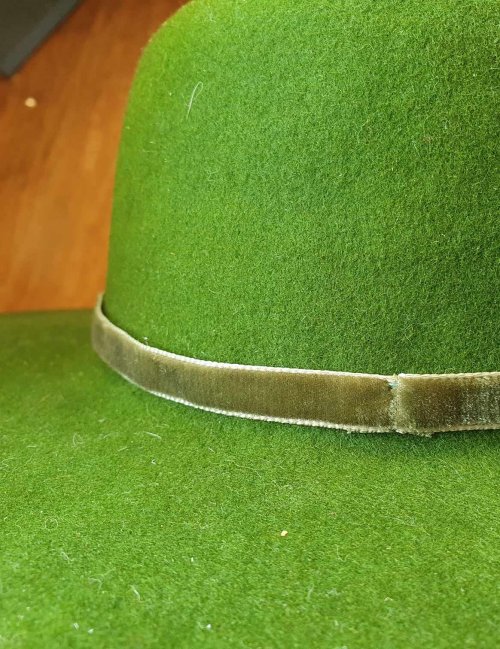
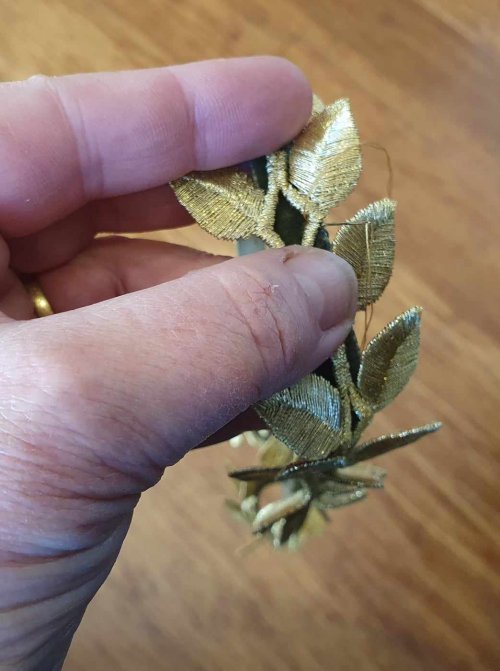
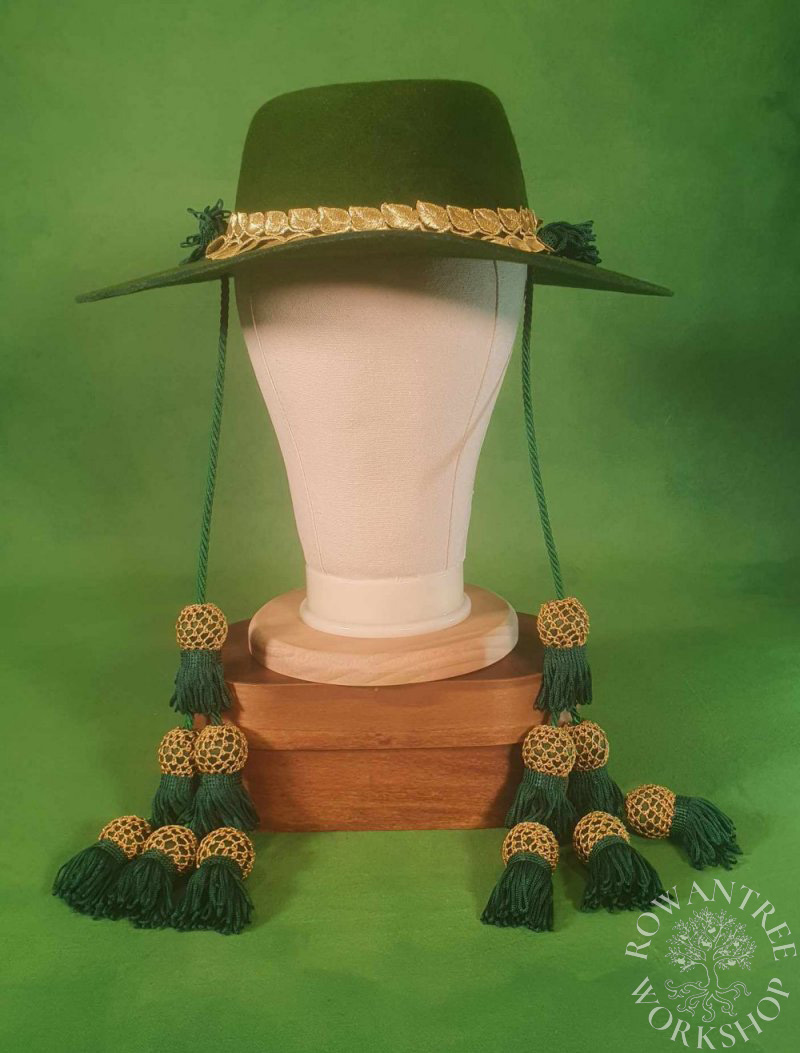
To match the embroidered picture, I wanted to make a gold hatband. It’s not a feature of the original galero, so I decided to make it removeable.
I had some commercial gold wreath braid, which was ideal for the task – and a nice ‘Laurel’ reference. I made the base from green velvet ribbon, then sewed the braid to this, allowing ease so that it sit easily around the crown.
I put the finished wreath in place and marked placed between the leaves, so I could thread the cords without disrupting the line.
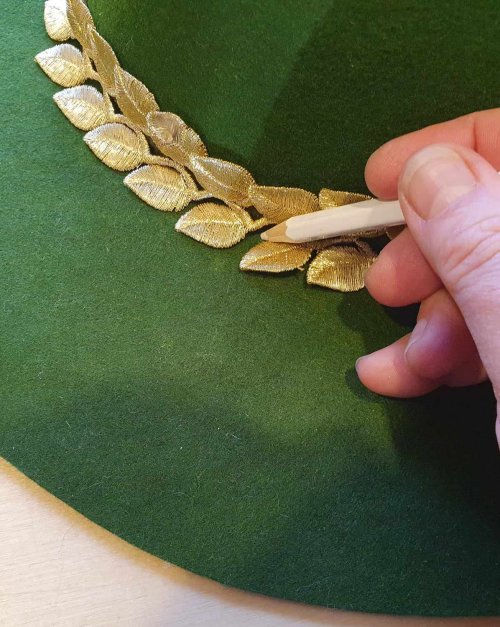
Time to add the tassels. I took off the hatband and punched small holes in the felt, then threaded the cord through.
The cord on each side divides into 2 and then 3, to support 6 tassels on each side. The wrapped cord makes it difficult to do this neatly. After experimenting with a few ideas (sewing, splicing, etc) I got the best result by un-plying at each junction, then plying in and sewing the ends of the new cords.
But I also realised that I needed to thread 2 cords through the middle tassel along the base. There was no way my 5mm cord was going to work! I found some 3mm cord, but it was too bright a green. So I dyed it using Dye-na-flow, set with a hairdryer. Onwards….
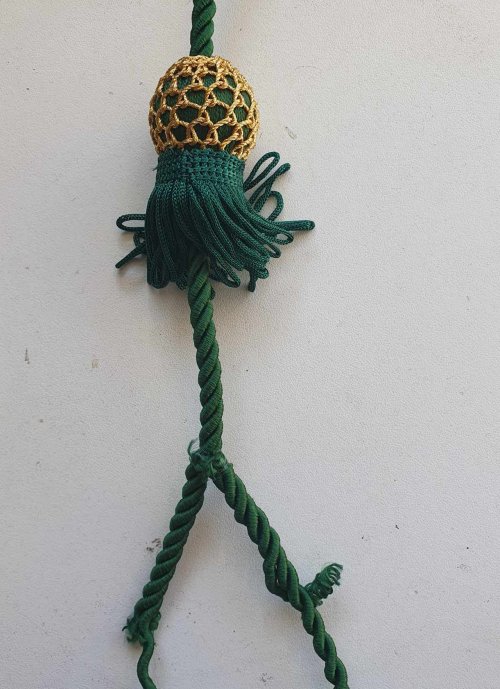
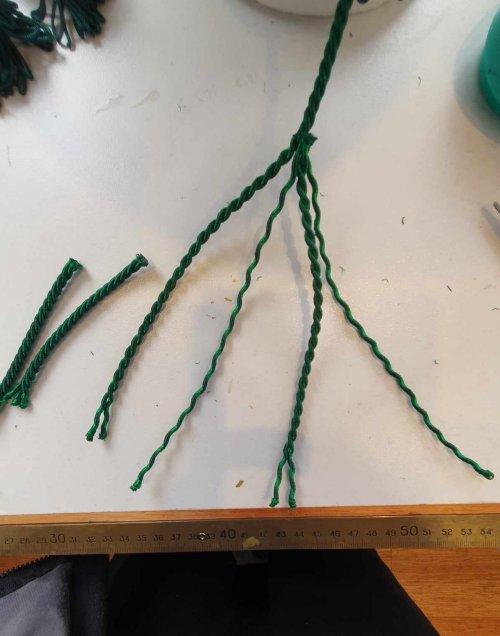
The tassels need to be evenly spaced and added between each division, so I marked each key point with a contrast thread tack, removed once they were all in place. Then I plied cords, sewed ends and threaded tassels to form the sets.
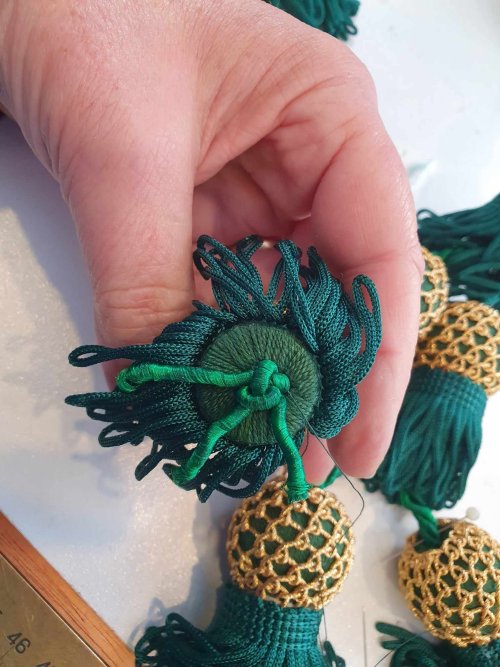
The cord was too stiff to knot neatly at the base, so I knotted the individual elements, sewed them together to secure the knot, trimmed them off and then dyed the resulting knot.
The top of the cord is also finished with a knot or tassel – a distinctive feature of these hats. A knot was not going to work, so I used more of the rayon fringe to make a simple tassel, winding around the end of the cord and sewing in place.
Finished at last – and in time to hand it over at the event on the weekend.
This hat was difficult to photograph because the tassels really need to rest against the chest to give the full effect, but it does look quite heraldic.
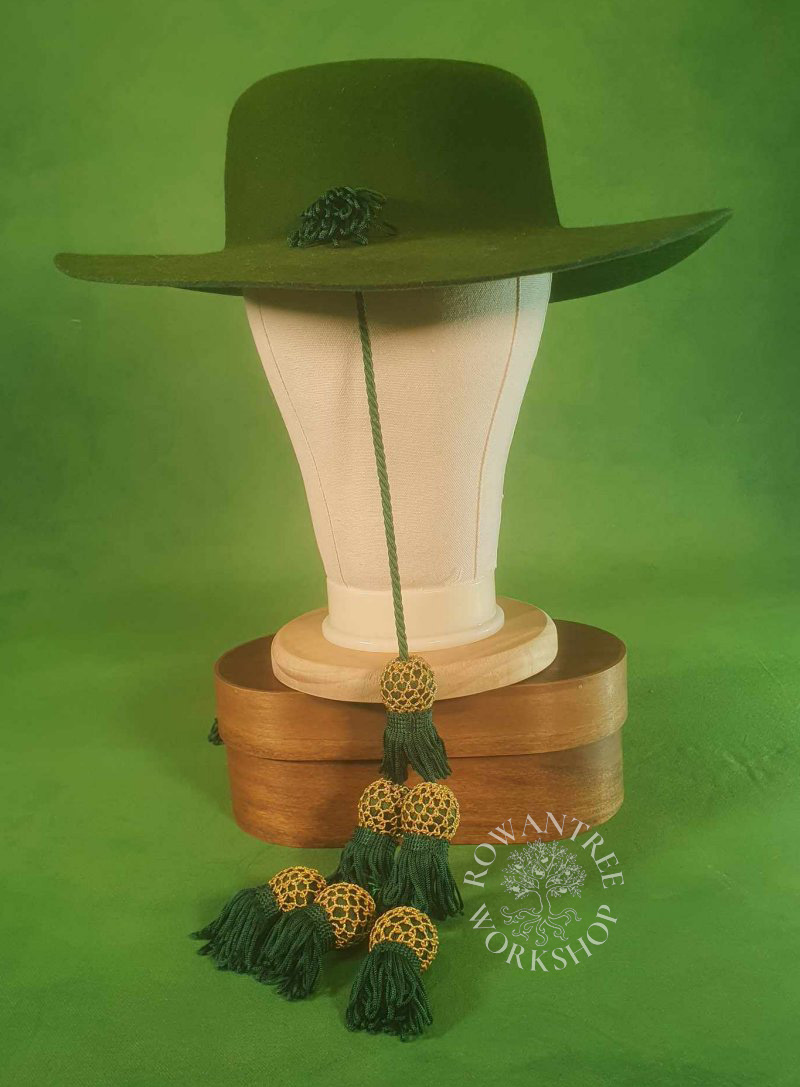
And with the addition of the gold wreath band, it certainly looks rich – not a stealth Laurel hat!
Maelgwyn was very pleased with his galero, and it really did set off his amazing cope. Once he has finished it, he plans to have another picture taken wearing both cope and hat, to match his embroidererd version (yet another iteration of life and art).
You can read more about his embroidery and the story behind the cope at his Silentium page.