

A pleated Goller (partlet) in very fine linen with an embroidered collar, suitable for an early 16th century noble German lady, or rich merchant’s wife. This project was one of those Learning Experiences…
When I finally finished my green velvet ‘Cranach’ gown a year ago, I knew that it really needed a very fine pleated linen Hemd (smock/chemise) or Goller (partlet) with white on white embroidery, to match my inspiration painting. But I was short on time, so I wore it with my pattern-darned Halshemd – the right style, but in heavier linen.
I thought about a fine Goller on and off, but had other too many things to do – until the same Midwinter event came around again and provided the incentive.
Hit with sudden inspiration, I searched my stash and found a couple of meters of superfine linen voile (1.3 oz/45 gsm) – perfect for this, and hopefully enough. (I wonder where I got it from?)
Research & Design
Zander-Seidler (1990) describes many types of Goller, including those in fine linen or silk, used to fill in the front of the Hemd (smock). Although it can be difficult to determine which specific name goes with which style, ‘Halsgoller’ was one of the known versions, and is a good descriptor for this high necked version.
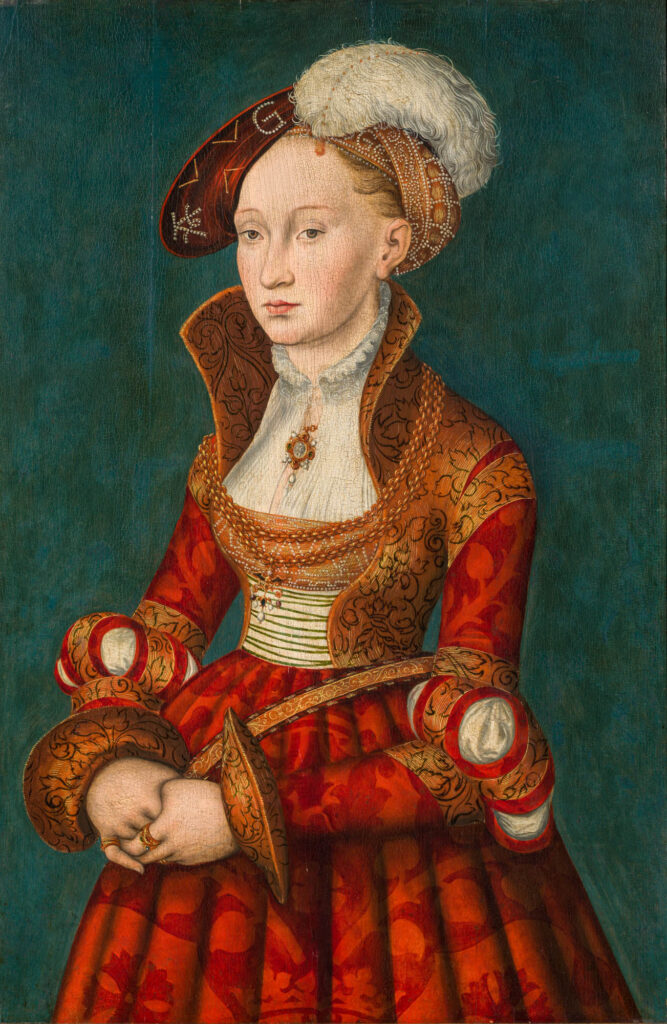
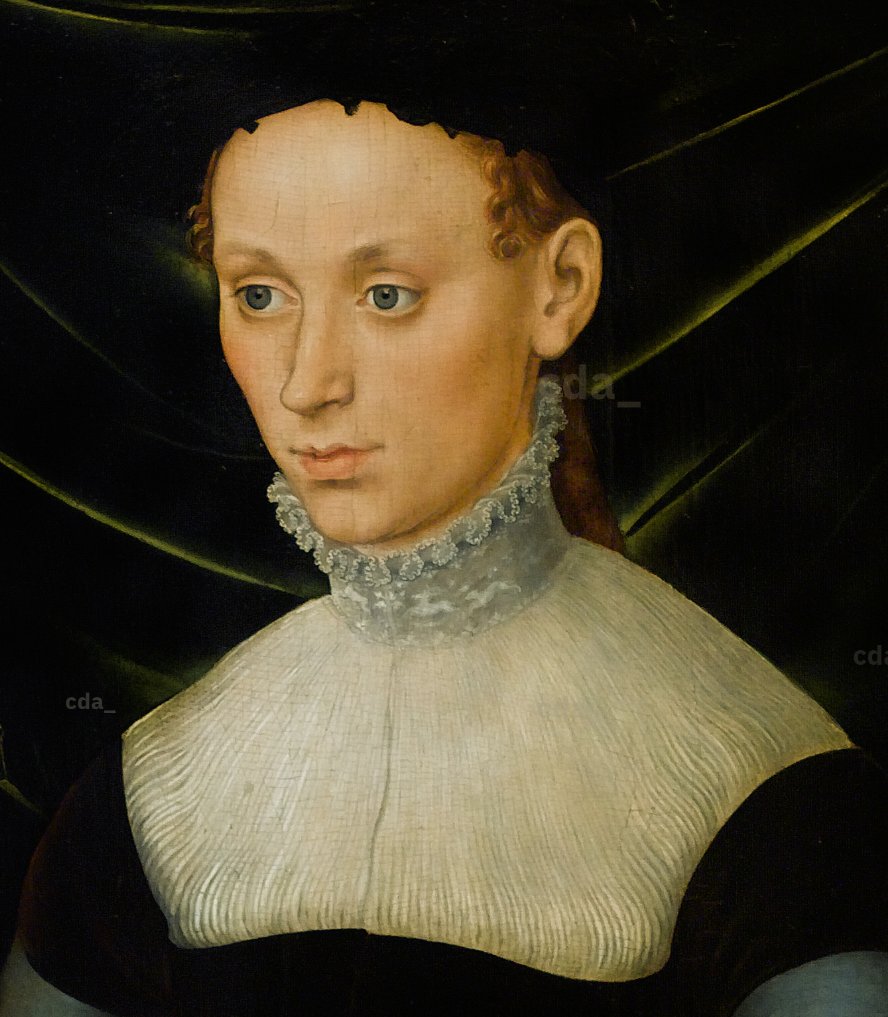
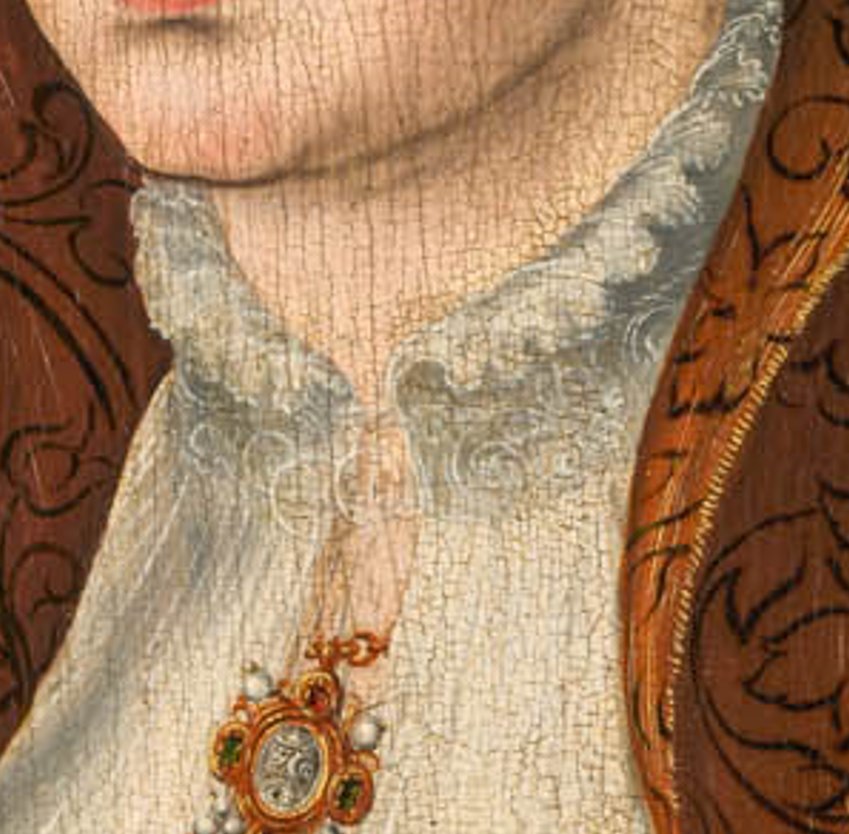
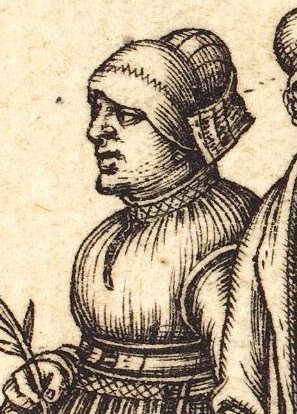
Early 16th century German artists depict both noble and well-off middle class women wearing a high necked under-garment in fine pleated linen, with an white-on-white embroidered collar, such as Cranach’s Bildes einer junger Fraulein below.
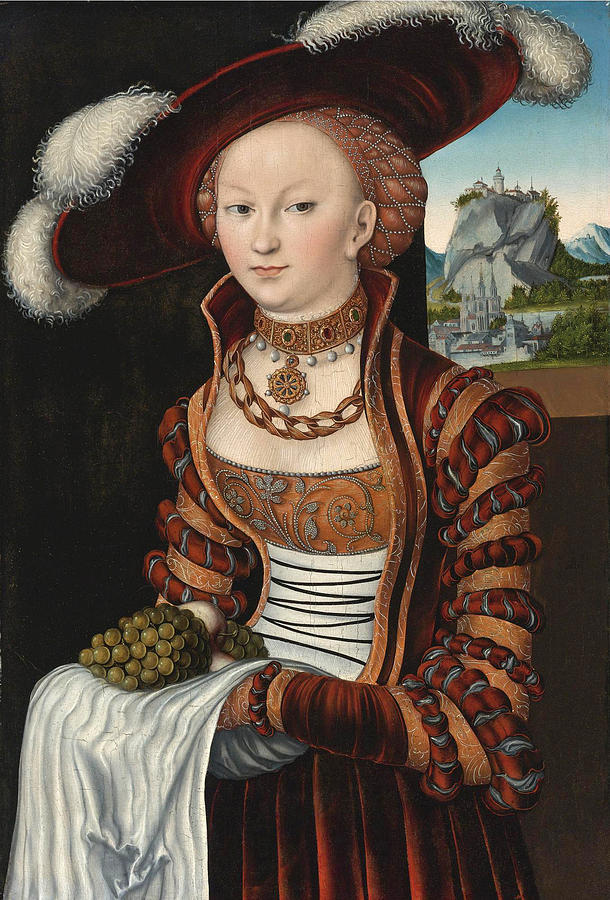
In some cases you cannot tell whether it is a Hemd or Goller, but other examples are more obvious, such as the such as the Cranach portrait of Young lady with grapes below, where the sheer fabric on her throat does not match the solid linen below her Brustfleck.
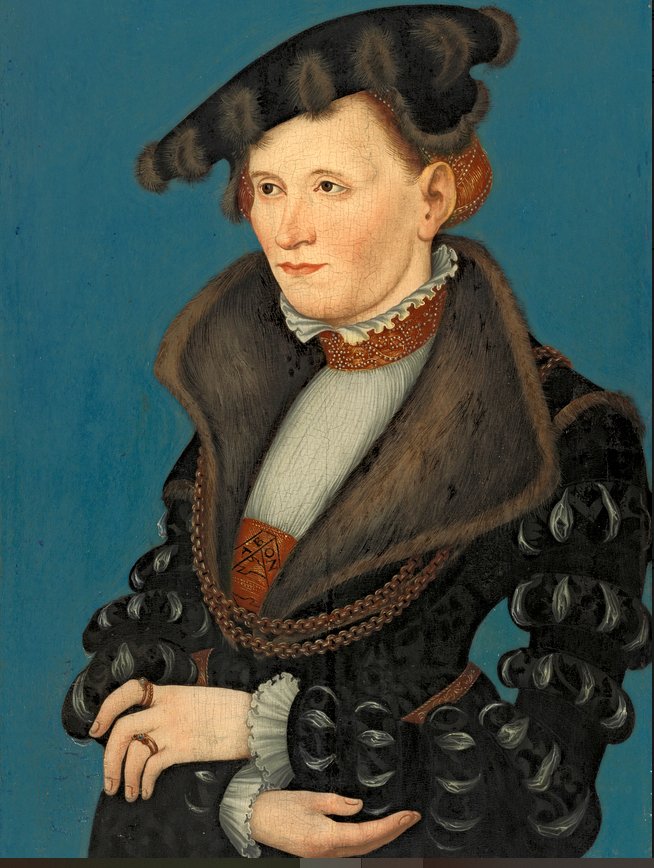
Some examples were worn with an additional band of jewelled gold or rich embroidery. In the Portrait of a Woman below, you can see the collar ruffle opens at the front, but the embroidered band presumably opens at the back.
Source: Antiques Trade Gazette
Source: Thyssen-Bornemisza
The same fine, high-necked, pleated linens can also be seen worn under some middle class gowns, both with white embroidered collars and with more ornate bands.
Source: Cranach Digital Archive
Source: The Louvre
I had two significant questions about the Goller:
- Position: Where does it sit, in the many layers of the outfit?
- Patterning: What is the shape and how is it fastened to keep it in place?
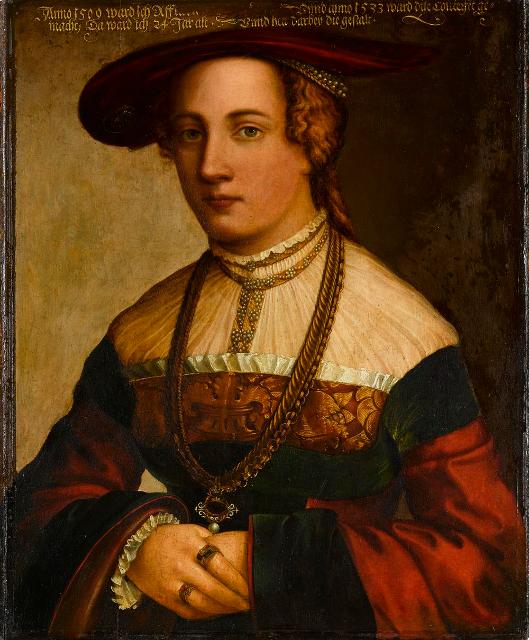
My starting place was to assume that it would be similar to my middle class Goller – worn under or over the Unterrock. However, I found a couple of images which showed the Goller under the Hemd, such as the Portrait of Afra Manlich above. So both options were possible.
In terms of shape, I want to end up with a Goller that has a high neck, with fine, even pleats around the neck and continuing down into the neckline of the Rock. To avoid it riding up, it has to be attached somehow – pinned or tied. Pins are likely to catch on other layers, so I will use ties.
The various paintings show different ways to close the front slit – ties, buttons or hidden hooks and eyes. I might make an embroidered neck band to be worn over the top, so this Goller will use hooks and eyes, to give the smoothest finish.
Construction
First, developing the pattern.
I started with the pattern for my middle class linen Goller, which gave me some basic proportions. To make the pleats, the width needed to be at least 3x the neck measurement, ideally more in the fine fabric. The neck needs to be cut straight, so it can be pleated on the grain.
I tried out my ideas in fine ex-sheets, and the later versions in cotton voile, to approximate the fabric weight and stiffness. I sewed and gathered the neck using longest machine stitches and left everything else raw – these are fast mock-ups.
I really enjoy patterning and it’s so satisfying when it works first go! But if not, I have learned that it is worth as many iterations as it takes to get the mock-up working well before cutting real fabric. In this case my first 3 versions did not work – I could not get a nice line or enough pleats over the shoulders.
Then I thought: I want it to look like my Halshemd…. So Version 4 was based on that, with two long rectangles for the body and two short ones over the arms, sewn along the sides, then gathered at the neck. Aha!
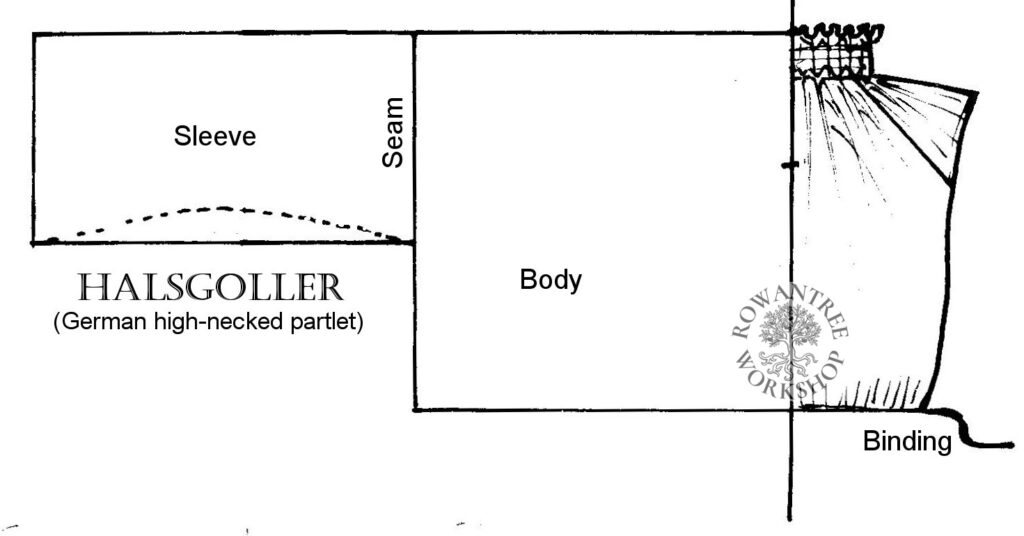
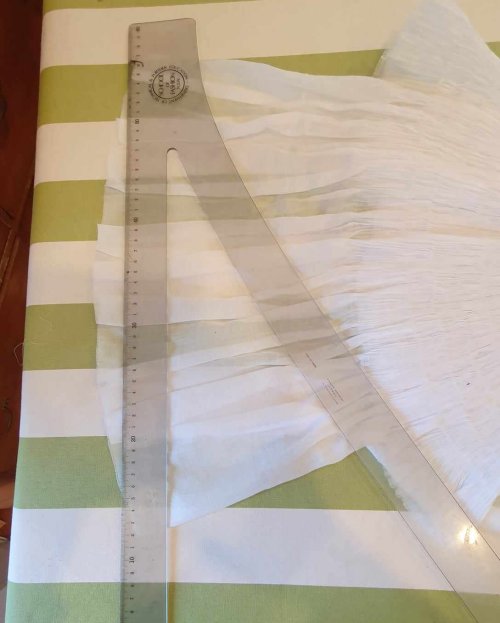
I also did a test on the fine linen voile, to see how much width I needed to make the pleats look well proportioned. The rule-of-thumb for pleating is 3x the width, but fine fabrics need more to look good. For my test run, I tried 4.5 times the width.
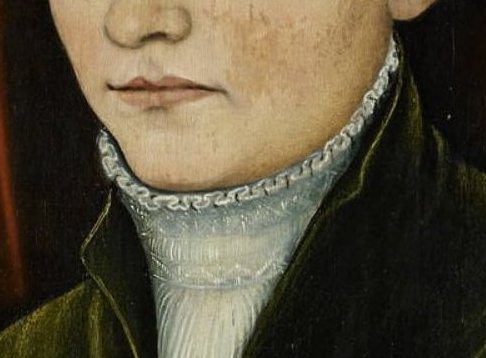
Now to test some embroidery ideas. The neck embroidery on Cranach’s Junger Fraulein painting has a scrolling form, with no horizontal lines for securing the pleats, so perhaps it was worked as a separate collar. The neck on Cranach’s Young Girl clearly shows the horizontal lines and geometric zig-zags, reminiscent of a many Modelbook designs.
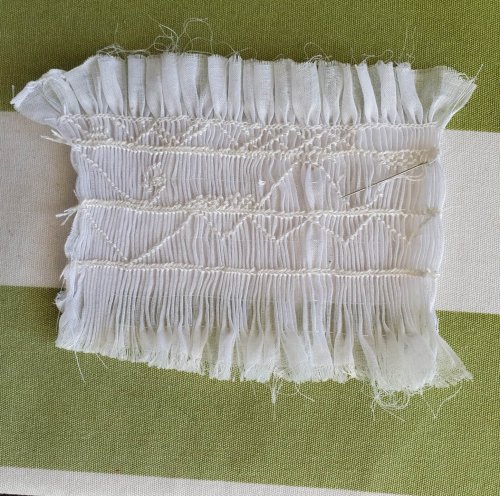
My test piece showed that the zig-zags were easy to work over the pleats and effective. But also proved that I needed a higher pleat density – more fabric, to make the pleats closely packed.
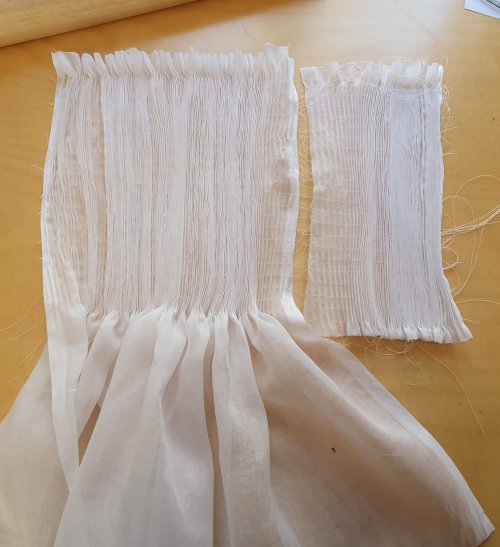
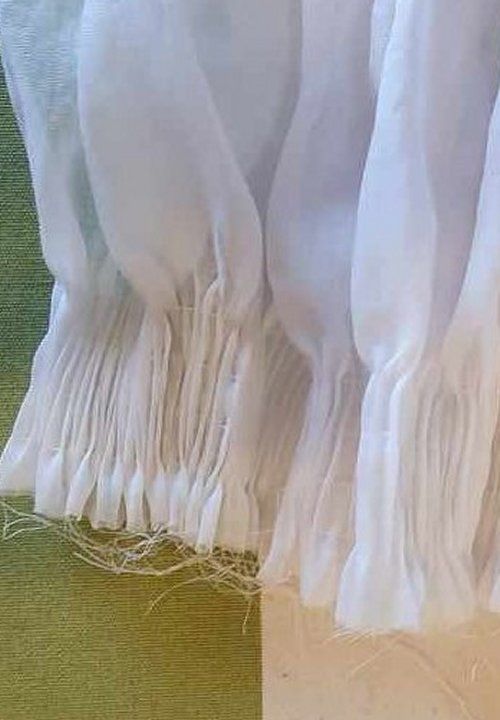
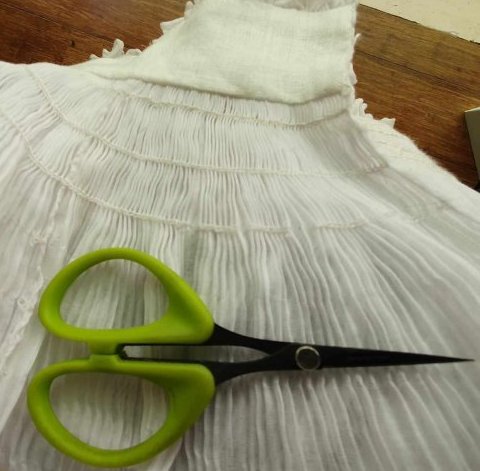
Time to cut the linen – the most I could manage from the piece I had was a full width each for front and back, and half width on the shoulders – a total width of 2.7m. I drew threads to get accurate lines and then machine stay-stitched along one edge before cutting, to give a firm foundation for the rolled hem on the neck ruffle.
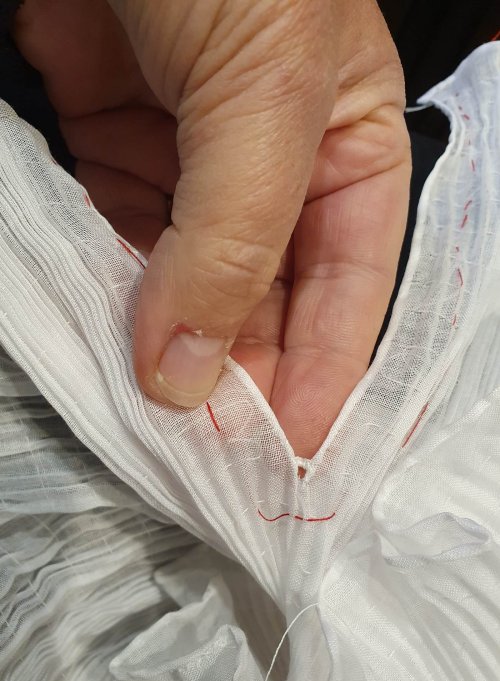
I also stay-stitched around the front slit, but did not cut it at this stage.
If I was pleating by hand, I would sew the side seams first, but that doesn’t work on a pleating machine. I set up my machine with the full width of needles, then put each piece through separately, trying hard to stay on-grain. I sewed the side seams using false French seams, which do not interfere with the pleating, but took waaay longer than expected in this fine fabric.

With the seams done, I roll-hemmed the top edge in fine linen thread, using the catch-and-pull method. I cut the front slit and finished it the same way, sewing the base in buttonhole stitch and adding a worked bar for reinforcement.
Finally, I basted the slit closed, so I could work the neck embroidery without distortion.
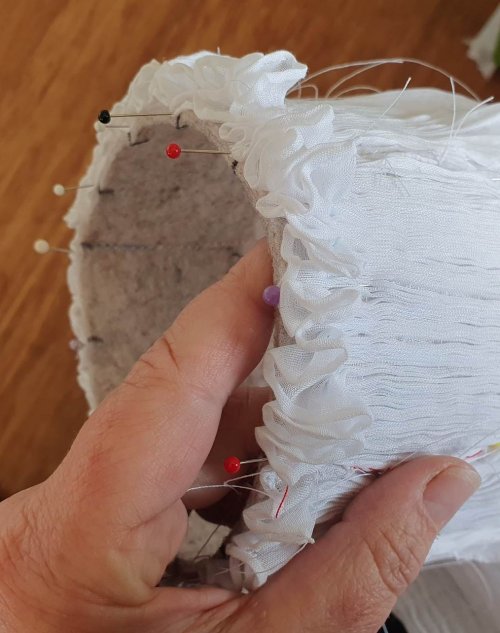
After the problems I had with my Halshemd, I wanted to make sure the neck was the right size. So I made up a ring of 3mm furnishing felt to the correct size and marked this with 12 divisions.
I pinned the fabric on this (inside out) matching the centre front, back and the seams. I pulled up the draw-threads around the neck, distributing the fine pleats evenly and then tied off the draw-threads. I pulled the draw-threads in the body a bit to reduce bulk, but did not tie them off at this stage.
On to the embroidery.
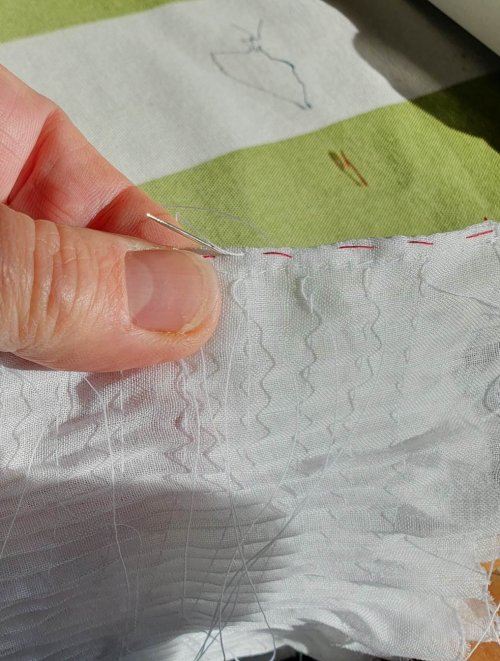
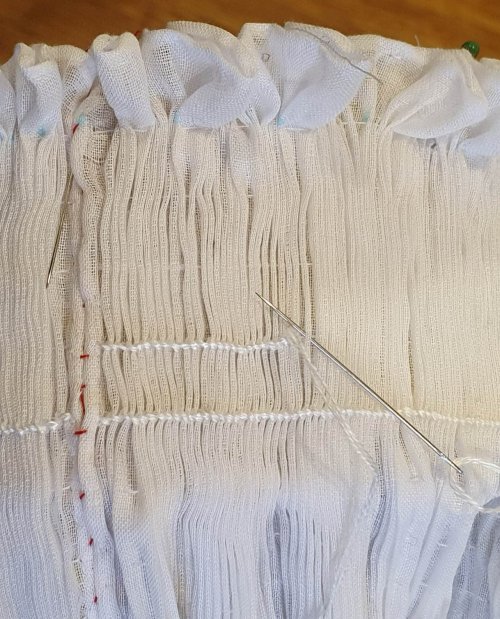
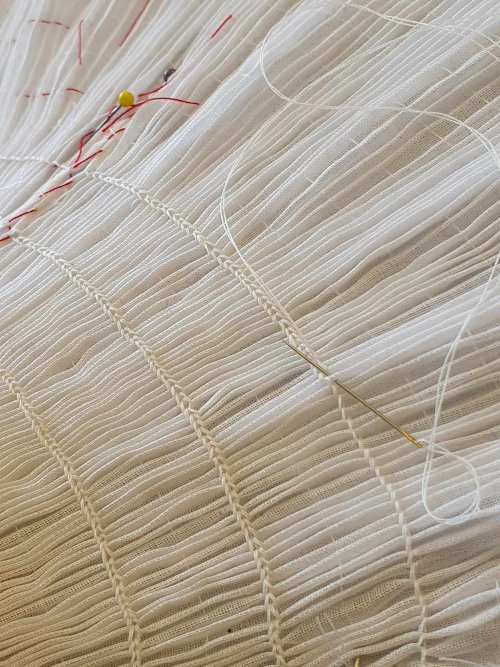
I took the fabric off the the felt ring, turned it right-side out and pinned it back in place. The first step was to work horizontal lines to stabilise the shape: five paired rows of stem stitch in silk worked along the draw-thread lines. The pleats are tiny, so each row took about an hour – 10 hours of pleating.
Once the straight rows were in, I worked more stem stitch in stepped rows, to make the zig-zags, fudging a little at the back to ensure the fronts matched.
Once the embroidery was complete, I unpicked the front tacking and took the collar off the felt ring. I measured the ring and cut a solid linen lining to support the collar and protect the fine pleats from dirt and wear.
I pinned the lining evenly to the collar – which wanted to expand once off the ring! I basted the collar to the lining to control it, and then sewed it in place. So the lining also works to keep the collar the right size.
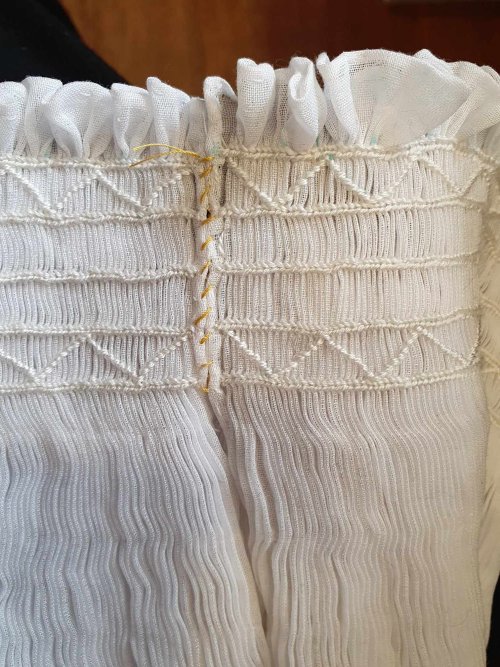
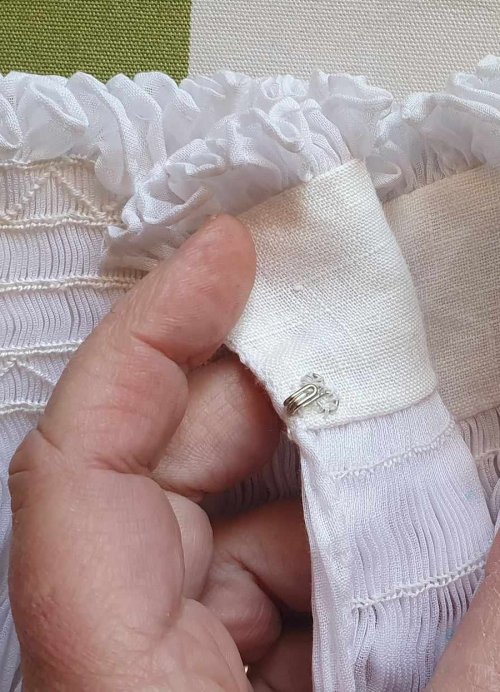
Finally, I sewed on 2 sets of hooks and eyes to close the front opening.
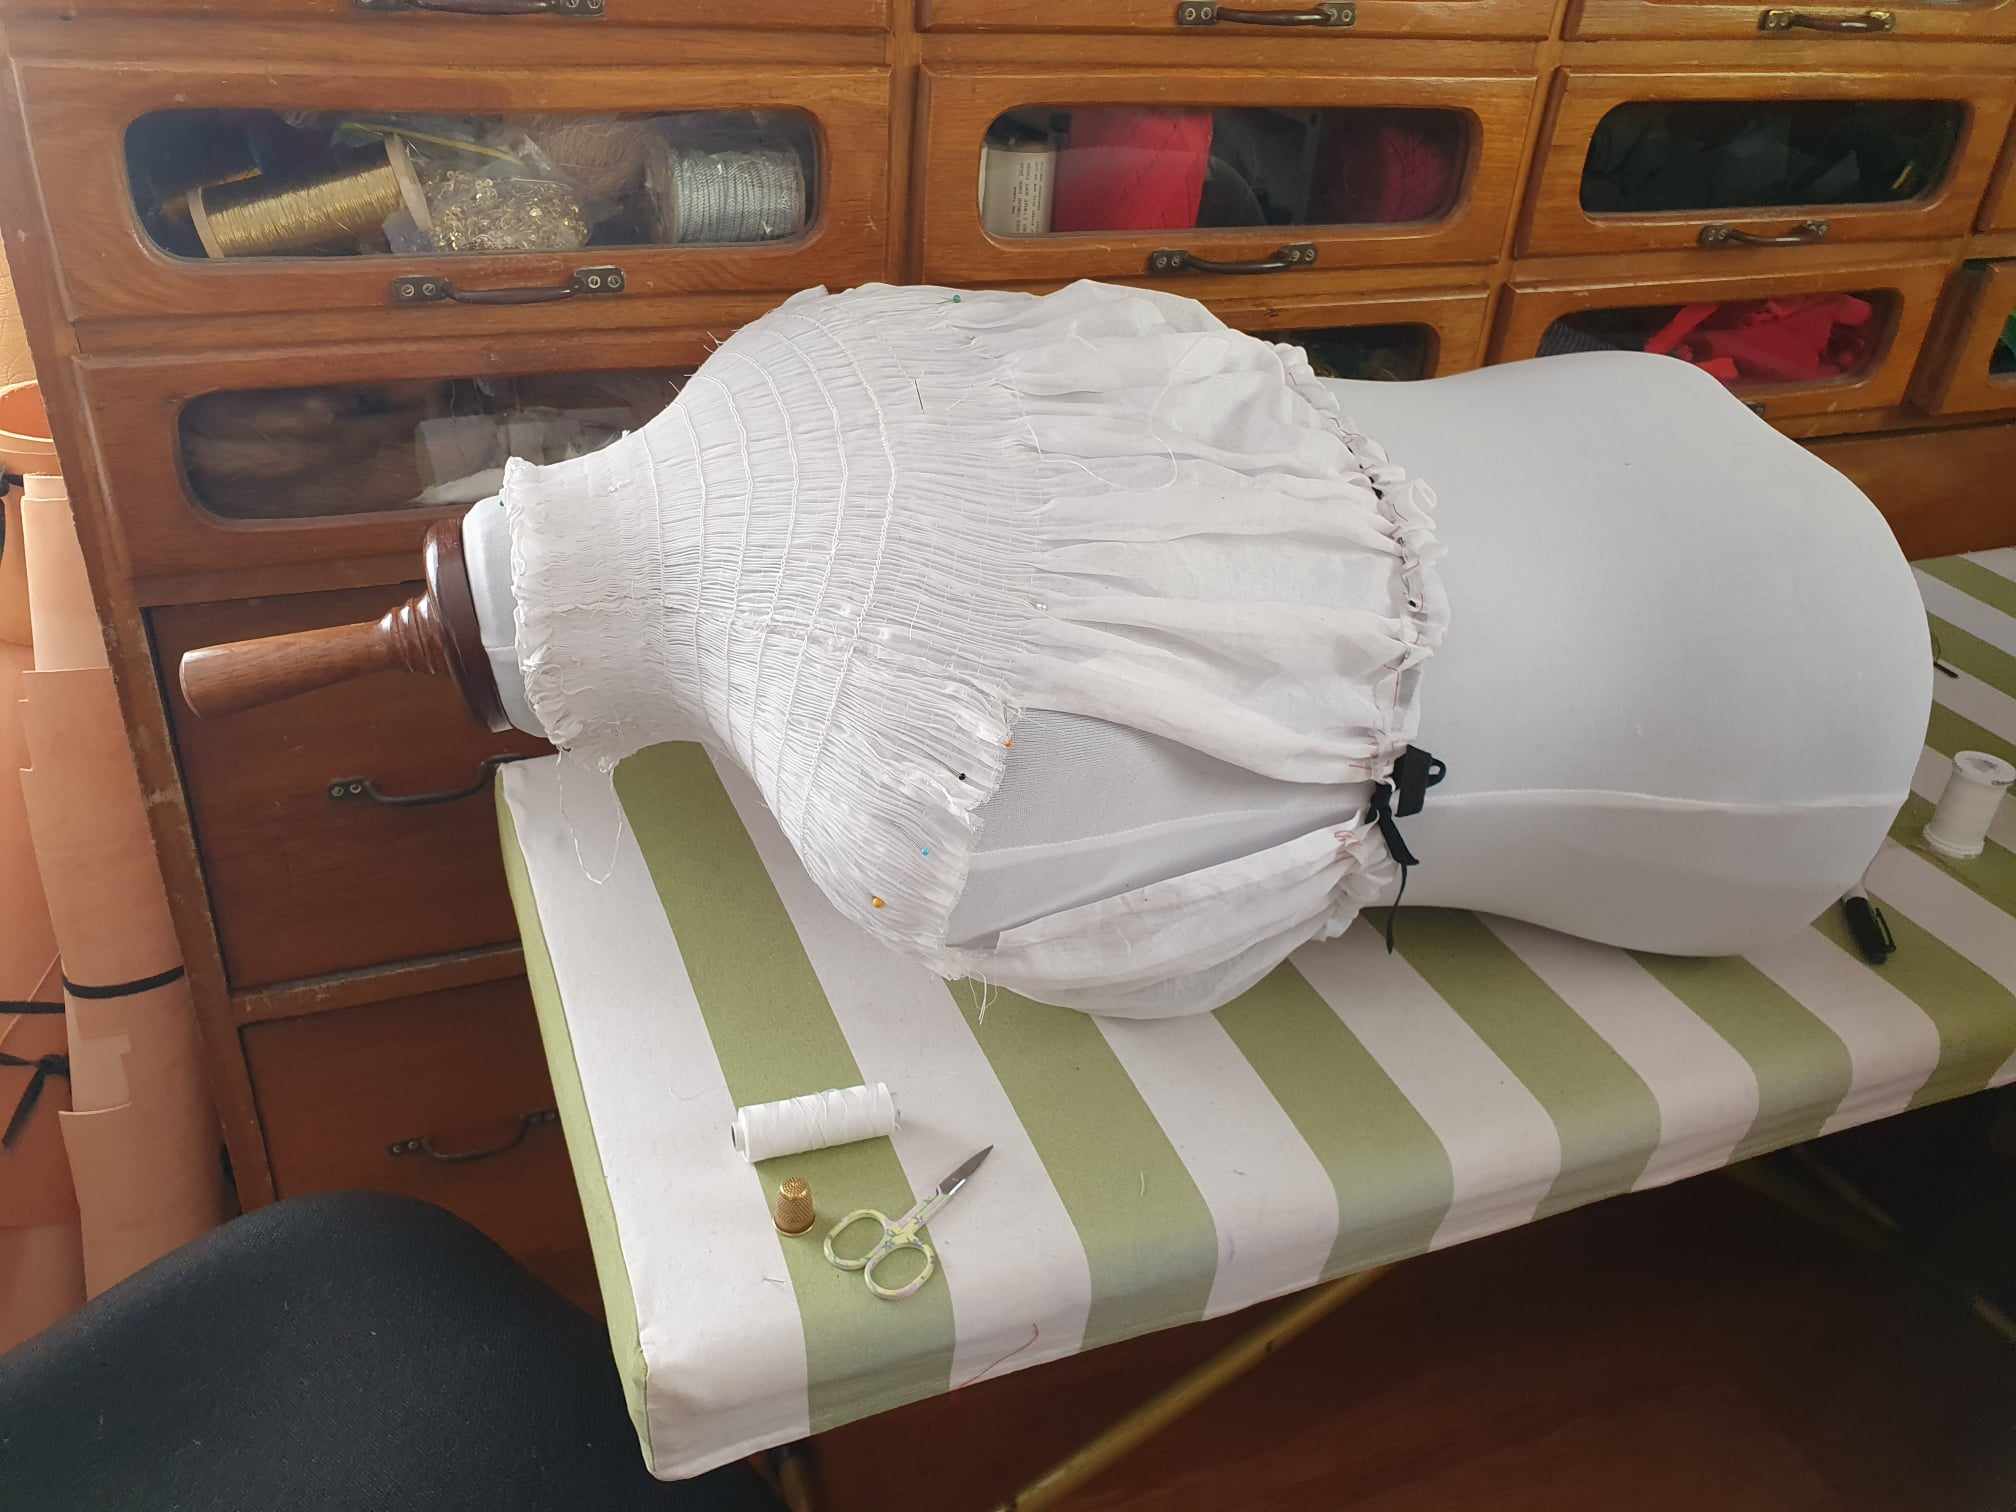
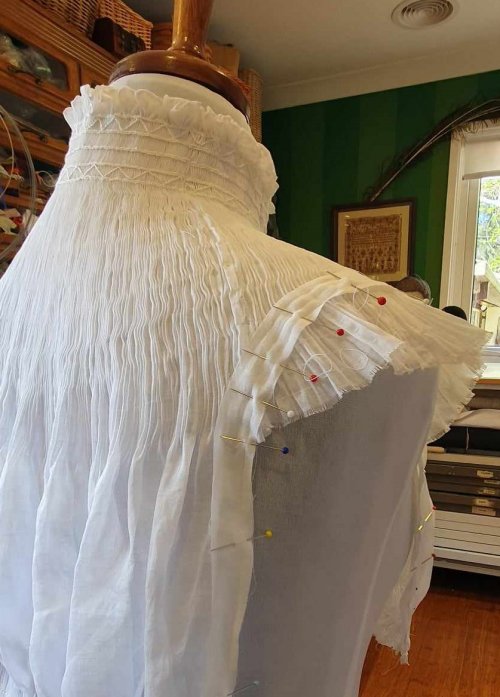
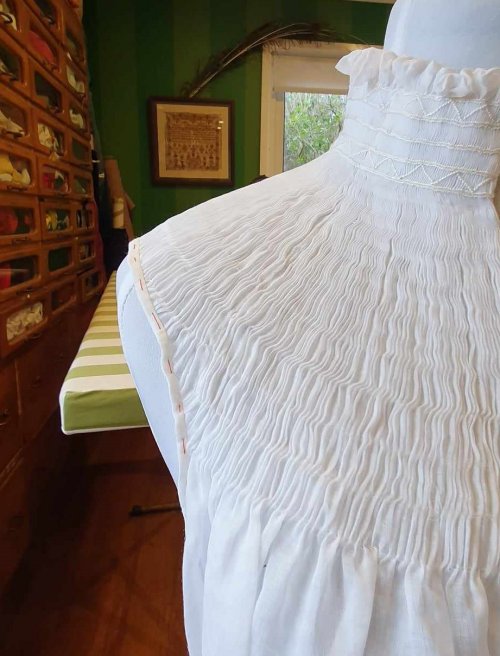
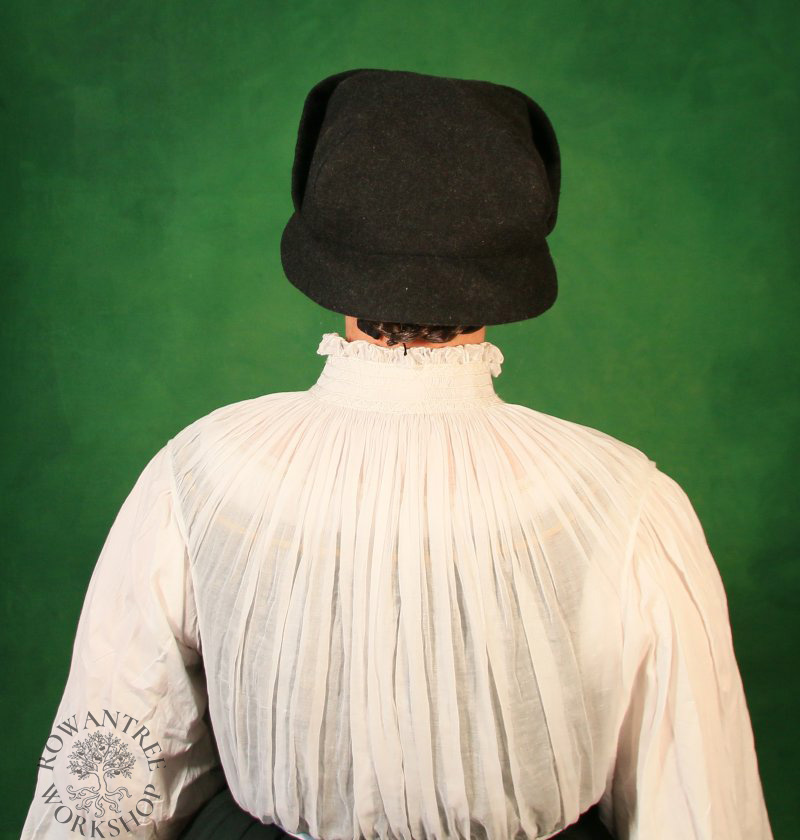
With the collar finished, I put the Goller (inside out) on my dress form so I could draw up the remaining pleats to lie nicely over the shoulders and chest. Once I was happy with the placement, I worked double rows of stem stitch in linen thread on the back – 10 rows, 2cm apart. This backstitching should keep the tiny pleats in place for wearing and washing, but will hopefully not be obvious.
The backstitching took 30 hours. To keep the shape, I worked over the dress form – I took it off the stand to make this easer, but it was still a tricky task. When it was done, I tried on the Goller and marked the final length along the shoulders, front and back.
The collar looked lovely, and the translucent linen is beautiful. But I was not happy with the garment as a whole:
- Despite my efforts, the variation in grain on the pleats meant the lines were not perfectly smooth. In contrast, the pleat lines on my Halshemd sit very well, with no stitches to hold them.
- I could clearly see the lines of stem-stitch in rows around the neck. These are not visible on any of the paintings, even those depicting very fine fabric.
- The process seems impractical for making these in the 16th century – using the dress form to ensure the shaping was awkward and did not feel ‘right’.
I came to the inescapable conclusion that my theory about back-stitching the pleats for this style of Goller was not borne out in practice. It would look better without the rows of stitches.
I would need to remake it from scratch, or undo all that work…
So I put it back on the dress form and worked on a small fun project (the Schlappe) as a distraction.
Two weeks later, I had resigned myself to unpicking all the rows of back-stitching. It would take less time than starting again from scratch. I did not have any more of the fabric and I still wanted this Goller. Sigh.
But first, I would finish everything off.
While looking at woodcuts for another project, I found a Beeham image of a peasant woman wearing a high necked pleated Goller on the outside of her Rock. You can see some lines at the base, which look very like sewn lines to hold pleating. And lines for binding around the edge, which is shaped around the shoulder. Aha – support for my finishing ideas!
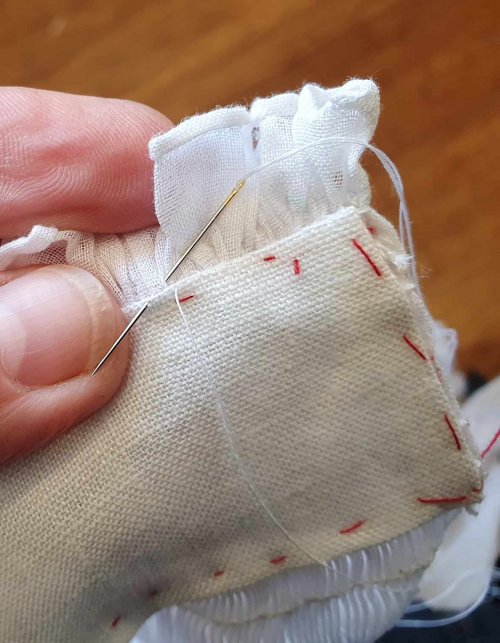
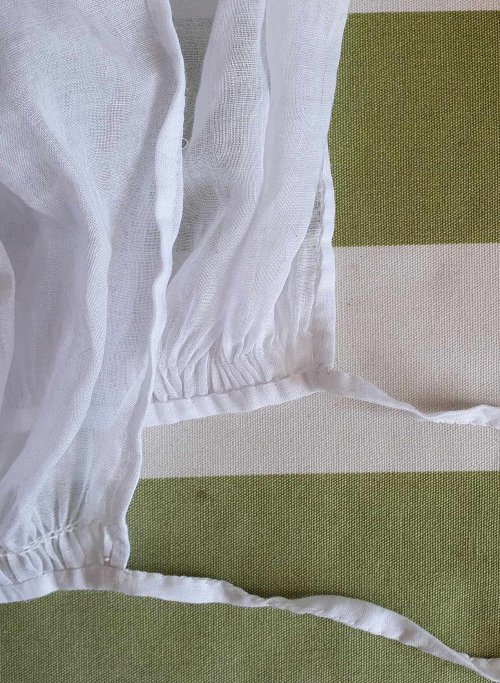
I cut strips from another piece of fine linen to bind the sides and bases. I pinned strips at the shoulder points and then in a smooth arc down to the sides. I basted and sewed the strip, then trimmed the excess, turned and basted the binding before hand-sewing it down.
When I tried on the Goller, I found the centre front and back dipped lower than the sides – an effect of the radiating pleats. So I trimmed the middle to make a straight line.
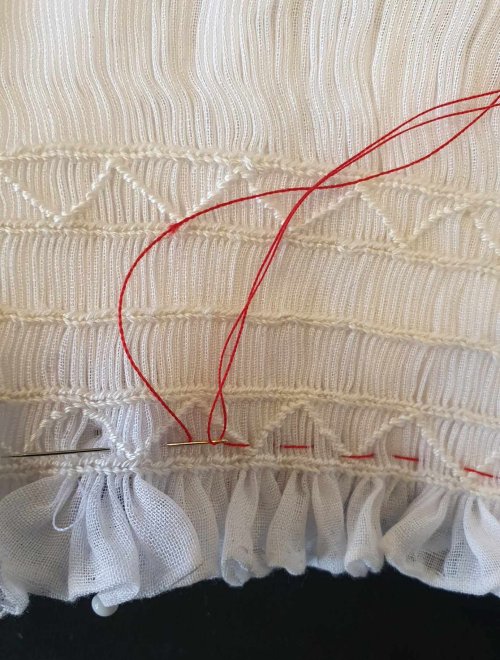
I ran the trimmed lower edges of the front and back pieces through the pleater to gather a few rows, then sewed one double row of backstitches to hold the pleats (the minimum – I was a bit over the whole pleating thing at this point). Then I bound the lower edges, continuing the binding strips to make ties.
With the binding done, I began the tedious work of unpicking all my careful stitching. It took over 6 hours, with the final tight row beneath the collar particularly frustrating.
Then I hand-washed the Goller and dried it under tension, to encourage the pleats.

After all that re-work, I was very pleased to be finally done with this.
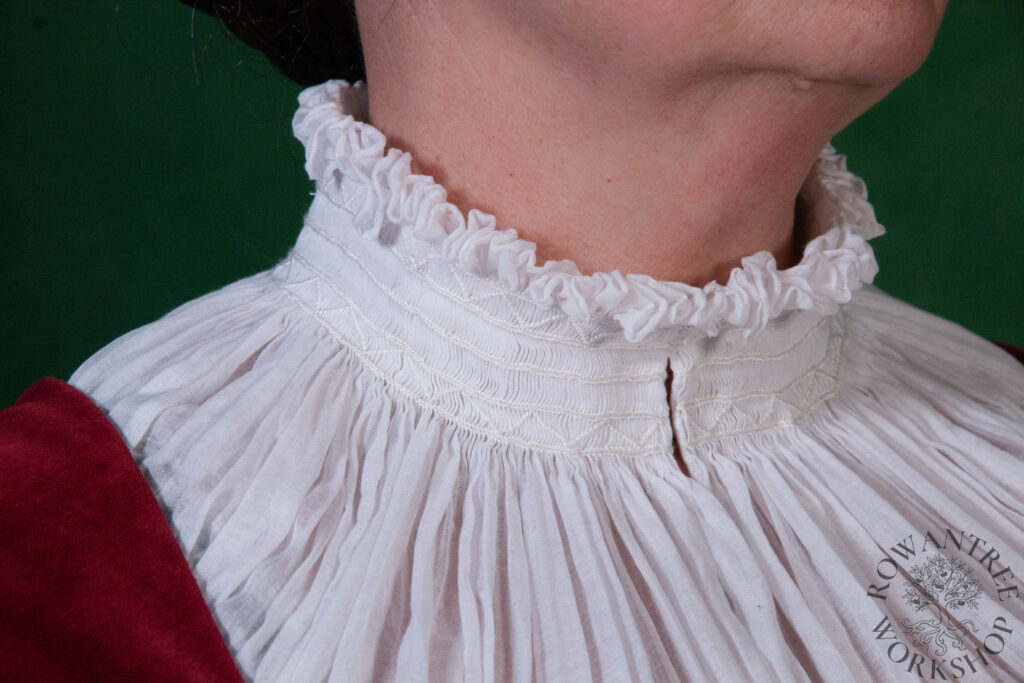
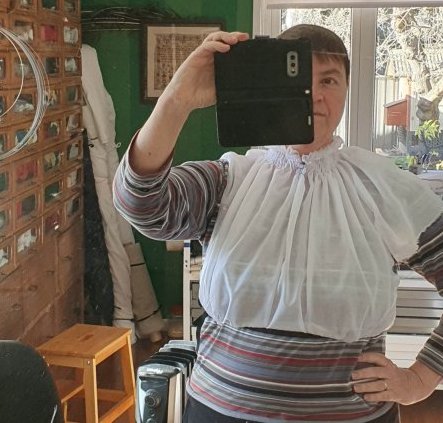
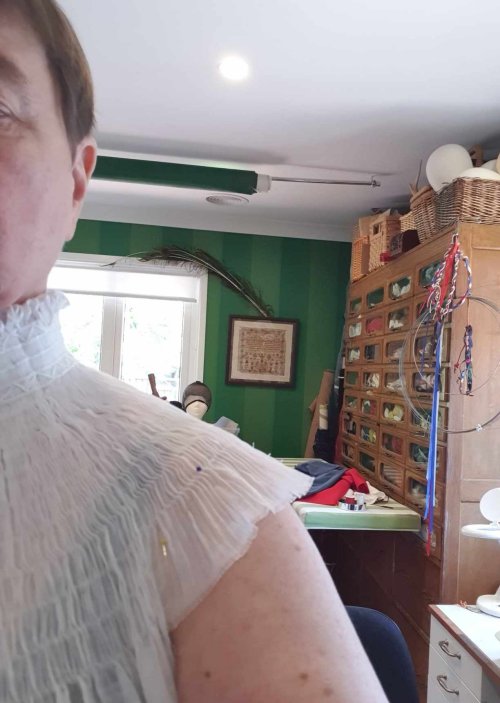
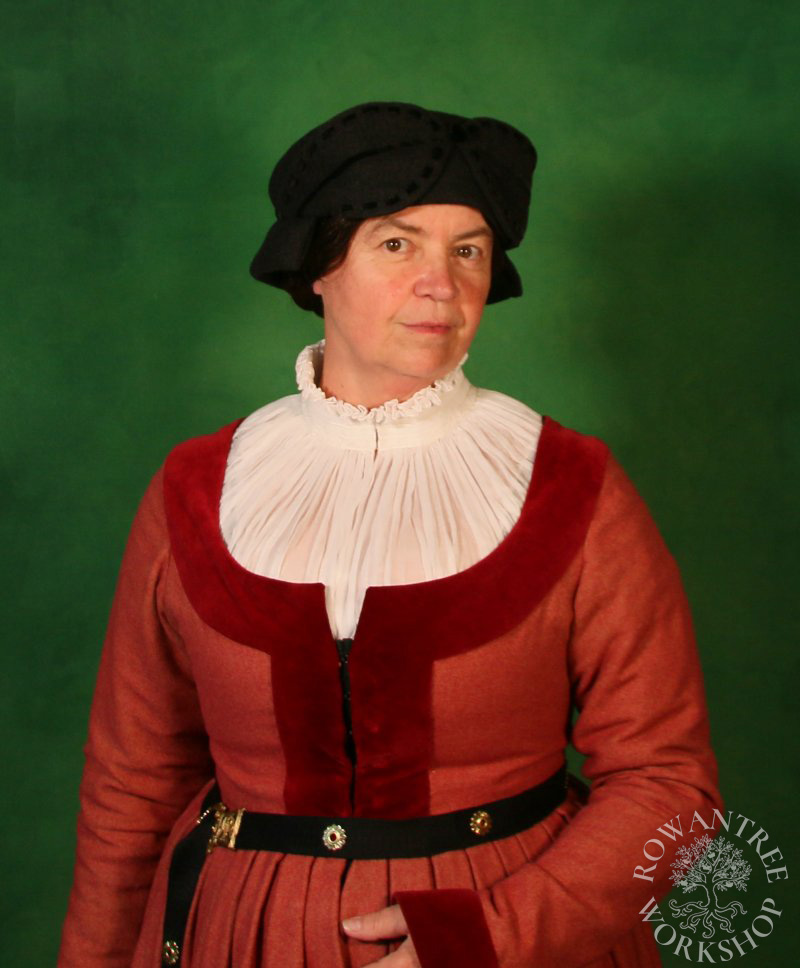
I tried wearing it under the Hemd, over the Hemd – and over the Unterrock, as seen here:
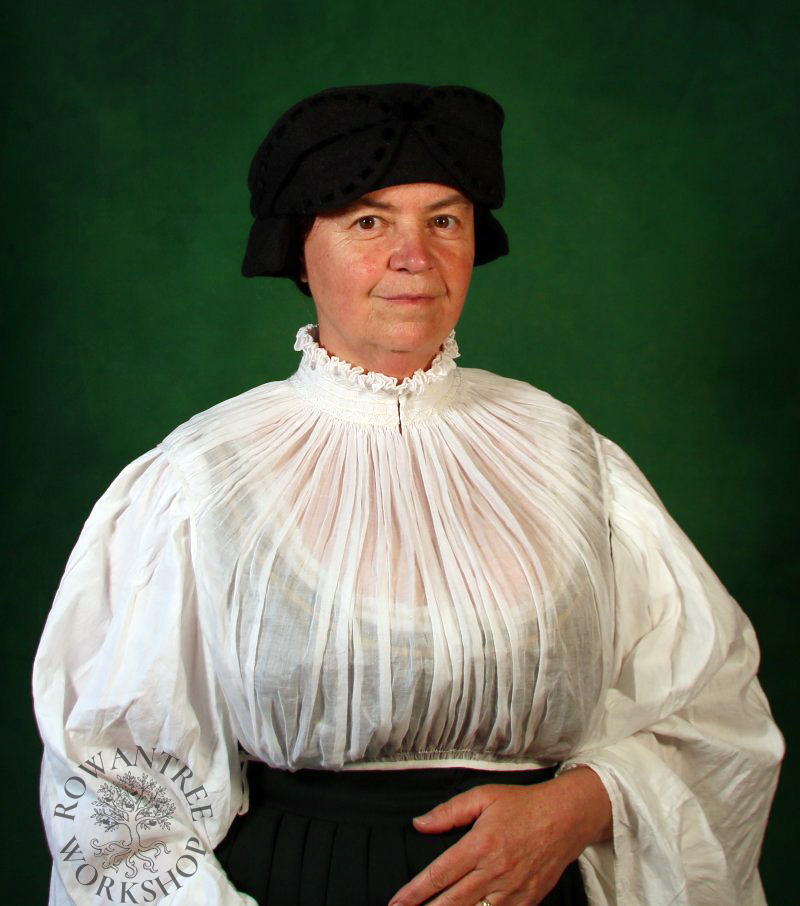
I think it works best over the Hemd – which needs to have a wide deep neckline to avoid being seen! I may need to make a new Hemd…
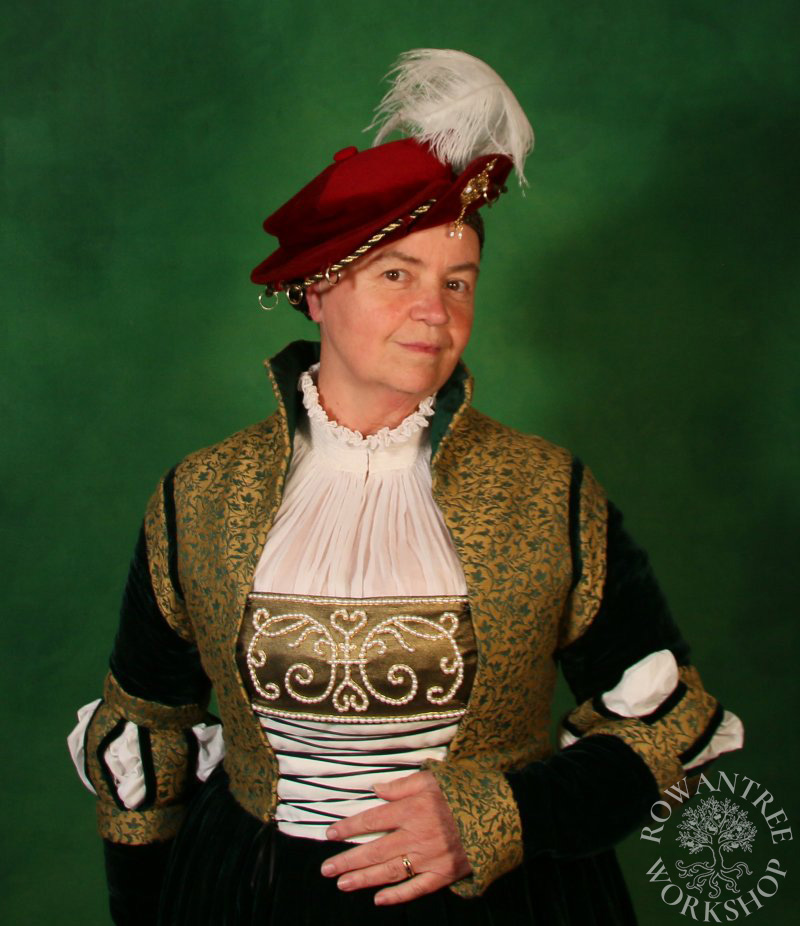
After all this, I am happy with the end result – it is comfortable to wear, looks good with both noble and middle glass gowns and is amazingly light – 45gm / 1.5 oz!
Afterthoughts
If I was making this again, I would just pleat the collar section, but not the deep body panels, I would still pleats the sleeve sections, to make them easy to shape and bind. I would still pleat the bottom section of body – enough to allow for trimming after final fitting.
Sometimes an experiment fails – you still learn from it (sometimes more than from success). And hopefully others can take the easier path first time!