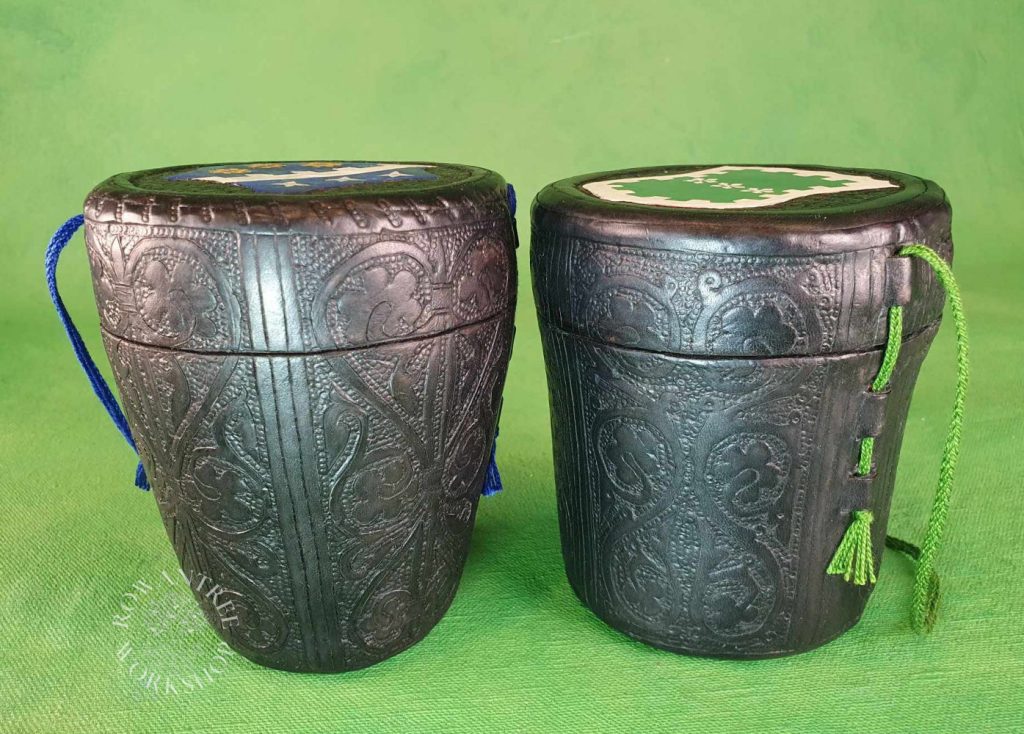
A set of tooled leather cases for our collection of Krautstrunk (prunt glasses), to protect them during travel. This style of case was common in the 15th and 16th centuries across Europe.
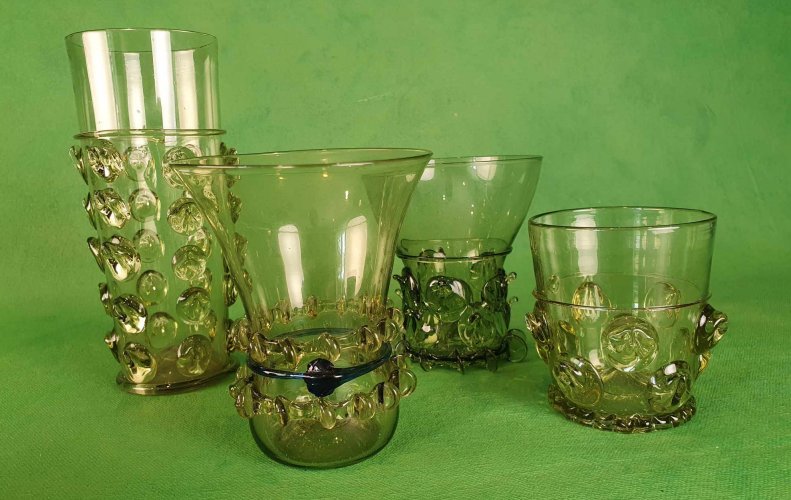
I love these glasses, which were popular across northern Europe in the 15th and 16th centuries (and indeed afterwards) and go so well with my early 16th century German wardrobe, and my husband’s Italian one. We bought them on visits to museums in Prague and Germany and brought them safely home.
But I hesitate to take them to events because of the risk of breakage, which is a pity – I want to use them, not just admire them on a shelf.
The historical (and practical!) solution is leather casework: making a custom leather cup case for each glass – a leder Futteral.
This project ended up taking much longer than I expected (months rather than weeks), with several side quests to test glues and dyes – and make a punch to tool the background. I also tested the use of foam moulds, rather than wooden ones.
My next casework project will be much faster – and you can learn from my mistakes!
Research and Design
Cases made of stiff leather (casework) were common in the middle ages and renaissance for holding, protecting and carrying all kinds of items, from pens to crowns. This technique is often referred to as cuir bouilli – “boiled leather“, but the leather is not actually boiled – this would make it shrink and turn brittle.
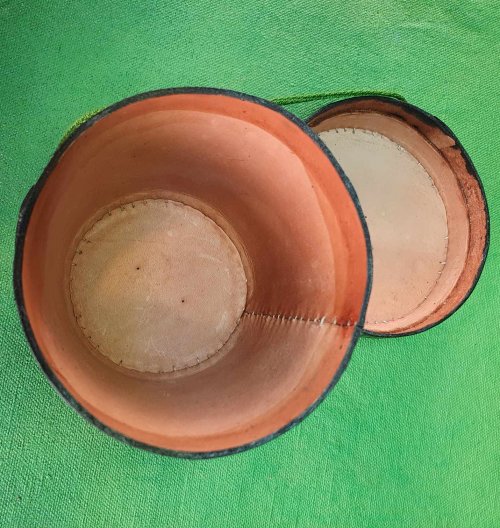
Instead, the leather is wet-formed in two layers, which makes it stiff. The seams of the inner layer are sewn, as can be seen below. In earlier examples, the outer layer was also sewn, but this technique was later replaced with skiving (thinning the edge) and glueing. Goubitz (2007) notes a rare 14th century glued writing case; the technique becomes more common in the 15th century and almost ubiquitous in the 16th century.
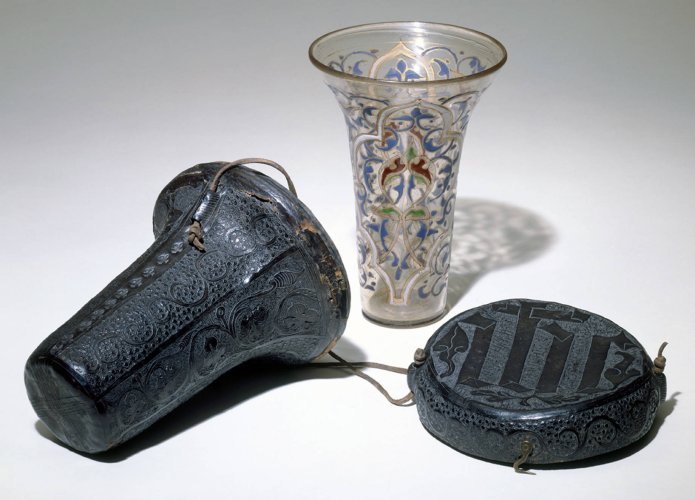
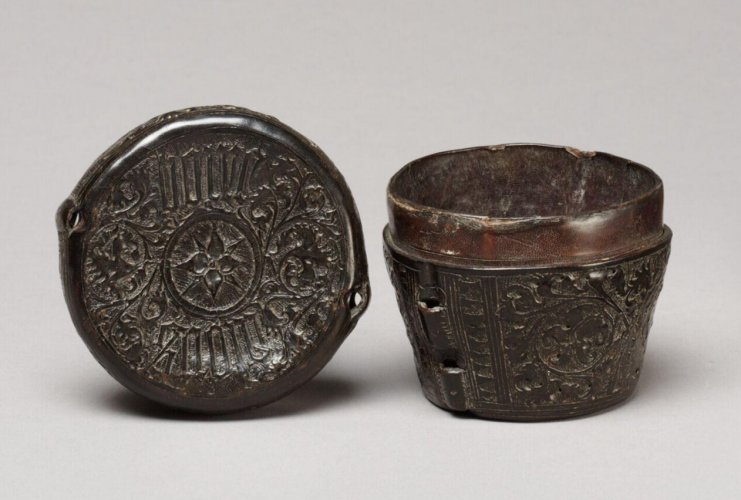
There are many extant examples of medieval leather cases for glassware, in various shapes and sizes, along with cases for many other items. Each one is carefully made for a specific item – a close fit adds to the protection.
Most leather cases were dyed black, although there are also examples with paint (egg tempera) and gilding, as seen below. Cases were usually decorated with tooled or incised decoration in the style of the time, with the backgrounds often punched or tooled for contrast. The lids were held on with silk cords or leather thongs, through slots formed in both case and lid.
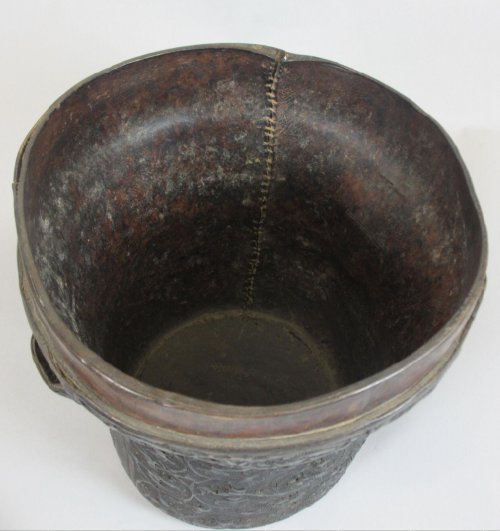
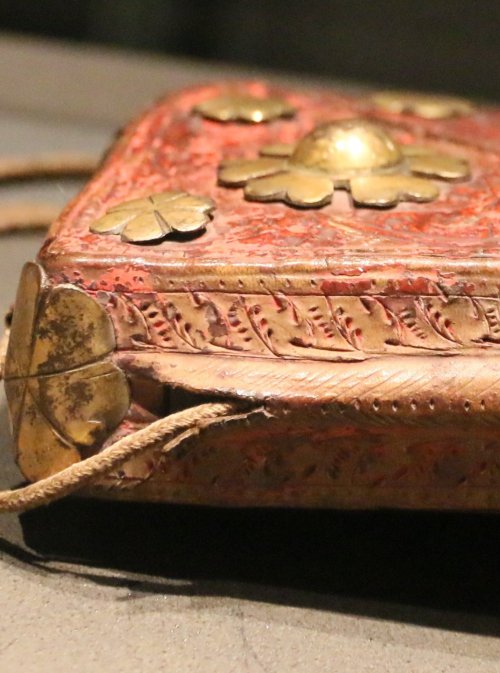
Photo: Robyn Spencer
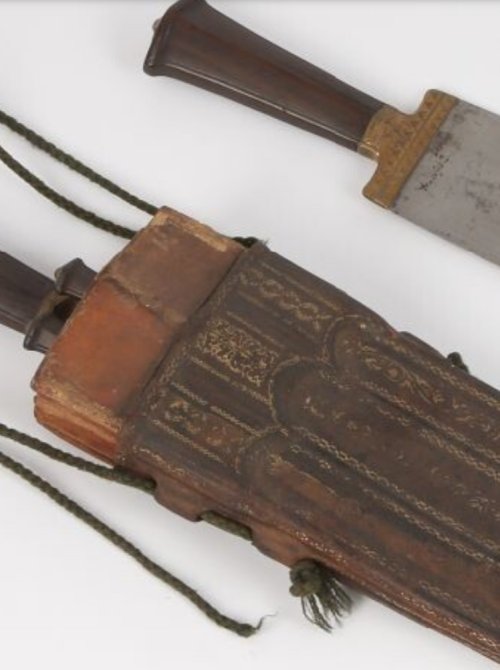
Cases from the 16th century show the typical foliate tooled designs with stamped backgrounds. Note that the line where the cap is cut goes right through the design – this is worked on the outer layer before the cap is cut.
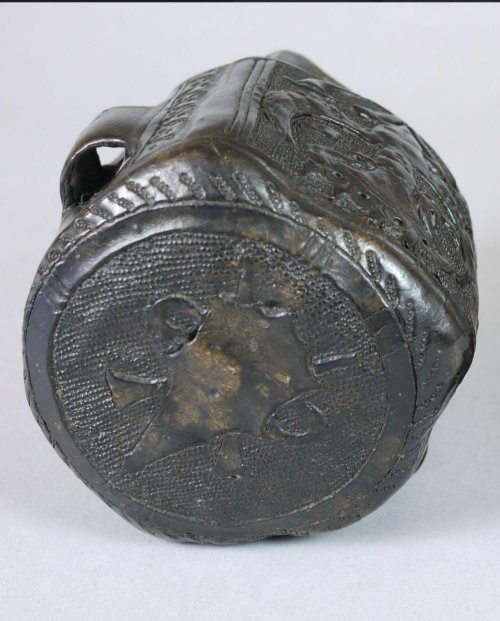
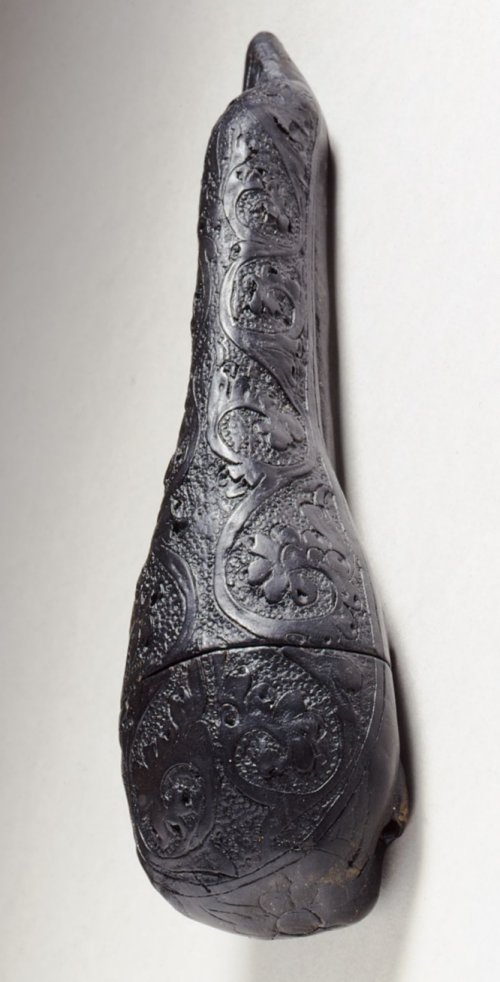
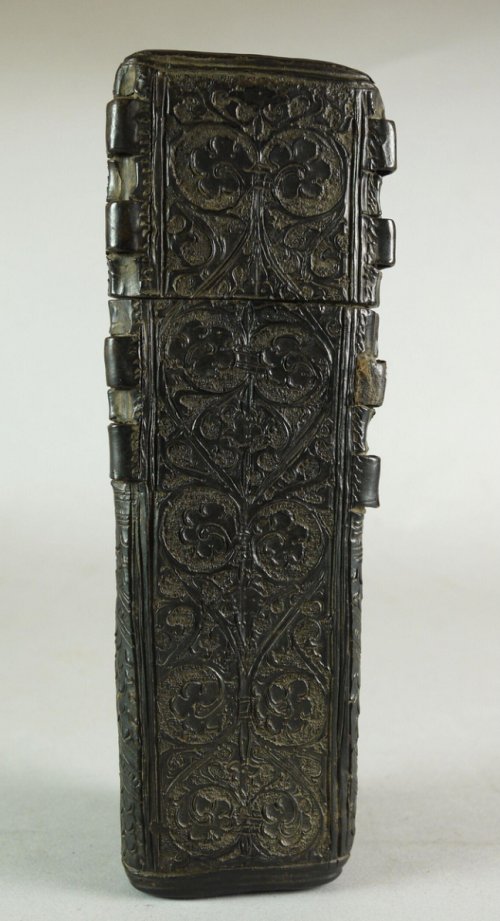
I planned to make a set of leather cases for our four glasses, with suitable 16th century decorations and fingerloop braid cords.
At the same time, I wanted to use this project to test out several ideas including:
- Whether the foam I use for making hat blocks would work, in place of my usual wooden moulds (eg eyeglasses case or needlecase), to make the process accessible to those without woodworking skills
- What was the best glue for the skive-and-glue technique; and
- How well egg tempera worked on the leather, in combination with dyeing.
(Note that I was making several cases at the same time, so the examples in the pictures may not always match…)
Construction
I started by making profile patterns of the four glasses. The prunts make the glasses hard to draw around, so I’ve used calipers to measure the maximum size at different heights. The shape of the case is based on this, but must also conform to some rules:
- The cap must have at least a 1cm overlap, or larger for a big case
- This overlap section must be straight
- The sides must be straight or flare towards the top, with no indents.
Once I have the shape drawn, I cut it out and test it over the glass, rotating to ensure it will fit at every angle (no need to do this with a simple form, but the prunts are tricky!) and adjust if needed. I allowed 2-3mm clearance at the top and sides – enough to make it an easy fit, but not allow too much movement. (Note: This was not enough ease – allow 5mm on both sides and the top to counteract compression).
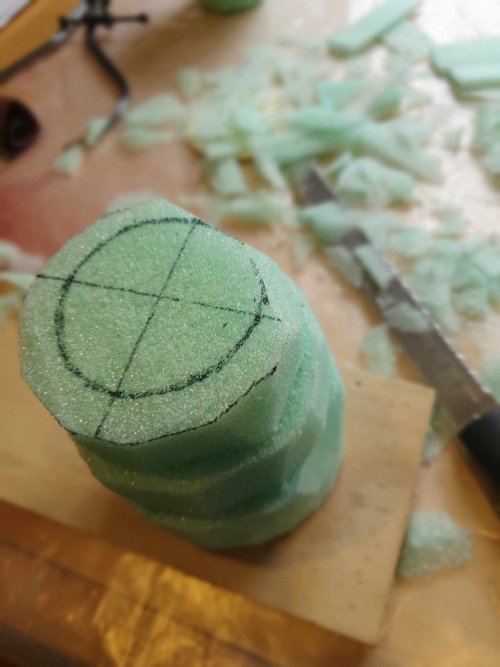
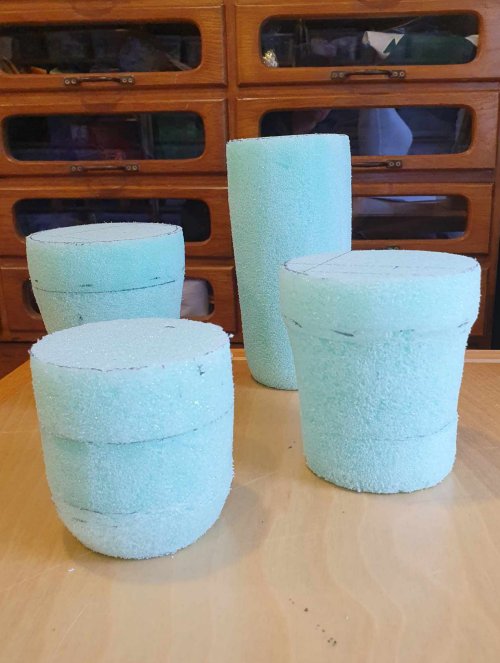
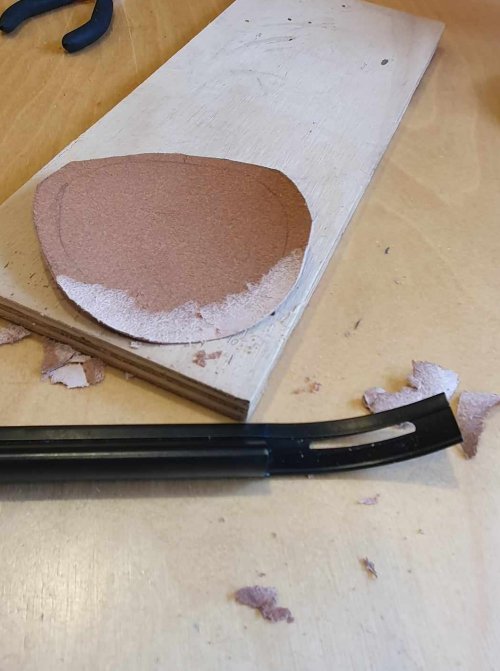
I’m making the mould from layers of XPS foam, using the method I use for hat blocks. I draw the layers on my pattern and measure the largest size of each layer. Since these are circular forms, I can simply cut circles of the right sizes and glue them together to form the shapes. For the tall glass, it was faster to use 3 long slabs.
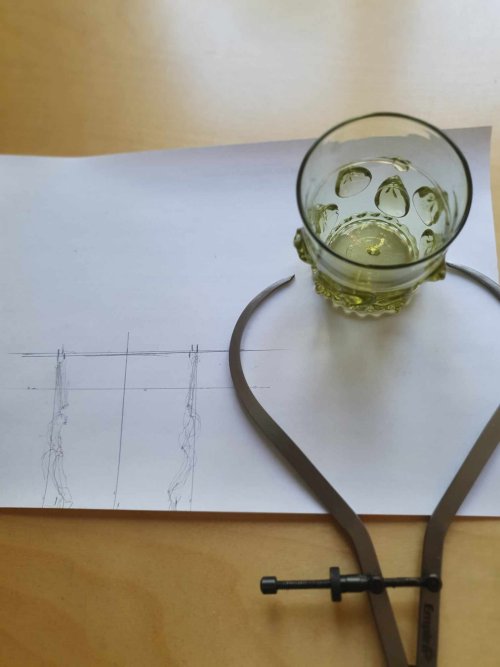
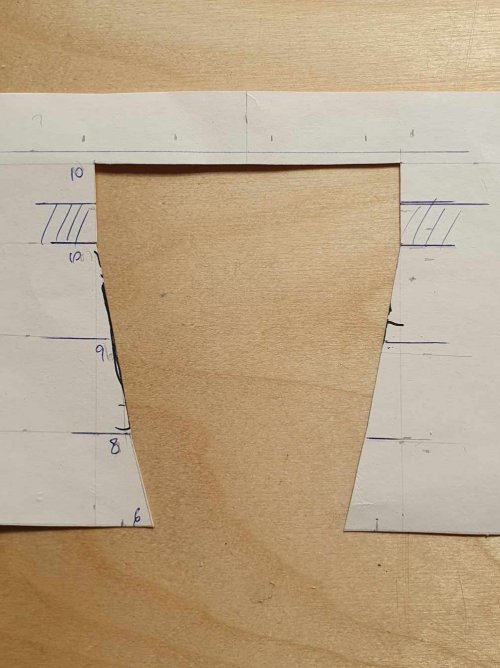
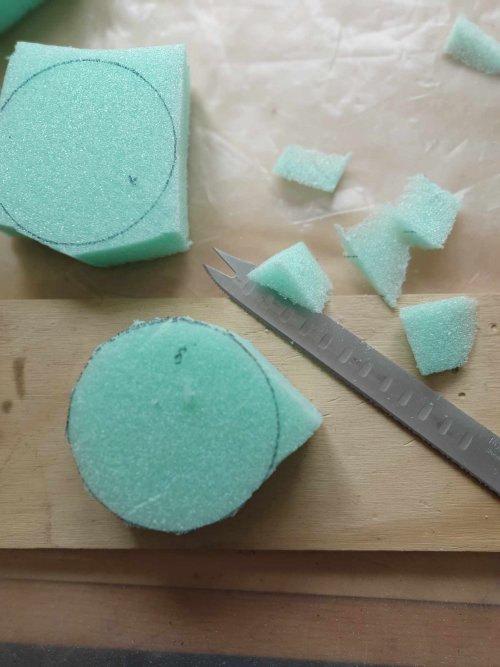
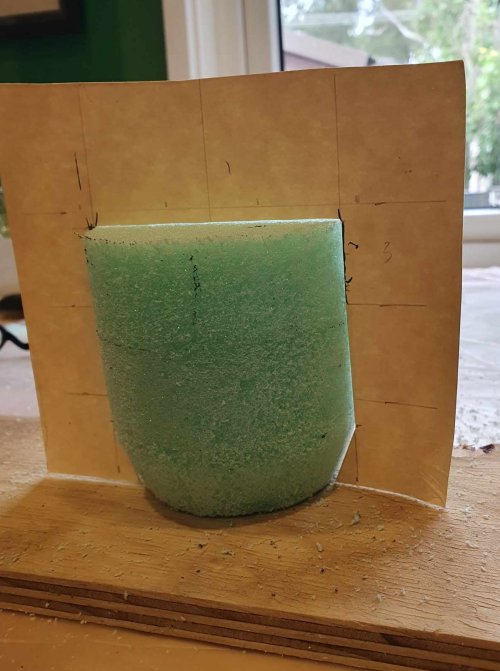
I roughed out the shapes with a breadknife, then used a rasp and sandpaper to get them to match the template exactly. The forms are ready to use.
(Note: I would now wrap them in duct tape at this stage, rather than in plastic wrap later).
Inner layer
On to the leather. Since this is an experiment, I decided to only make 2 of the 4 at this stage, to check the foam works end-to-end.
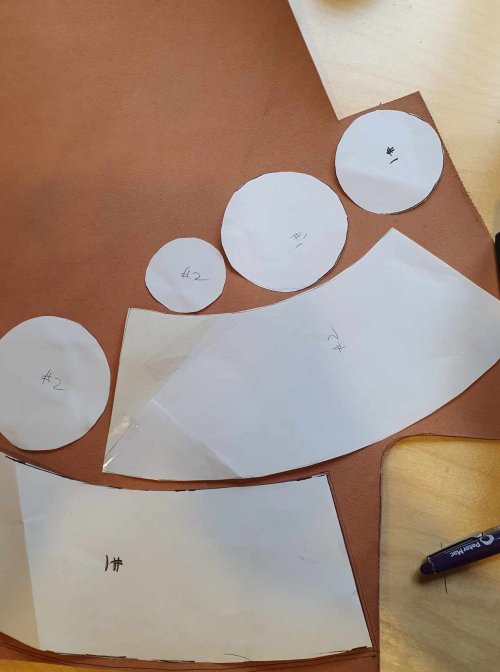
I made patterns on the forms by tracing the top and base, then rolling the form and marking the arc, adding 3mm all around to allow for leather thickness and ‘turn of cloth’. I will need to trim some of this off, but better too much than too little.
I cut the pieces out of 2mm thick vegetable-tanned leather, then ‘mellowed’ them: wet them thoroughly, drained, wrapped in paper and plastic and rested them overnight (a couple of hours is fine). I pinned the leather flesh side (fuzzy side) out to the top and base of the form with small brass pins, then trimmed the leather to match the form.

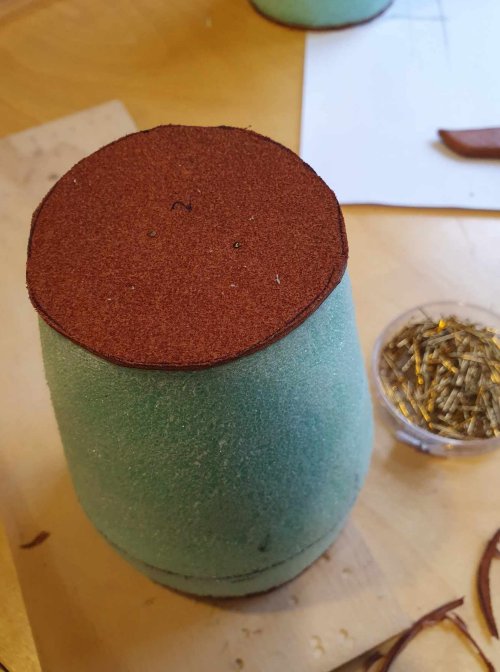
I wrapped the form in plastic wrap to make it easier to pull it out later – the flesh side of the leather will stick to the foam. (As noted above, now I would wrap in duct tape before patterning instead.)
I wrapped the main section, lining up at the top and trimming the excess at the base, so the leather was flush. For the first one, I also trimmed the main section in a butt join, as I’ve done on smaller pieces – but discovered the shrinkage is greater on larger pieces.
So the second one I simply overlapped and trimmed once it had dried (much better!). I wrapped the lot in strips of wool to dry and set to shape overnight.
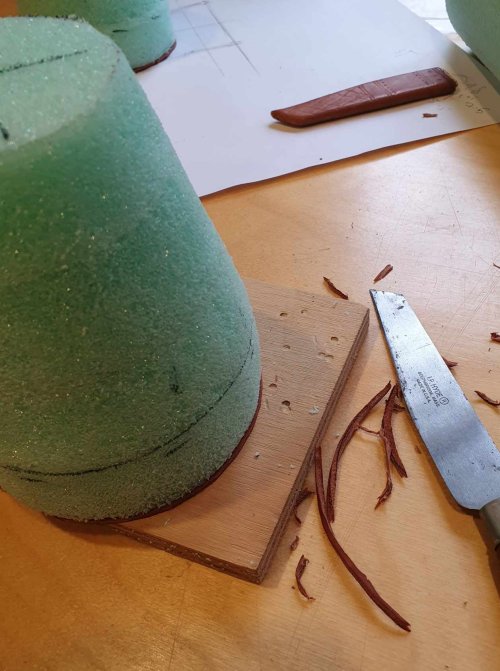
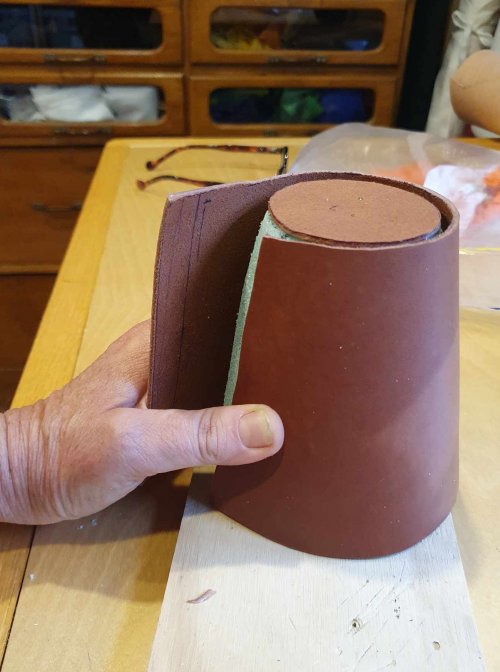
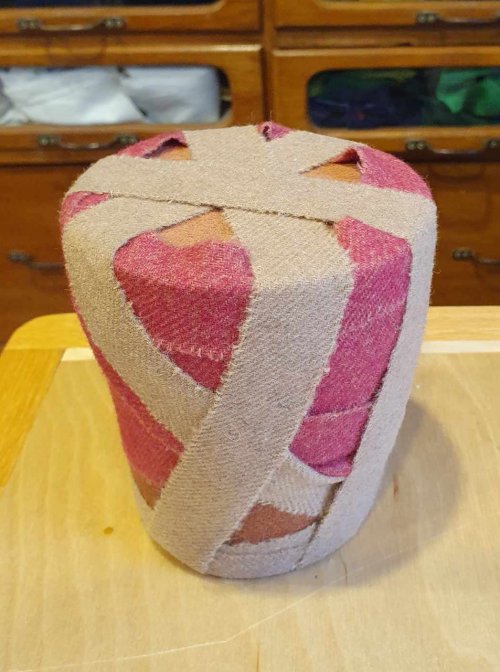
The next day I unwrapped and checked – the first had gaps where I had trimmed the butt join, so I removed the leather, cut another piece, wet and moulded as before with an overlap (I’ll re-use the first piece of leather on another proejct). Once dry, I marked and cut the overlap to make a butt join.
I also marked the cut line for the cap lining – 1-1.5cm above where the outer cap will sit, to make an overlap join. The flange is an extension of the body lining.
The first layer is sewn along all seams with a whipstitch. I’ve loaded a boar bristle with linen thread treated with coad (a needle and waxed thread would work fine). I wet down the edge to make it softer, then use a fine awl to make a hole, then make a stitch and repeat. I do a couple of extra stitches where the overlap will be exposed, to help hold this in place.
I usually hold the work in a foot strap, tight against the form, but these large forms worked fine just held between my knees. Once the piece is dry, I burnish the stitches with a bone folder – the friction heats the coad and helps the stitches sink into the leather, so they won’t show under the outer layer.
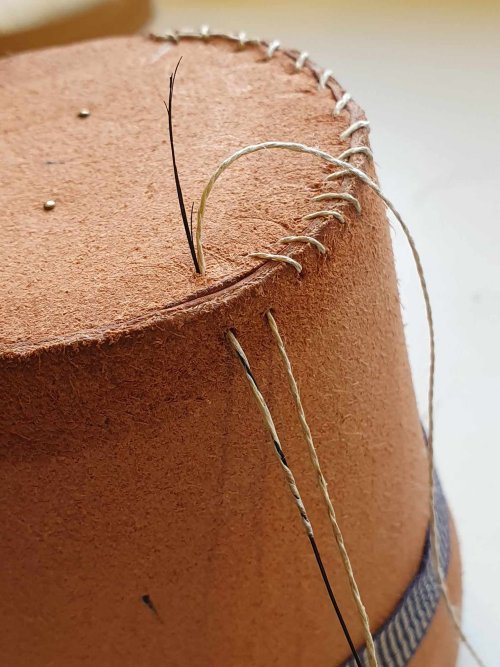
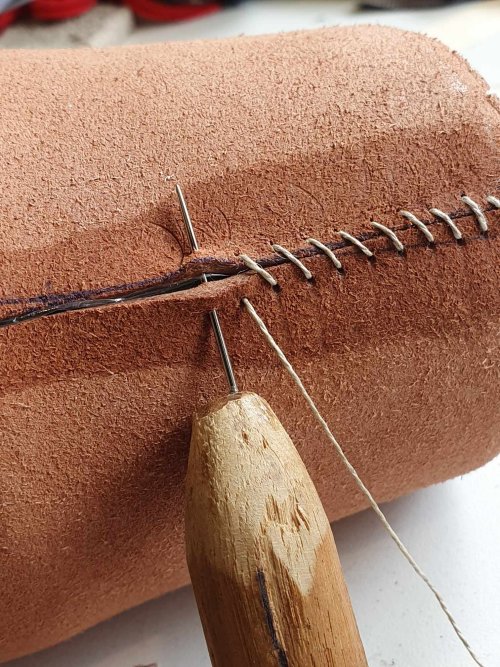
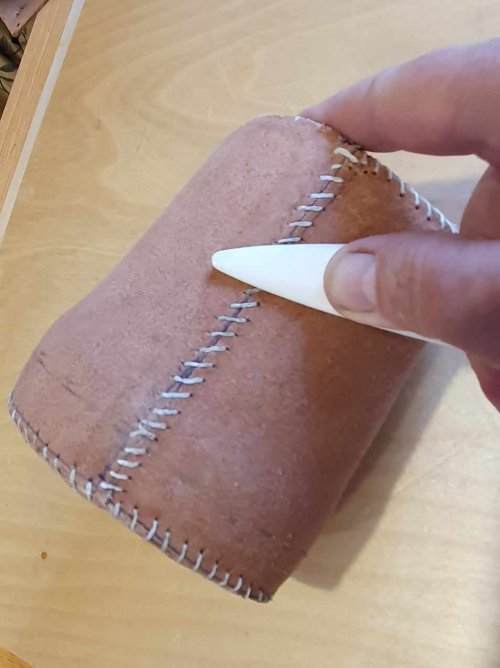
I also took out the pins holding the ends on – impossible once the outer layer is on!
Note: Now would be the right time to check if the case fits the glass! Cut the cap now (rather than later), remove the form and test – if OK, continue on. If not, do not waste your leather and time – make a new form and start again!
Outer layer
Having looked closely at pictures of extant glued examples (and a couple in person) it is clear that the tooling is done after the outer layer is glued on – the tool marks go over the skived edge and help disguise the join.
To pattern the outer layer, I drew around the ends, then added 8mm to fold over the edge. I’ve skived the edges: shaved off the flesh side down to nothing at the edge using a skiving tool (you can also use a sharp knife). Then I wet, rested and moulded the end caps over the form. Once I was happy, I wrapped them tightly in wool strips to set overnight.
The base cap on the first one was good, but the top was too thick on the edges. (I left it, which proved a mistake, making the stamping harder later on). The 2nd one was good on both ends.
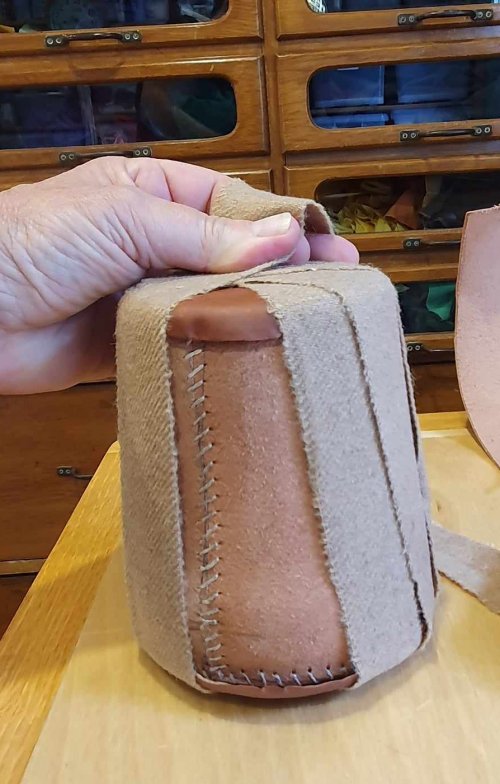
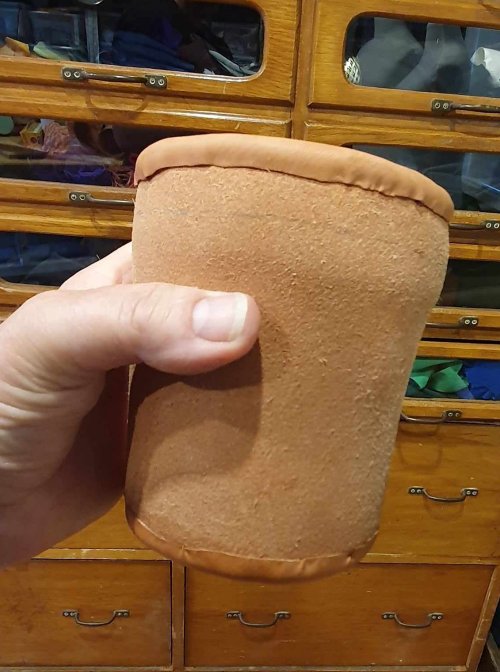
I patterned the main piece, adding extra at the end for the overlap. I skived the top and ends, but left the base as is, then wet, rested and moulded this, with the top edge a little below the cap. I marked the height, then took of the leather to trim and skive before putting it back on the form and wrapping to set overnight.
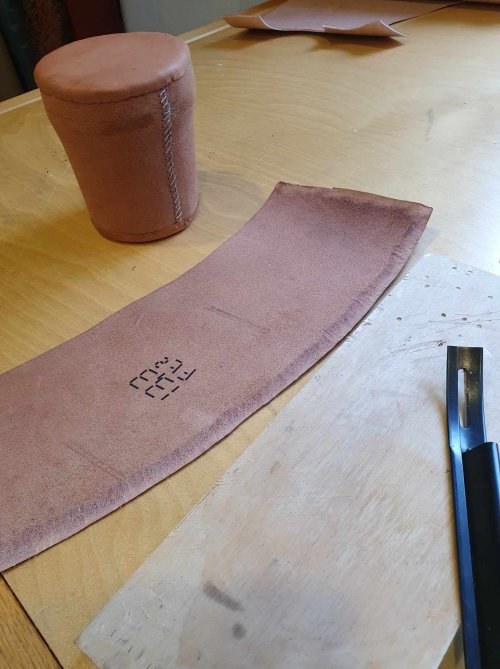
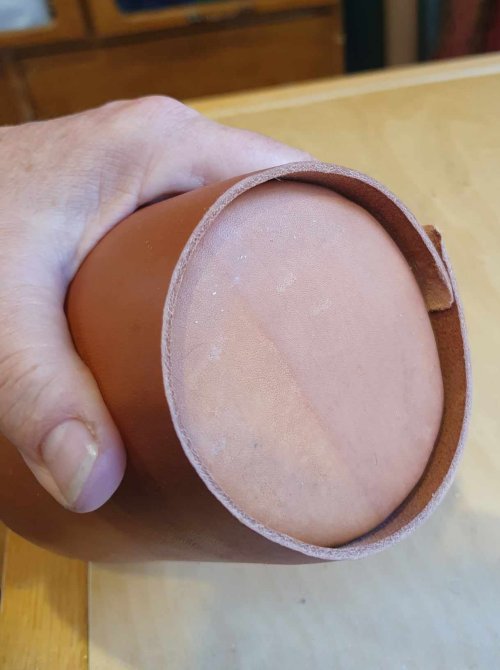
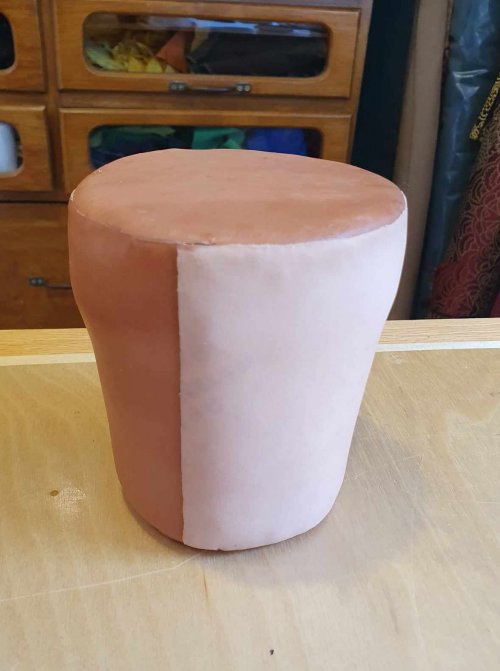
Once dry, I took off the outer layer (with some effort!) and cut the top of the inner layer – this will form the edge of the overlap for the cap. (As noted above, I suggest you do this before patterning and cutting the outer layer.)
I was a bit concerned how the foam would stand up to this (my usual wooden forms are easy to cut against). It did some damage, but these are one-off forms – it will last until the piece is finished.
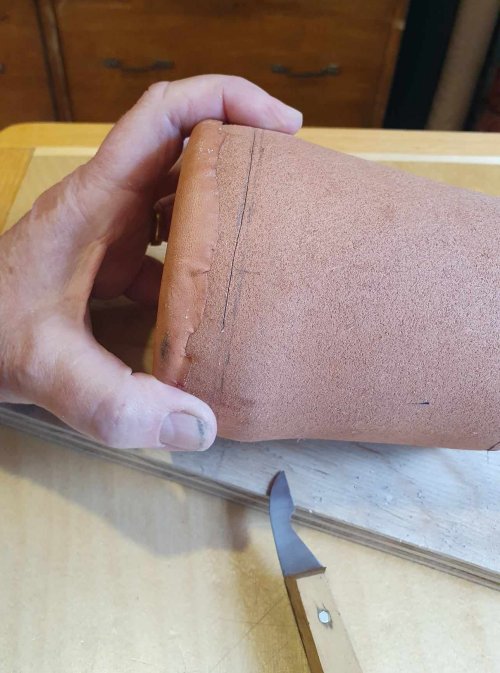
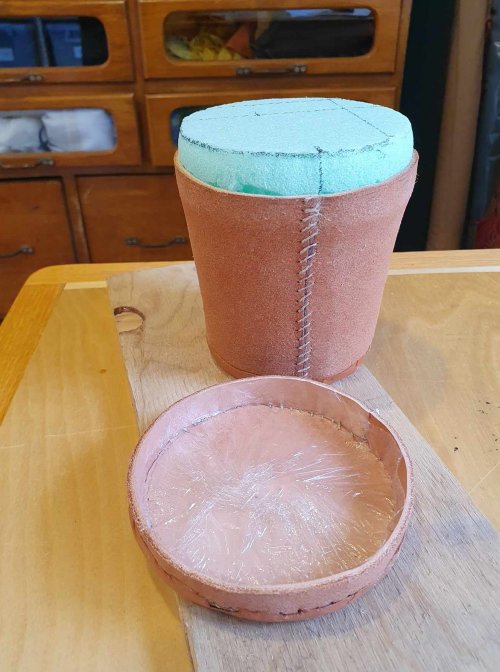
Sidequest 1: glues and dyes
At this point I paused to test using different glues, in different strengths, with different techniques – and their impact on stamping and dyeing. I found:
- Hirschkleber starch paste works very well for both flesh/flesh and flesh/grain joins, but when wet down for tooling, it goes soft – the edge will lift up if disturbed
- Hide glue 1:4 looks like a good compromise between strength and open time. For flesh/flesh, apply to both sides, wait until tacky to join. For flesh/grain, apply to grain side only, wait until tacky to join.
- Glueing down does not reduce ability to tool
- Residual glue does impact the ability to absorb water – try to avoid
- Residual glue may impact dye absorbtion – more tests needed.
After several rounds, I concluded the best approach was to:
- Glue everything on the outer layer with starch paste – easy to use, easy to remove excess without impacting dye (but see Afterthoughts)
- Dye as per my plan, pre-treating the leather with tannic acid, then iron acetate (vinegaroon)
- Paint the lot with dilute hide glue (1:8), focussed on the skived edges
- Polish as usual.
Onwards…
The channels
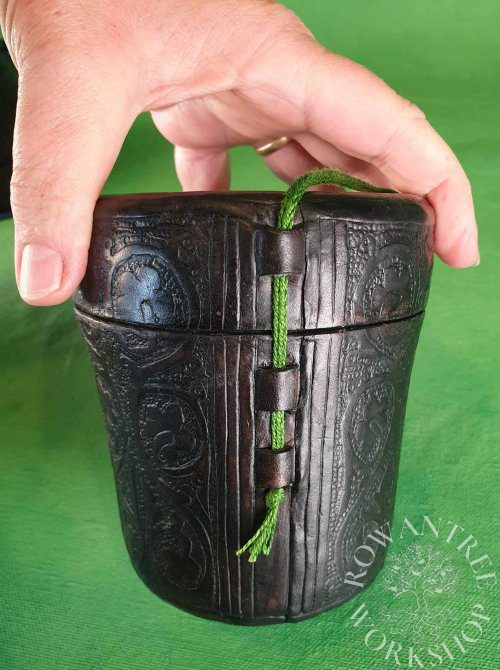
To keep the lid attached, cases have slots or channels on each side of the cap and the sides, with a cord or lace through them. Often just a pair on each side, or sometimes more for security and/or decoration. The location of the slots is critical to ensure the cap works well – I’m putting one on the cap and two on the base, on each side.
I tested the size of the channels which will hold the fingerloop braid – a 10mm chisel works best at this scale. I marked the positions, then I removed the leather and cut 10mm slots with a chisel (tricky with the cuved leather!)
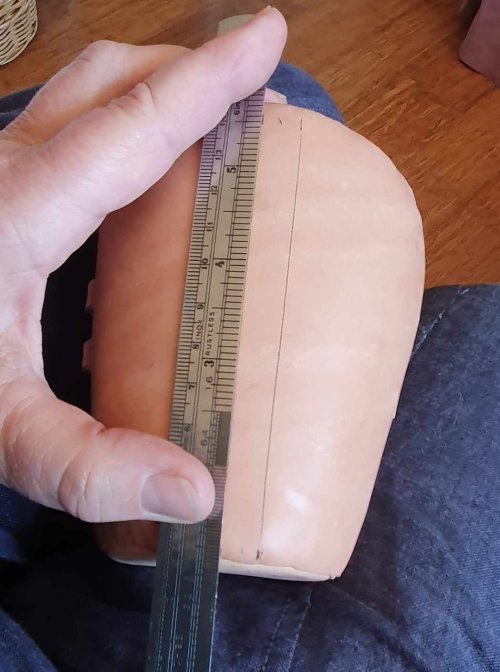
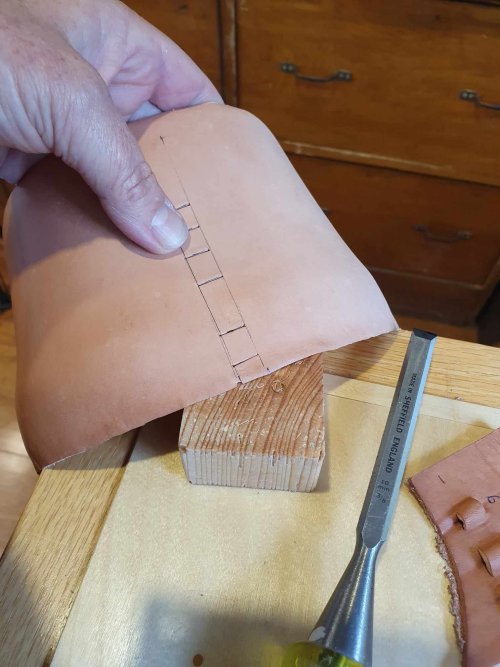
I marked the positions of the slots clearly on the inside. I spread glue on the inside, making sure the edges were well coated and there was no glue on these areas.
And made a Serious Mistake.
I am so used to sewing the outer layer, I forgot about the cap. I should have marked the cap overlap section and NOT glued this either! I didn’t realise this until much later….
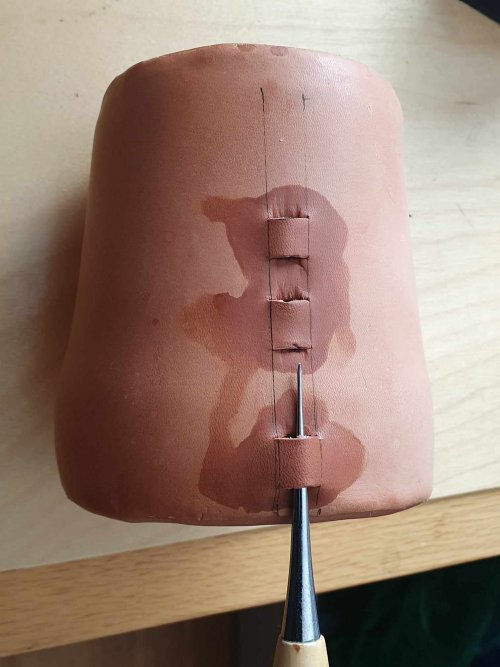
I put the leather back around the form, smoothing the edges and then wrapped it again to dry overnight. Once it was dry, I could raise the channels. I wet the area between the cuts, and a little to each side – a drop of water on the finger, repeated a few times as it soaks in.
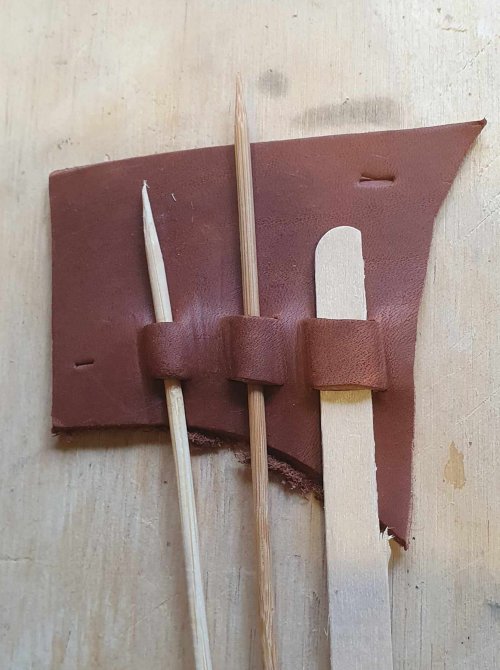
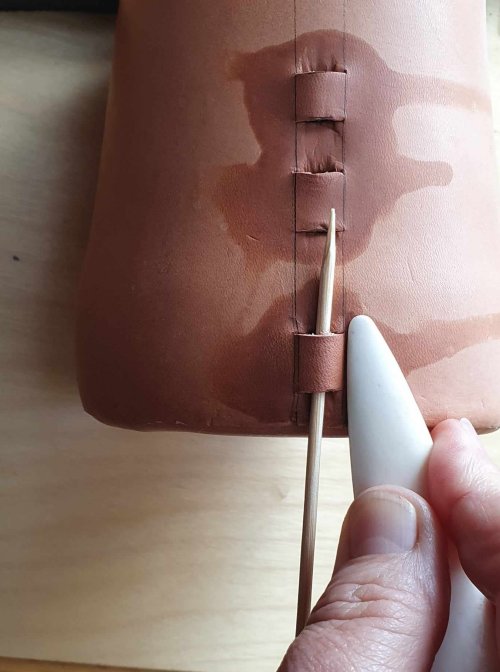
Once it is soft, I levered up the edge using a flat tool (or the end of a nailfile) and then used my awl to gently open the hole, adding more water if needed. To hold the channels open while they dry, I’m using bamboo skewers, which come in several useful sizes.
While still damp, I use my bone folder to press down the side of each channel, to help define the shape. Now, wait until it dries (again)…
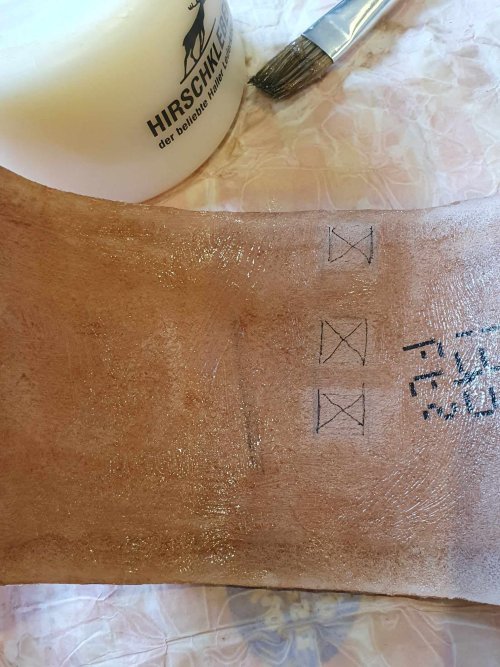
Now the case is ready to be tooled.
Sidequest 2: 4-dot punch
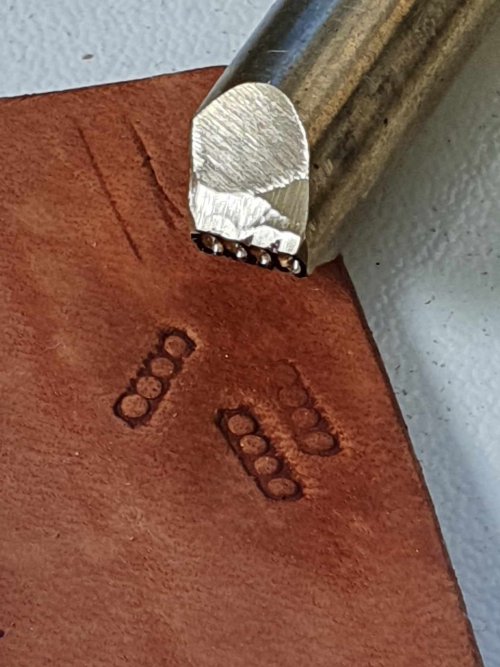
Most of the cases are decorated with scrolls, foliation and other designs in polished leather, brought into contrast by matt backgrounds, made by cross-hatching, scraping, or (most commonly) punching with tiny dots – including the examples I am using as inspiration. The dotted versions are usually done with a multi-dot punch for the broad areas, and a single punch for the corners.
I have a single dot punch, made and gifted by my friend Hugh, and it’s been really useful. But there is a lot of background in my future, so another side-quest appeared…
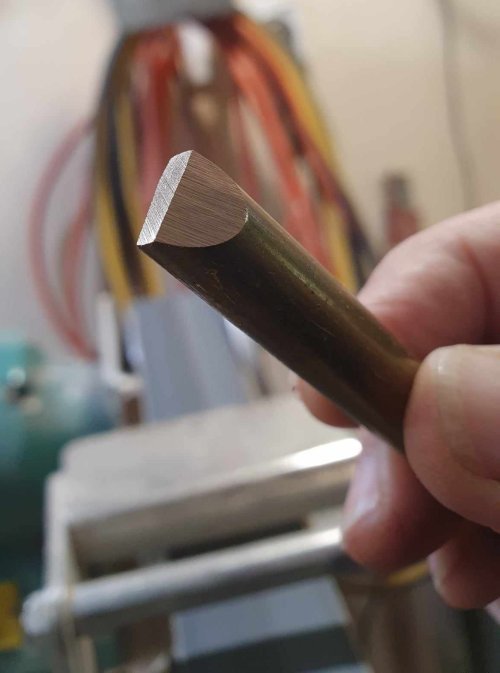
So I checked Hugh’s punch – looks like the end was made with a 1 mm bit. I found a piece of brass rod – bar would have been better, but needs must. I started by linishing the end down to make a rectangular blank, then polished the end on 800 grit paper.
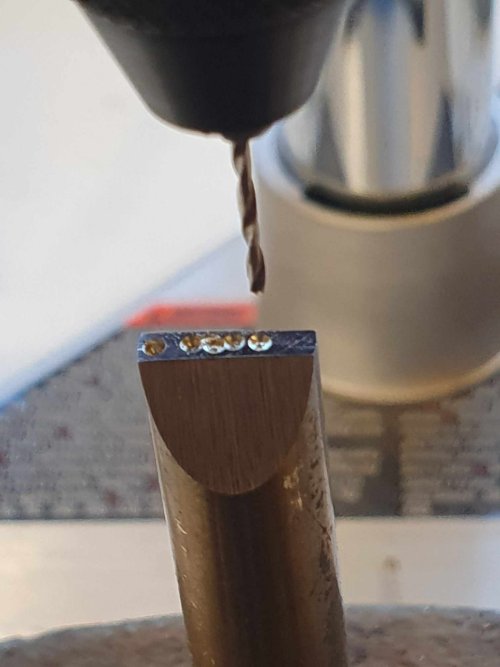
I coloured it black, then used my awl to scratch a centreline, then marked the centres and centre-punched them. Then I put a 1mm drill in our new Dremel drill-press stand – perfect for this job!
I tested the position and depth at one end, then made a series of 4 holes. Spacing was not ideal – time to grind off and try again. I did the next version by eye and tested it. Close enough! To finish the punch, I ground the edges closer, then used a file to indent the edges. Not perfect, but certainly usable.
Decoration
So now I can tool the designs…
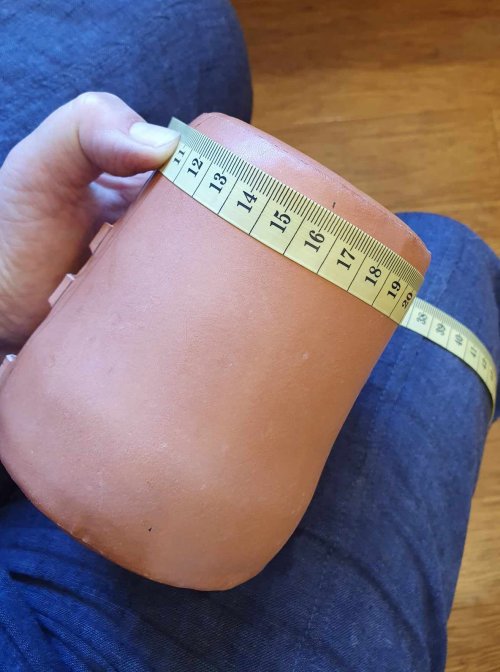
I measured up the outside of the cases, then marked out the shapes and did some design sketches for the tooling, based on extant examples. My case is based on the German knife case (GNM HG1982), while my husband’s is based on the Italian case (V&A O112817). Both examples have decorated panels between vertical striped columns.
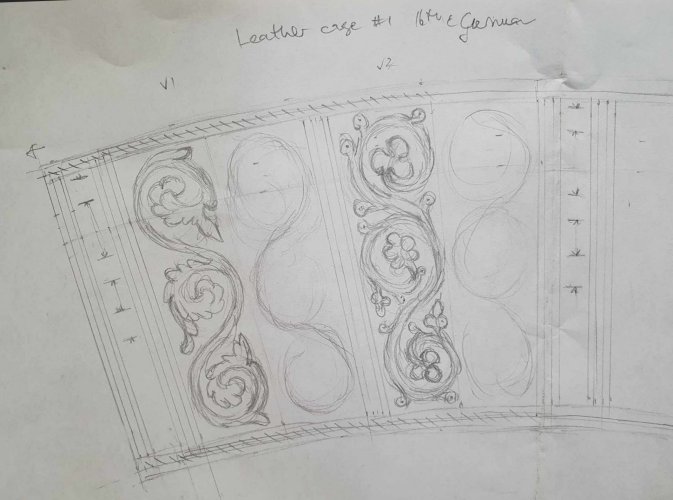
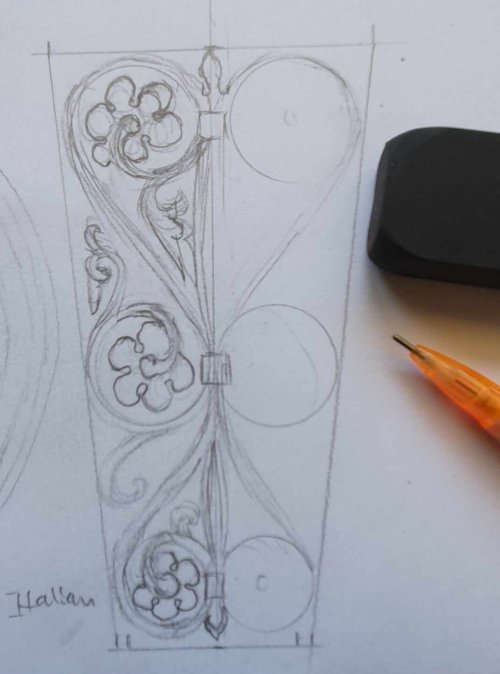
With a simple design, you can work it out and then just draw on the leather. Since I need to get the same design 8 times, it’s best to draw it a pattern and then transfer with graphite paper (NOT carbon paper). This shows up well, even on wet leather, but will vanish in the dye.
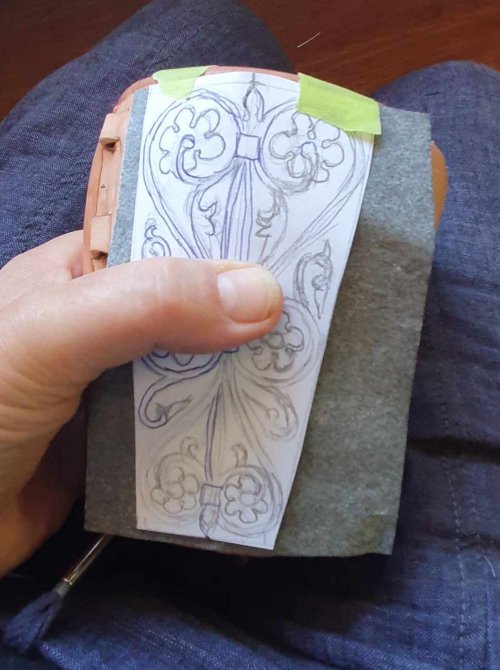
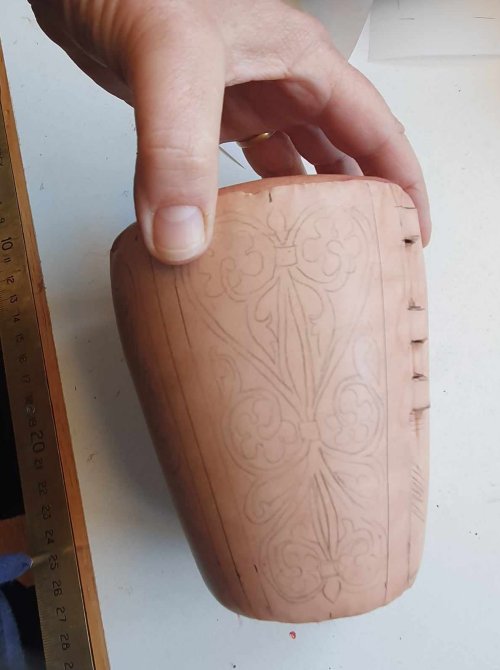
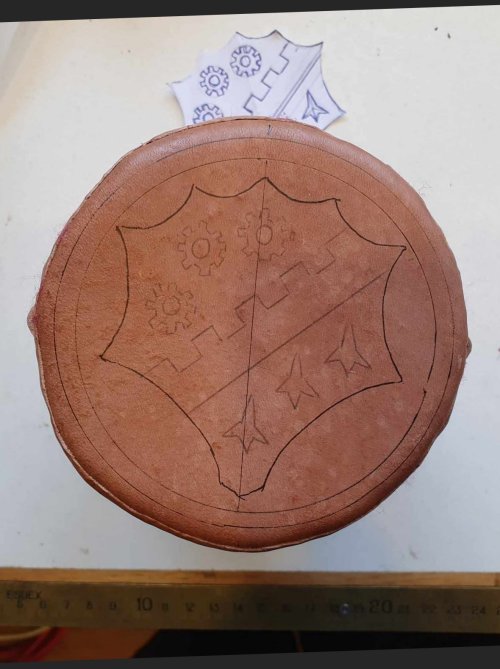
The tooling has to be done in sections – the damp leather marks easily and you don’t want to accidentally damage a section you have already worked. I started with the tops, wetting the leather well and letting it absorb the moisture – it needs to dry from wet to damp.
I used my knife to score around the lines, then a creasing tool to depress the background beside the cut. Using my new 4-dot punch, I stamped the background and the finished the corners with the single punch. These only need hand pressure to make a mark, but I’m finding the foam moulds soft to work against compared with my usual wood.
I’m using 2 different styles of background, to match the inspiration pieces. The Italian one has parrallel rows of dots, while the German one follows the design.
I also wet down the top of the body piece and then burnished the edge against the lid, to help hide the join line. On the Italian piece, I went over this join with the 4-dot stamp. With the German one, I burnished but didn’t stamp – I’ll do that as a separate step and see which method works best.
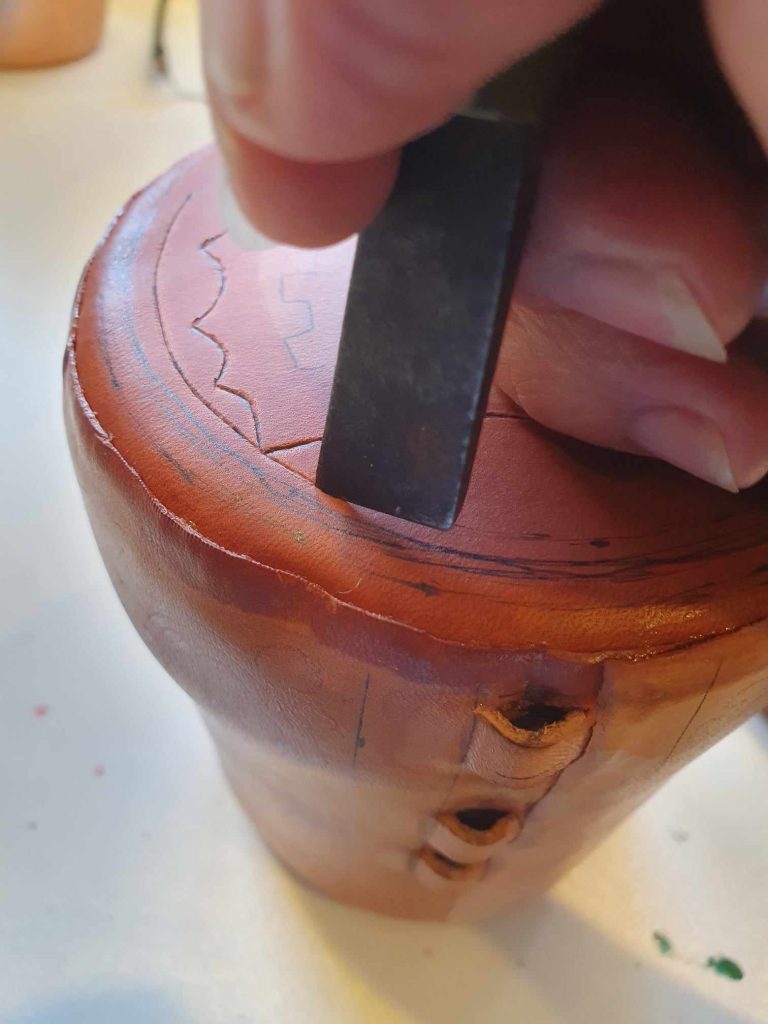
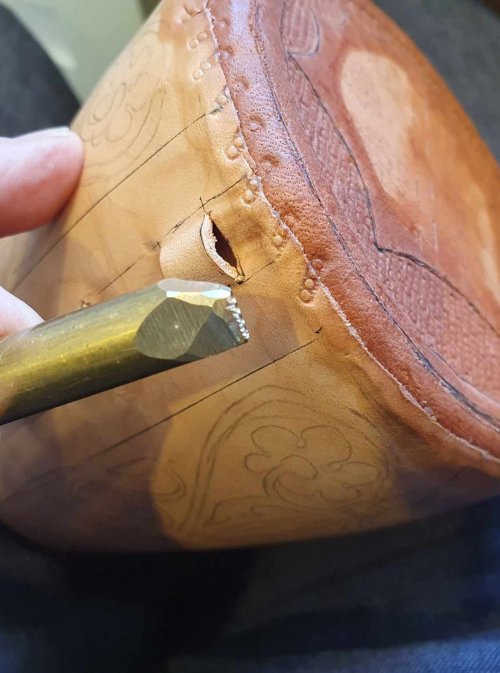
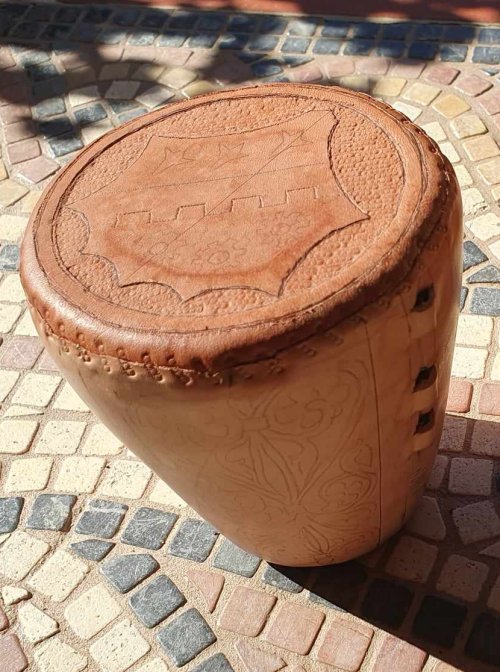
The next day, I wet the top and bottom rims and incised the horizontal borders – and realised I should have done this before burnishing and stamping the edges, so I repeated the burnishing.
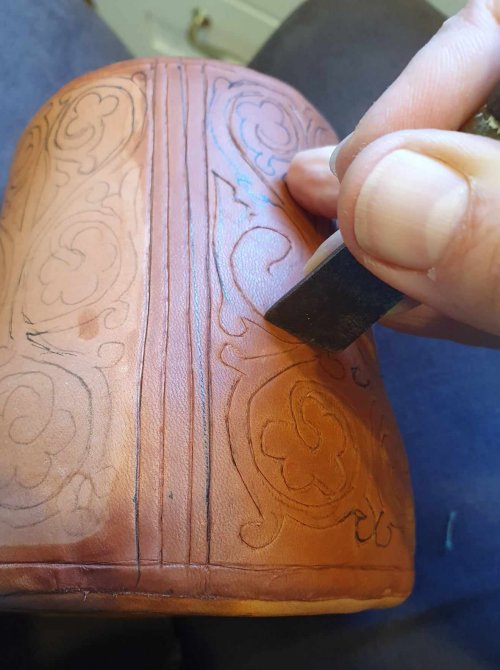
I wet the vertical borders between the stamped sections and incised the parrallel lines. I tried using a ruler, but the curved shape made this impractical – I did better by eye! I noticed the water was also softening the channels, so I put the skewers back in to keep them open.
Once these were dry, I started on the foliate design. I wet one section and then cut around the design with my knife. A modern swivel knife would be much easier around the curves, but I want to use the old tools where I can. Once the leather is semi-dry, I stamp it with the 4-dot stamp and fill the corners with the single stamp. Wait until dry and then onto the next section…
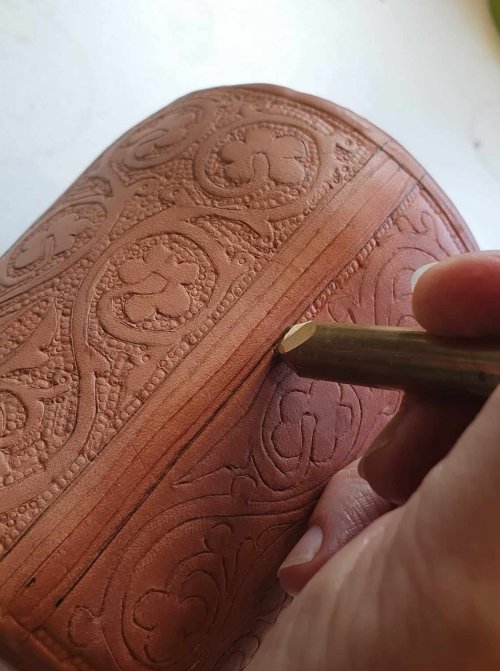
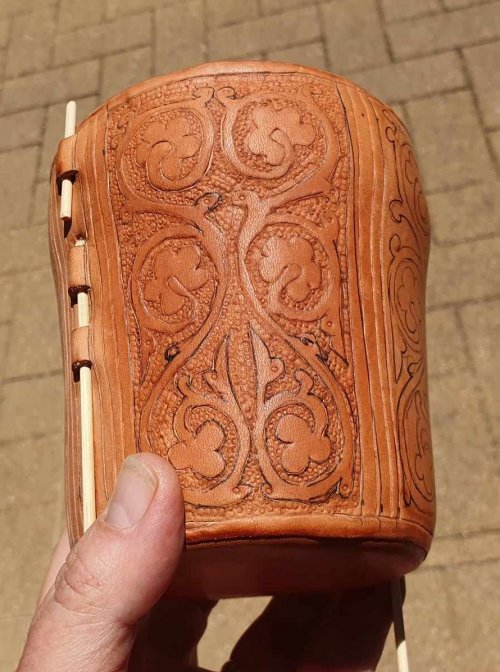
At this point, I realised my mistake with glueing the cap on… Arghhhhh!
After the initial panic, I realised I’d used the Hirschkleber paste, which is water soluble. I could soak the whole top, but this would also open skived lid seam. And any serious pressure on the leather would damage the tooling.
In the end, I taped the lid seam to keep it firm, then marked and cut around the cap, squirted water in with a hypodermic, waited for it to loosen, and carefully prized up the edge, repeating until I could remove it. Then I taped over the flange (so it would not re-stick), put the cap back on, wrapped the join and set it to dry again.
Then I removed the form and tidied everything up – not as much damage as I’d feared. I scrubbed the joint to remove as much glue as I could, and let everything dry again.
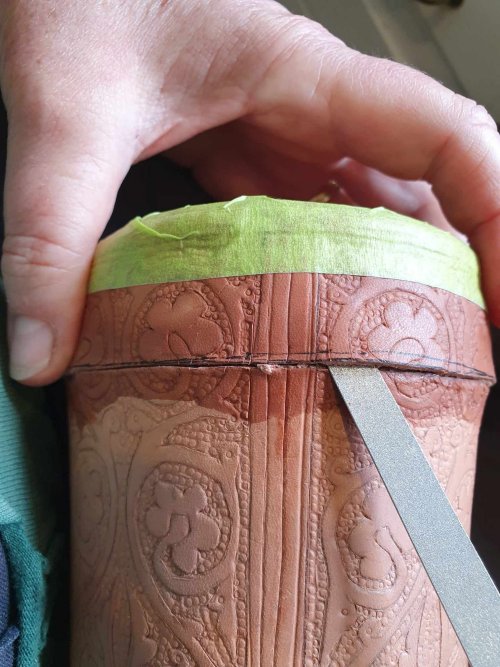
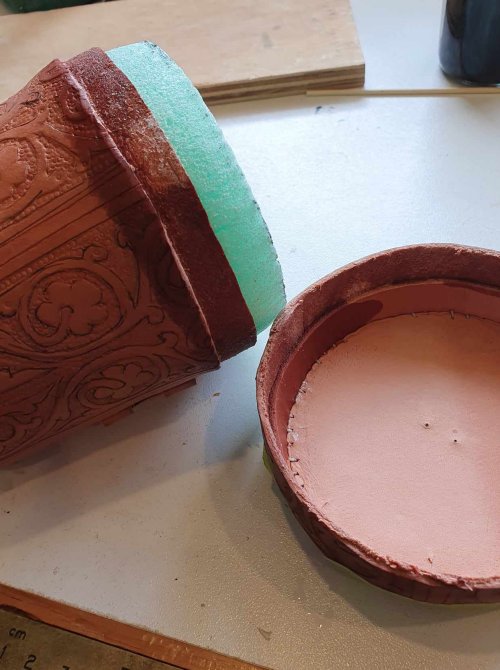
Onward…
Finally, it’s time to dye the cases. I start by boosting the tannin in the leather, painting on a saturated solution of tannic acid. Once this is dry, I paint over again with my iron/vinegar solution, leaving the device on the top clean. It’s like magic – the iron salts bond with the tannins in the leather to make a jet black dye!
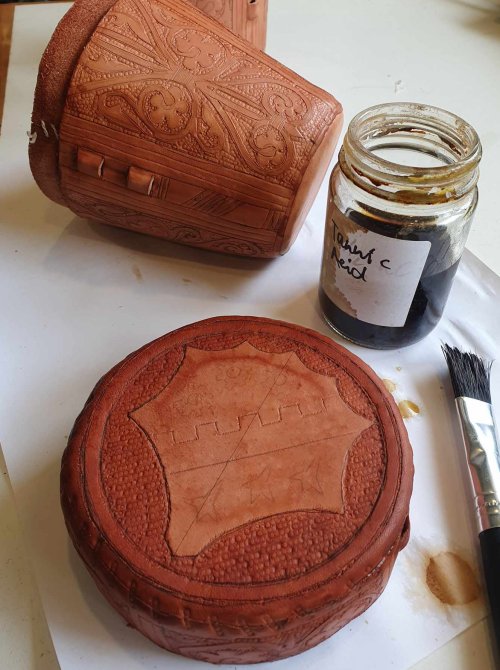
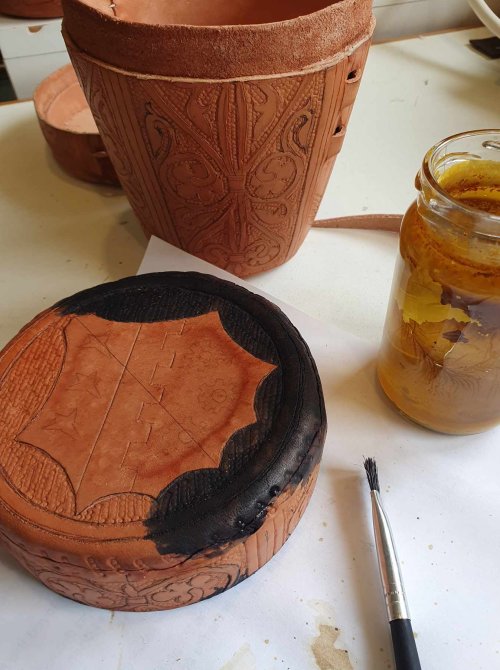
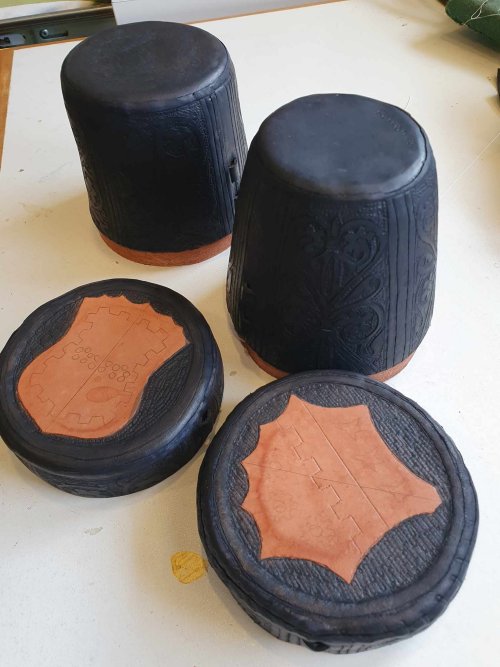
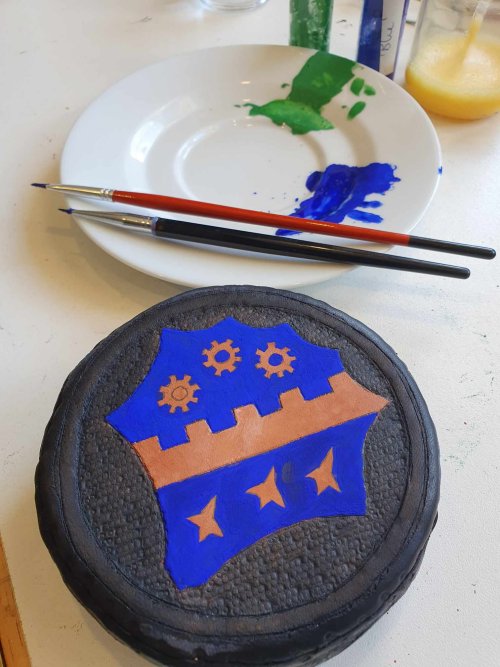
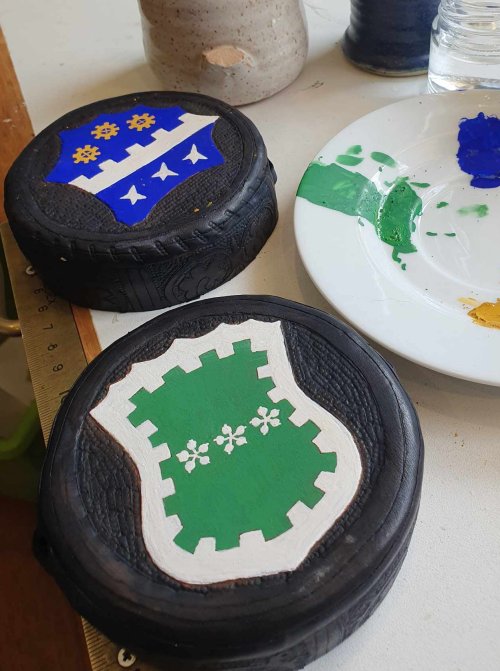
Next, painting the devices. I’m using egg tempera: ground pigments mixed with egg yolk and water. I hadn’t used my pigment pastes for a couple of years, but they rehydrated easily.
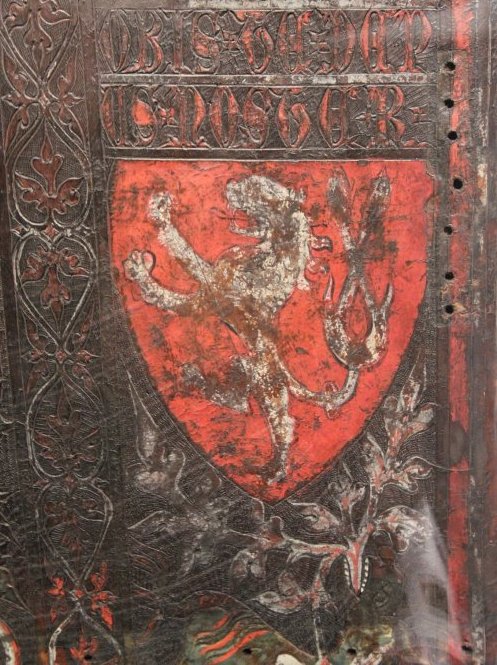
The 14th century example shows the lion painted separately to the background, but the leaves below are detailed by layering the colours. I painted the blue device the hard way – working around the small details, but painted the cinqufoils over the green – much easier!
The first colours I tried were smooth as expected, but the white was granular – the white paste had not aged well (each colour is a different substance). I scraped the paint back a little, but did not want to damage the finish.
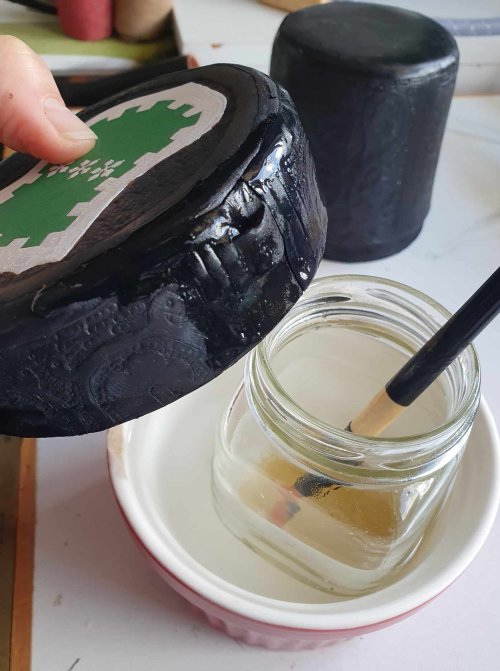
Now for the hide glue – a 1:8 solution, painted all over the pieces to help reinforce the glued edges and make the single layer edges stiffer and stronger. And then set to dry thoroughly.
To finish and protect the cases, I applied some polish. In place of my usual beeswax/boiled linseed oil, I’m using some sent to me by Wayne Robertson, who made it using a 17th century recipe. Thanks Wayne! This also made the cases glossy, to match the extant examples.
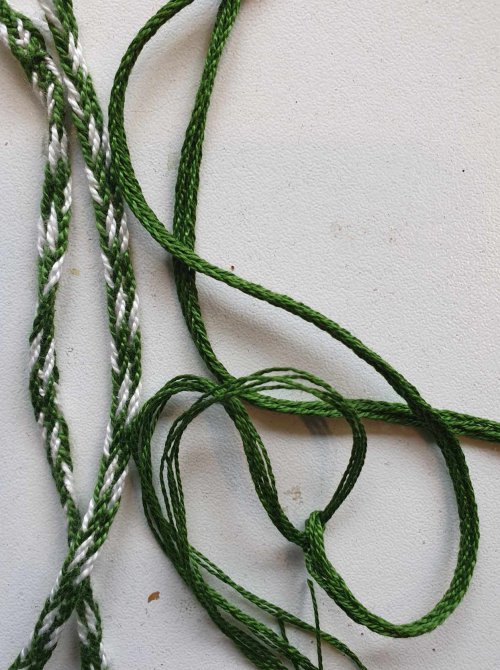
The last step is to make cords to retain the caps. I made flat fingerloop braids of 5 bowes, with 2 colours to match the devices. I threaded the cords through the channels and knotted each side – and then decided they needed to be longer and one colour, so I made plain cords to replace them.
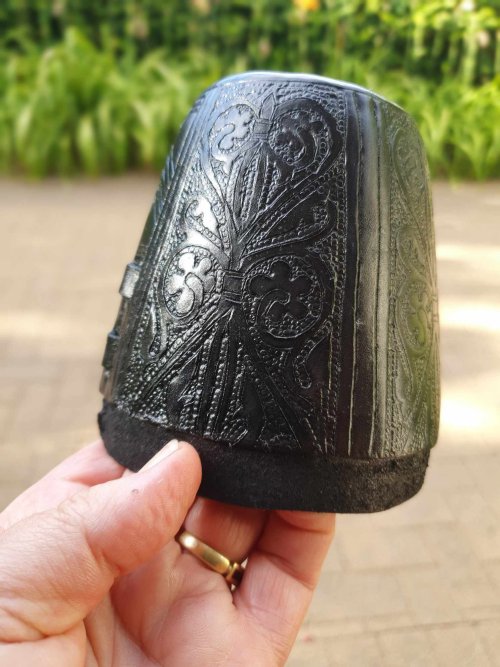
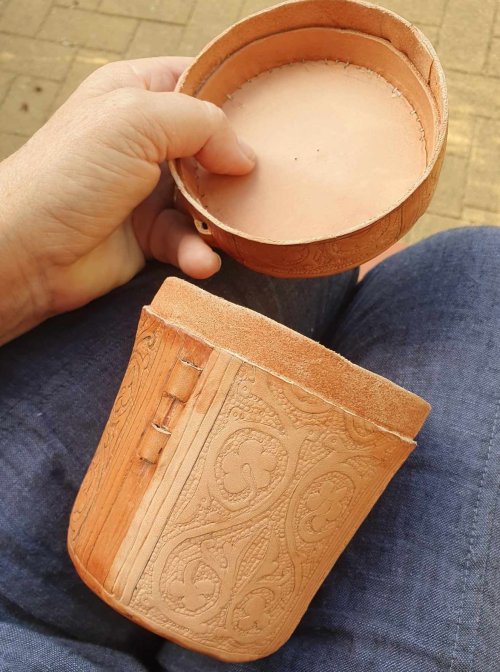
I’m very pleased with the way the skived seams are hidden in the design – it is quite hard to spot them from the outside! The insides look bright now, but will darken over time. The stripe at the top is where I applied hide glue to strengthen the single layer flange.
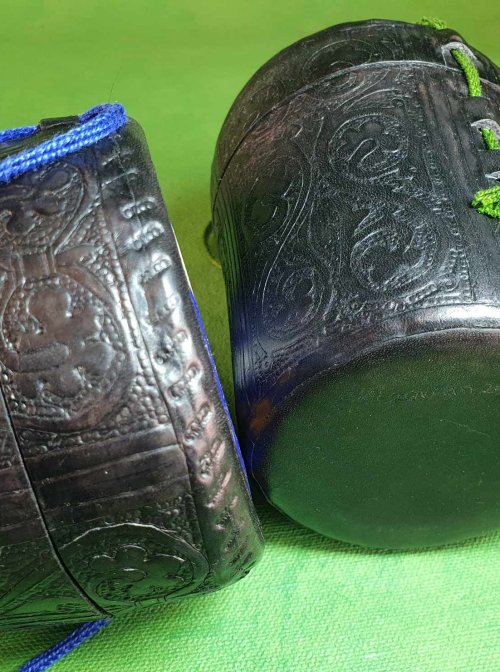
I am really pleased with the end result!
They look great, and should provide excellent protection for our lovely glasses when we travel to events.
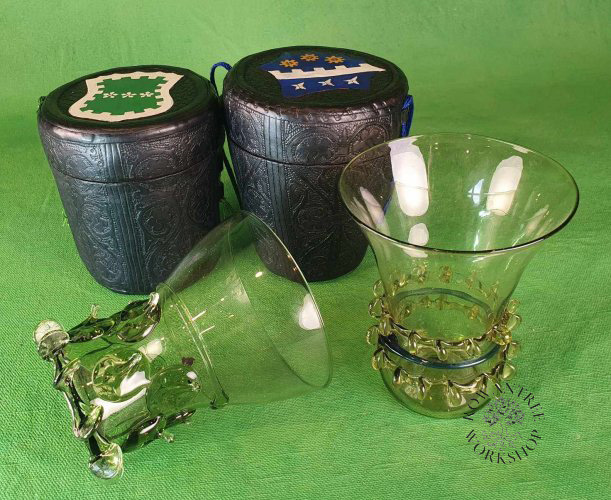
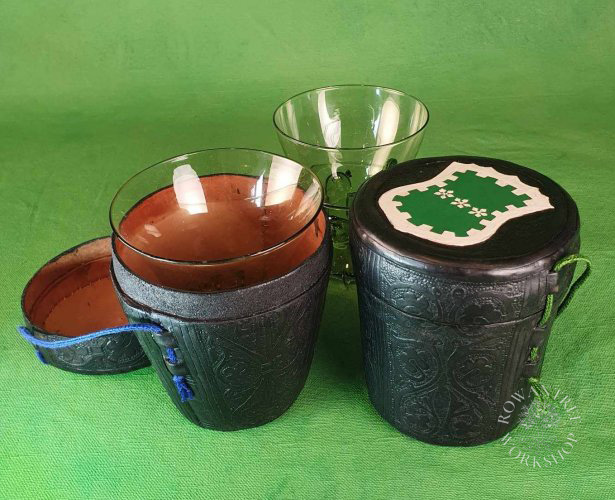
These cases took much longer than I expected, not helped by several side-quests to explore materials and make a punch. I’m glad I stopped at two cases, so that I could finish this project off, but I look forward to making the other two in future.
Afterthoughts
I tested out a lot of casework ideas with this project. Here are some learnings:
- XPS foam is an easy way to make a form, but next time I would add extra width to offset the compression. I would also wrap the foam in duct tape to stiffen it and make it easy to remove (easier to manage than clingfilm).
- Cut the cap as soon as the inner layer is completely dry and test to see if your item fits, before proceeding to the outer layer. If not, start again…
- The starch-based leather glue is easy to work with but not waterproof. Glueing the edges with hide glue might be a better approach (I’ll try this on the next case). Treating the seams with hide glue once built does seem to work too (I treated the whole case to ensure a consistent surface appearance).
- The multi-dot punch is much faster than a single punch, but it’s easy to accidentally go over the line.
- The egg tempera bonds well with the leather. It would be better to let it cure for longer (a week?) before sealing over the top.
I’ve been really pleased to hear of several people who have been following this project, and are now involved in making their own cases. If you do this, I’d love to hear from you too!

